Love this? Save it for later!
Share the inspiration with your friends
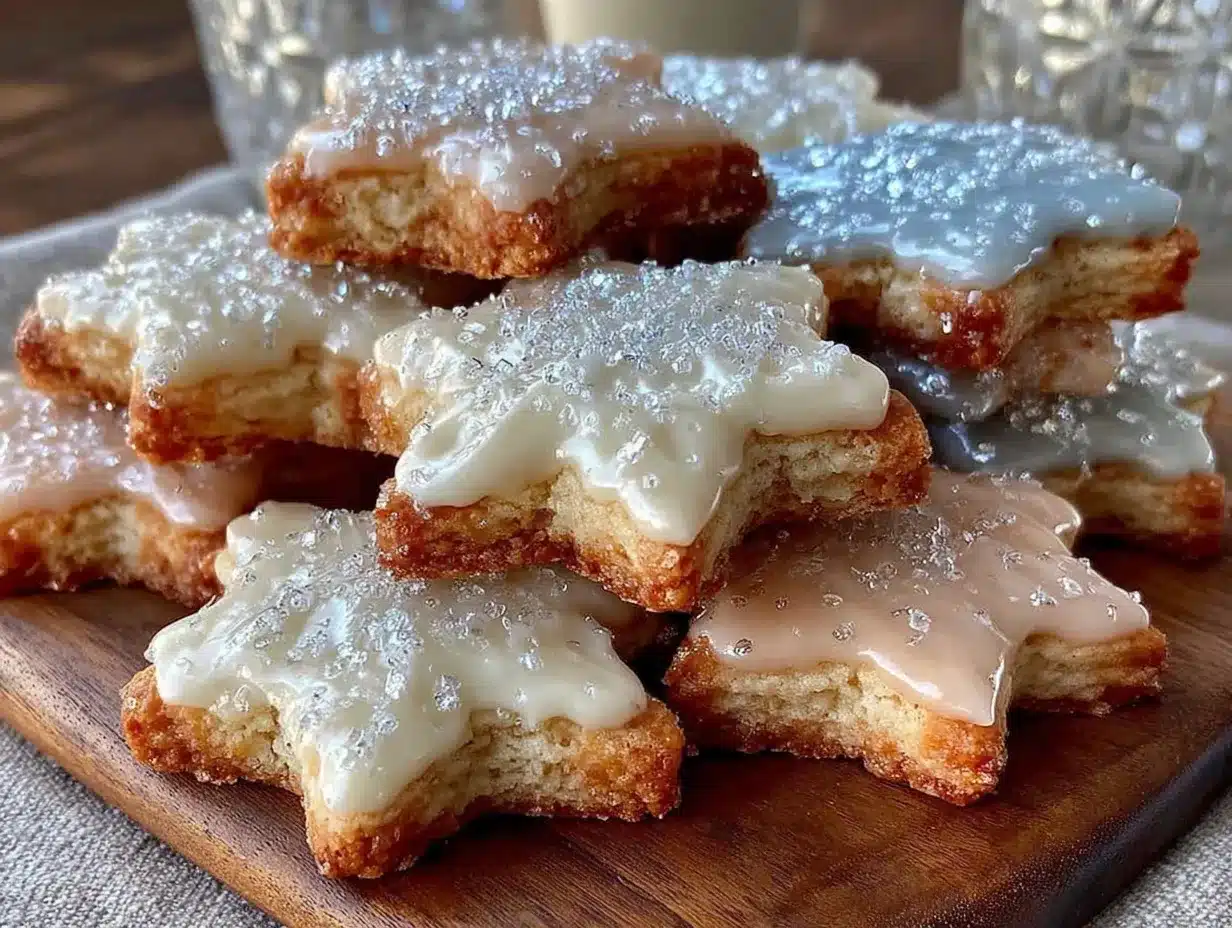
“You won’t believe how much trouble a little glitter can cause,” my neighbor chuckled one chilly Thursday afternoon as she handed me a plate of her famous star cookies. I had dropped by unexpectedly, juggling grocery bags and a cranky toddler, only to be pulled into the warmth of her kitchen filled with the smell of vanilla and cinnamon. Honestly, I wasn’t planning to bake that day, but those shimmering royal icing stars with edible glitter caught my eye — and my heart.
That afternoon turned into an impromptu cookie-decorating session, with flour dusting the countertops and tiny hands carefully applying glitter that sparkled like frost on a winter morning. I learned quickly that these Perfect Royal Icing Star Cookies with Edible Glitter are not just about looking pretty—they’re about capturing that holiday magic you can almost taste in the air. Maybe you’ve been there, caught up in the chaos of the season, looking for a simple joy to bring a little sparkle to your celebrations.
Since that day at Karen’s cozy kitchen, this recipe has become my go-to holiday treat. It’s easy enough for a last-minute baking fix but special enough to impress guests or delight little ones. Between you and me, the first time I tried to pipe the icing, I made a total mess—blobs everywhere—but the charm of these star cookies is in their imperfect shimmer, like tiny winter stars you can hold. So, let me share with you how to make these festive, glittering delights that have a way of turning any holiday gathering into something memorable.
Why You’ll Love This Recipe
Let me tell you, this isn’t just any sugar cookie recipe. After several trials—trust me, I tested this enough to fill a cookie jar—I’ve nailed a method that balances ease with that “wow” factor. Here’s why you’ll want to keep this Perfect Royal Icing Star Cookies recipe close every holiday season:
- Quick & Easy: From mixing to decorating, you can have these festive treats ready in under 90 minutes, perfect for those last-minute holiday baking sessions.
- Simple Ingredients: No need for specialty stores; these star cookies come together with pantry staples like flour, powdered sugar, and eggs.
- Perfect for Holidays: The star shape and edible glitter make these cookies an instant crowd-pleaser for Christmas parties, Hanukkah celebrations, or winter gatherings.
- Crowd-Pleaser: Whether you’re baking with kids or hosting a cookie exchange, these treats always get compliments (and disappear fast!).
- Unbelievably Delicious: The buttery cookie base paired with smooth royal icing melts in your mouth, while the edible glitter adds that magical sparkle without any weird taste.
What sets this recipe apart is the perfectly balanced royal icing that dries just right—smooth but not too hard—and the gentle sprinkle of edible glitter that adds festive flair without overwhelming the flavor. Honestly, I love how these cookies bring a little bit of sparkle to the table without fuss or mess (well, except for that one glitter explosion I mentioned!).
So, whether you’re a holiday baking pro or just someone who wants a simple, show-stopping treat, these star cookies combine tradition and fun in a way that feels just right. Get ready to impress your family, friends, or even yourself!
What Ingredients You Will Need
This recipe uses simple, wholesome ingredients to deliver bold flavor and satisfying texture without the fuss. Most of these are pantry staples, and the edible glitter adds a festive touch you might want to stock up on during the holidays.
- For the Cookies:
- 2 ¾ cups (345 g) all-purpose flour (I prefer King Arthur for consistent results)
- 1 teaspoon baking powder
- ½ teaspoon salt
- 1 cup (227 g) unsalted butter, softened (room temperature is key for easy mixing)
- 1 ½ cups (180 g) powdered sugar, sifted (helps keep the dough smooth)
- 1 large egg, room temperature
- 2 teaspoons vanilla extract (pure vanilla makes a difference!)
- For the Royal Icing:
- 3 large egg whites (pasteurized if preferred for safety)
- 4 cups (480 g) powdered sugar, sifted
- ¼ teaspoon cream of tartar (for stability)
- 1 teaspoon vanilla or almond extract (optional for extra flavor)
- For Decorating:
- Edible glitter (silver or gold recommended for that holiday sparkle)
- Food coloring gels (optional, if you want colored icing)
If you’re looking for a gluten-free option, swapping the all-purpose flour for a gluten-free blend works well, just be sure it’s a 1:1 replacement. For the royal icing, if you prefer a dairy-free or vegan alternative, aquafaba can be used in place of egg whites, though the texture will be slightly different.
Equipment Needed
- Mixing bowls (preferably glass or metal for egg whites in royal icing)
- Electric mixer or stand mixer (makes whipping the icing a breeze)
- Measuring cups and spoons (accurate measuring is key for baking success)
- Rolling pin (a non-stick one helps prevent dough from sticking)
- Star-shaped cookie cutters (sizes between 2-3 inches work great for parties)
- Baking sheets lined with parchment paper or silicone mats (for even baking and easy cleanup)
- Piping bags and small round tips (for precise royal icing application)
- Spatula and sifter (for folding and sifting powdered sugar)
If you don’t have a stand mixer, a good hand mixer will do just fine—though it might take a bit longer to get that stiff peak in the royal icing. For rolling the dough evenly, I sometimes use two wooden dowels as guides, but a ruler works in a pinch. And trust me, investing in a silicone baking mat is worth it; your cookies won’t stick, and cleanup is a snap.
Preparation Method
- Mix the Dry Ingredients: In a medium bowl, whisk together 2 ¾ cups (345 g) all-purpose flour, 1 teaspoon baking powder, and ½ teaspoon salt. Set aside. (This helps evenly distribute the leavening and salt.) (5 minutes)
- Cream Butter and Sugar: In a large mixing bowl, beat 1 cup (227 g) softened unsalted butter and 1 ½ cups (180 g) powdered sugar with an electric mixer on medium speed until light and fluffy, about 3-4 minutes. (This step is crucial for tender, melt-in-your-mouth cookies.) (4 minutes)
- Add Egg and Vanilla: Add 1 large egg and 2 teaspoons vanilla extract to the butter mixture. Beat until combined but don’t overmix. (If you do, the dough might become tough.) (2 minutes)
- Combine Wet and Dry: Gradually add the dry ingredients to the wet, mixing on low speed until just combined. The dough will be soft but should hold together. (If too sticky, chill for 15 minutes.) (3 minutes)
- Chill the Dough: Wrap dough in plastic wrap and refrigerate for at least 1 hour or up to overnight. (This makes rolling easier and prevents spreading.) (60 minutes)
- Preheat Oven and Prepare Baking Sheets: Preheat oven to 350°F (175°C). Line baking sheets with parchment paper or silicone mats. (Make sure oven racks are centered.) (10 minutes)
- Roll and Cut: On a lightly floured surface, roll out dough to about ¼ inch (6 mm) thickness. Use star-shaped cookie cutters to cut out shapes, and transfer carefully to baking sheets. (You might need to reroll scraps.) (15 minutes)
- Bake: Bake cookies for 8-10 minutes, until edges just start to turn golden. (Don’t overbake—cookies should be pale.) Remove and cool on baking sheets for 5 minutes, then transfer to wire racks to cool completely. (10 minutes baking + 10 minutes cooling)
- Make Royal Icing: While cookies cool, beat 3 large egg whites and ¼ teaspoon cream of tartar on medium speed until frothy. Gradually add 4 cups (480 g) powdered sugar, then increase speed to high, beating until stiff peaks form—about 7-10 minutes. (If icing is too thick, add a few drops of water.) Stir in 1 teaspoon vanilla if desired. (15 minutes)
- Decorate: Divide icing into bowls for coloring if using. Transfer to piping bags fitted with small round tips. Pipe outlines on cookies first, then flood the centers with thinned icing. (Use a toothpick to spread icing evenly.) While icing is still wet, sprinkle edible glitter for that holiday sparkle. Let dry completely—ideally overnight. (20-30 minutes decorating + drying time)
Pro tip: If your icing crusts over too quickly, keep it covered with a damp towel between uses. Also, don’t rush the drying—patience means no sticky fingers later!
Cooking Tips & Techniques
Working with royal icing can feel intimidating at first, but a few tricks make all the difference. Always start with clean bowls and beaters—any grease or residue can prevent egg whites from whipping properly. I remember my first batch was a flop because I forgot this step, and the icing wouldn’t stiffen no matter what!
When rolling dough, keep the surface and rolling pin lightly floured to avoid sticking but not so much that you dry out the dough. Chilling the dough is a game-changer; it helps the cookies keep their shape instead of spreading out into blobs.
For piping, steady hands help, but honestly, the charm of these cookies is in their handmade look. If you mess up a line, wait for the icing to dry, then gently scrape it off with a toothpick and try again. I’ve done this more times than I care to admit.
Timing is everything: bake the cookies just until the edges turn slightly golden, and let the icing dry undisturbed overnight. Multitasking by prepping dough the night before can save you a last-minute rush. Also, use gel food coloring sparingly; too much liquid can thin the icing too much.
Variations & Adaptations
- Flavor Twists: Add a teaspoon of almond extract to the cookie dough for a nutty note or swap vanilla in the icing for peppermint extract for a festive touch.
- Dietary Adjustments: Use gluten-free flour blends for a gluten-free version and substitute egg whites in the royal icing with aquafaba to make it vegan-friendly.
- Color and Shape: Try different cookie cutter shapes like snowflakes or Christmas trees, and use multiple colors of edible glitter for a more vibrant look.
- Baking Methods: If you prefer, this cookie dough also works well baked as small drop cookies for a rustic look without rolling.
- Personal Variation: I once added a tiny pinch of ground ginger and cinnamon to the dough for a warm, spicy twist that had everyone asking for the recipe.
Serving & Storage Suggestions
These star cookies are best served at room temperature so the royal icing is firm but not brittle. Arrange them on a festive platter with a sprinkle of extra edible glitter for a magical centerpiece. They pair beautifully with a warm cup of spiced tea, hot cocoa, or even a glass of cold milk—because, let’s face it, who doesn’t love dunking cookies?
Store the cookies in an airtight container layered with parchment paper to prevent sticking. They’ll keep fresh for up to a week at room temperature, but if you want to keep them longer, freezing works well. Just thaw overnight in the fridge and bring to room temp before serving.
Reheating isn’t necessary, but if you want to soften the cookies a bit, a few seconds in the microwave (under 10 seconds) does the trick. Over time, the flavors meld beautifully, and the royal icing develops a lovely sheen—perfect if you’re prepping ahead for holiday parties.
Nutritional Information & Benefits
Each cookie (assuming a 3-inch diameter) contains approximately 150 calories, with 7 grams of fat, 22 grams of carbohydrates, and 1 gram of protein. While these are treats, they’re made with real butter and egg whites, offering a bit of richness and a good source of protein from the icing.
Using real vanilla extract and pure ingredients means no artificial additives, and the edible glitter is made from food-safe materials, so it’s safe for the whole family. For those watching carbs, reducing the cookie size or sharing is a great option. Plus, these cookies bring joy and festive spirit, which honestly, is a kind of nourishment too.
For gluten-free or vegan diets, the substitutions mentioned keep these cookies inclusive without compromising taste or texture.
Conclusion
If you’re looking for a holiday cookie that’s both stunning and straightforward, these Perfect Royal Icing Star Cookies with Edible Glitter are a winner. They offer that nostalgic holiday charm with a touch of sparkle that’s sure to brighten any celebration. I love that this recipe lets you get creative without the stress—plus, it’s a fun way to bring friends and family into the kitchen.
Feel free to tweak the flavors, colors, and shapes to suit your style. Baking is, after all, part science, part art, and totally personal. I can’t wait to hear how your cookies turn out—let me know in the comments if you tried the peppermint twist or added your own glitter colors. Sharing is caring, especially when it comes to cookie magic!
Happy baking and sparkling holidays!
FAQs
Can I make the cookie dough ahead of time?
Yes! The dough can be made and refrigerated up to 48 hours before rolling and baking. Just wrap it tightly in plastic wrap to keep it fresh.
Is it safe to use raw egg whites in royal icing?
For safety, use pasteurized egg whites or meringue powder. If you prefer not to use raw eggs at all, meringue powder is an excellent substitute that works well.
How do I prevent the royal icing from cracking?
Keep the icing at the right consistency—not too thick or thin—and avoid rapid temperature changes while drying. Let the cookies dry slowly at room temperature.
Can I store decorated cookies for gift-giving?
Absolutely! Store them in an airtight container layered with parchment paper. They keep well for up to a week and make charming homemade gifts.
What’s the best way to apply edible glitter?
Sprinkle edible glitter over wet royal icing so it sticks well. Use a small, soft brush for precise application, especially around edges.
Pin This Recipe!
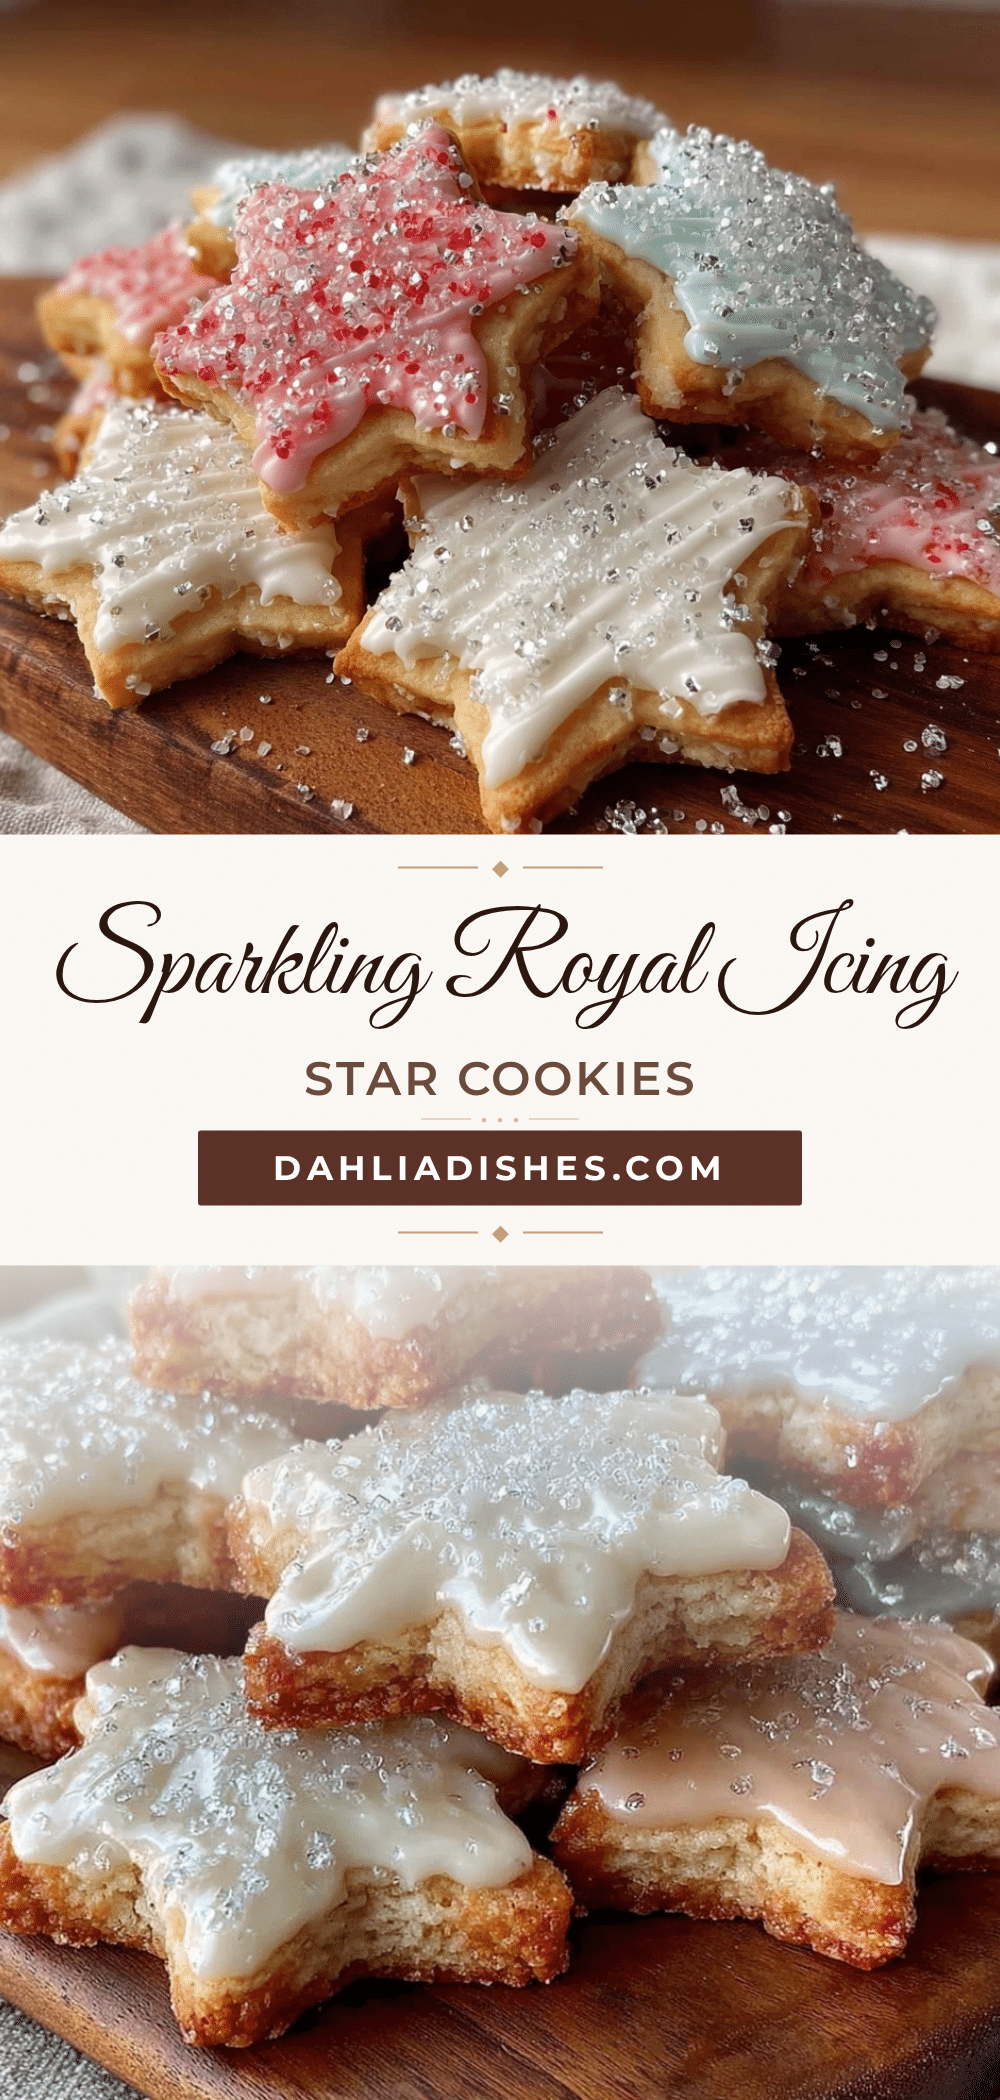
Perfect Royal Icing Star Cookies Recipe Easy Edible Glitter Holiday Treats
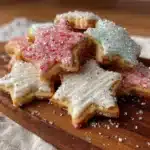
These festive star-shaped cookies feature a buttery base topped with smooth royal icing and edible glitter, perfect for holiday celebrations and easy enough for last-minute baking.
- Prep Time: 1 hour 44 minutes
- Cook Time: 10 minutes
- Total Time: 1 hour 54 minutes
- Yield: About 24 cookies 1x
- Category: Dessert
- Cuisine: American
Ingredients
- 2 ¾ cups (345 g) all-purpose flour
- 1 teaspoon baking powder
- ½ teaspoon salt
- 1 cup (227 g) unsalted butter, softened
- 1 ½ cups (180 g) powdered sugar, sifted
- 1 large egg, room temperature
- 2 teaspoons vanilla extract
- 3 large egg whites (pasteurized if preferred)
- 4 cups (480 g) powdered sugar, sifted
- ¼ teaspoon cream of tartar
- 1 teaspoon vanilla or almond extract (optional)
- Edible glitter (silver or gold recommended)
- Food coloring gels (optional)
Instructions
- Mix the dry ingredients: whisk together flour, baking powder, and salt in a medium bowl. (5 minutes)
- Cream butter and sugar: beat softened butter and powdered sugar with an electric mixer on medium speed until light and fluffy, about 3-4 minutes. (4 minutes)
- Add egg and vanilla: beat in egg and vanilla extract until combined, do not overmix. (2 minutes)
- Combine wet and dry ingredients: gradually add dry ingredients to wet mixture on low speed until just combined. Chill dough 15 minutes if too sticky. (3 minutes)
- Chill the dough: wrap dough in plastic wrap and refrigerate for at least 1 hour or up to overnight. (60 minutes)
- Preheat oven to 350°F (175°C) and prepare baking sheets with parchment paper or silicone mats. (10 minutes)
- Roll and cut: roll dough to ¼ inch thickness on lightly floured surface, cut with star-shaped cookie cutters, transfer to baking sheets. (15 minutes)
- Bake cookies for 8-10 minutes until edges just start to turn golden. Cool on baking sheets 5 minutes, then transfer to wire racks to cool completely. (10 minutes baking + 10 minutes cooling)
- Make royal icing: beat egg whites and cream of tartar until frothy, gradually add powdered sugar, beat until stiff peaks form (7-10 minutes). Stir in vanilla if desired. (15 minutes)
- Decorate: divide icing for coloring if desired, pipe outlines then flood centers on cookies. Sprinkle edible glitter while icing is wet. Let dry completely, ideally overnight. (20-30 minutes decorating + drying time)
Notes
Use pasteurized egg whites or meringue powder for safety. Chill dough well to prevent spreading. Keep icing covered with a damp towel between uses to prevent crusting. Let icing dry overnight for best results. Use gel food coloring sparingly to avoid thinning icing. For gluten-free, substitute flour 1:1 with gluten-free blend. For vegan, substitute egg whites with aquafaba.
Nutrition
- Serving Size: 1 cookie (3-inch dia
- Calories: 150
- Fat: 7
- Carbohydrates: 22
- Protein: 1
Keywords: royal icing cookies, star cookies, holiday cookies, edible glitter, Christmas cookies, easy cookie recipe, festive treats