Love this? Save it for later!
Share the inspiration with your friends
“You’ve got to try this,” my neighbor Tom said one rainy Thursday evening, holding a small, weathered notebook with yellowed pages. I wasn’t expecting cooking advice from Tom, a retired sailor known more for his fishing tales than his kitchen skills. But there I was, leaning over the counter as he flipped to a page scribbled with precise notes titled “Seared Diver Scallops – Omakase Style.” I mean, watching him talk about scallops like they were treasure from the sea was oddly captivating. That night, I tried the recipe, and honestly, it felt like a little slice of Japan had landed in my kitchen.
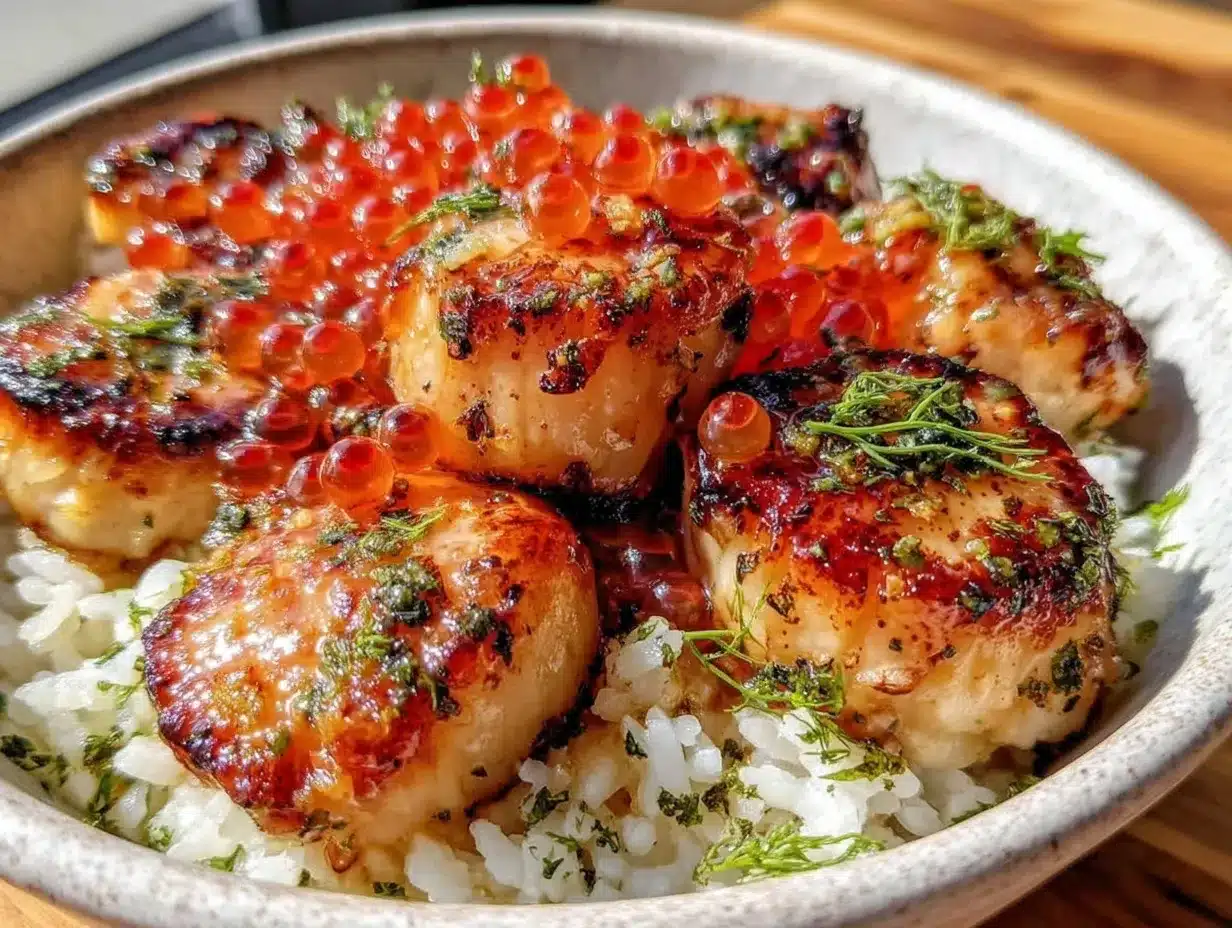
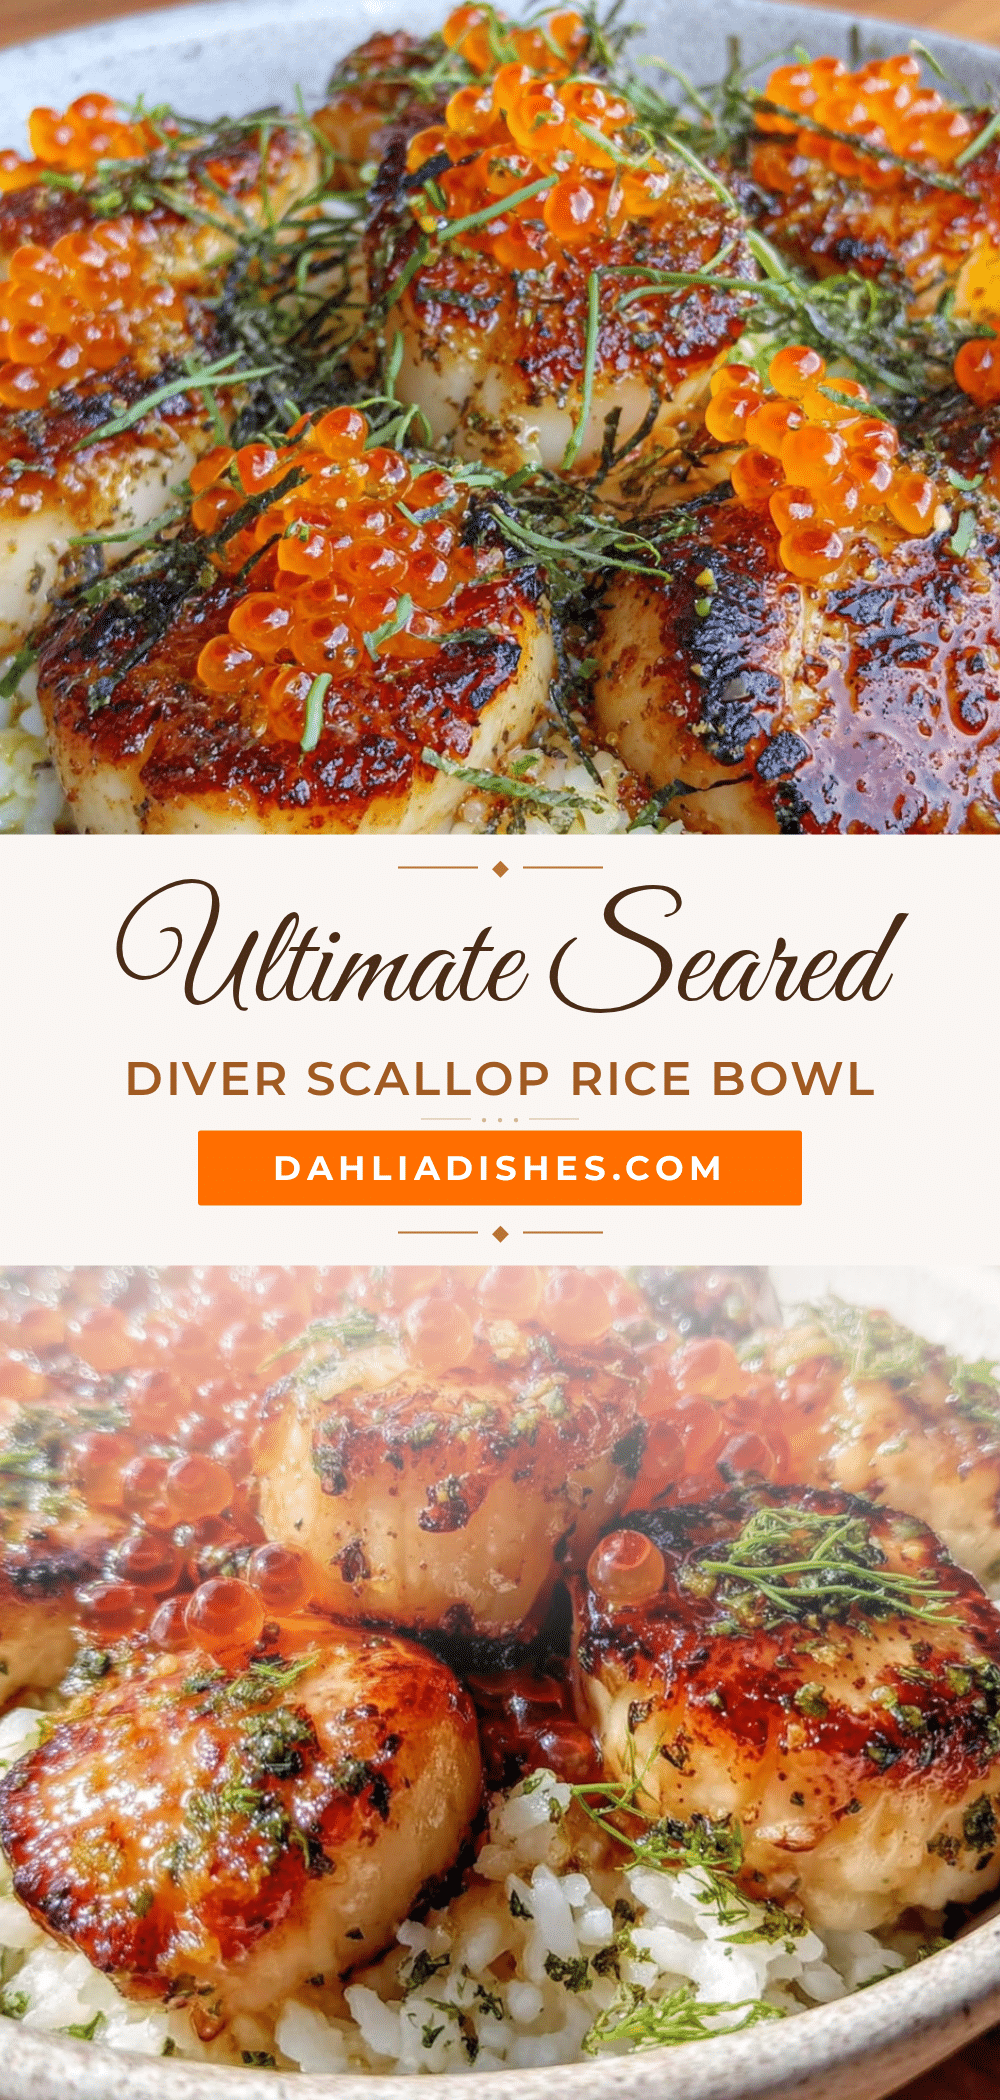
The beauty of this Perfect Omakase-Inspired Seared Diver Scallop Rice Bowl isn’t just in its elegant presentation but in the way simple ingredients come together to create something magical. You know that feeling when a dish surprises you with its layers of flavor and texture? That’s exactly what happened here. Somehow, the tender, caramelized scallops paired with perfectly seasoned rice transported me to the intimate ambiance of an omakase counter, where every bite tells a story.
There was one hiccup, though—midway through searing the scallops, I realized I’d forgotten to preheat my pan properly. The first scallop stuck and lost its golden crust. But instead of giving up, I adjusted the heat, and the next ones came out like tiny golden discs of perfection. Maybe you’ve been there, juggling timing and heat, but that’s part of the fun, right? This recipe stuck with me because it’s approachable yet feels special enough for a dinner party or a quiet night when you want to treat yourself.
Give this seared diver scallop rice bowl a try, and I promise you’ll appreciate how a simple dish can hold so much depth and soul. Let me tell you—it’s become my go-to when I want something that feels both comforting and refined.
Why You’ll Love This Perfect Omakase-Inspired Seared Diver Scallop Rice Bowl Recipe
After countless test runs in my kitchen, this recipe has proven itself as a reliable winner for both busy weeknights and special occasions. Here’s why you’ll want to keep it in your recipe rotation:
- Quick & Easy: Ready in under 30 minutes, perfect when you want restaurant-quality without the wait.
- Simple Ingredients: No obscure items here—just fresh scallops, sushi rice, and a few pantry staples you probably already have.
- Perfect for Impressing: Whether it’s a casual dinner or a small gathering, this bowl looks and tastes like you spent hours.
- Crowd-Pleaser: The combination of sweet seared scallops with the umami-rich sauce always gets compliments, even from picky eaters.
- Unbelievably Delicious: The contrast of the crispy sear and tender scallop inside, paired with fluffy rice, creates an addictive texture and flavor combo.
What makes this recipe truly stand out is the technique of searing diver scallops to just the right doneness—getting that perfect crust without overcooking. Plus, the seasoning is balanced with a subtle soy glaze and a hint of citrus that brightens every bite. Honestly, it’s the kind of dish that makes you pause and savor, the kind that lingers in your thoughts long after you’ve finished eating.
It’s comfort food reimagined—simple, elegant, and soul-soothing, perfect when you want to impress without stress. Give it a shot; you might find yourself making it more than you expected.
What Ingredients You Will Need
This recipe uses straightforward, high-quality ingredients that come together to create a bold flavor and satisfying texture without any fuss. Most are pantry staples or easy to find at your local market.
- Diver Scallops (6-8 large, fresh, patted dry) – Look for dry-packed scallops for the best sear.
- Sushi Rice (1 cup/200g) – Short-grain rice gives you that sticky, tender texture.
- Rice Vinegar (2 tablespoons) – For seasoning the rice, adds a slight tang.
- Sugar (1 tablespoon) – Balances the vinegar in the rice.
- Salt (½ teaspoon) – Enhances all the flavors.
- Soy Sauce (2 tablespoons, low sodium preferred) – Forms the base of the glaze.
- Mirin (1 tablespoon) – Adds subtle sweetness and depth.
- Fresh Lemon Juice (1 teaspoon) – Brightens the glaze and scallops.
- Sesame Oil (1 teaspoon) – For toasting rice and bowls for a nutty aroma.
- Green Onions (2 stalks, thinly sliced) – Fresh garnish for bite and color.
- Toasted Sesame Seeds (1 tablespoon) – Adds crunch and visual appeal.
- Pickled Ginger (optional, for serving) – For that classic omakase touch.
Substitutions and tips: If you can’t find mirin, use a mix of a little sugar and extra rice vinegar. For a gluten-free option, swap soy sauce with tamari. I personally like using Koshihikari rice for its perfect texture and Kikkoman soy sauce for consistent flavor.
Equipment Needed
- Non-stick or Stainless Steel Skillet: A heavy-bottomed pan works best for searing scallops evenly. I’ve had great results with a 10-inch stainless steel skillet, but a good non-stick pan will do if you don’t want to fuss with sticking.
- Rice Cooker or Medium Saucepan: For perfectly cooked sushi rice. If you don’t have a rice cooker, just keep an eye on the water-to-rice ratio in a saucepan.
- Small Mixing Bowl: To whisk together the rice seasoning and glaze.
- Sharp Knife: For slicing green onions and prepping garnish.
- Measuring Cups and Spoons: For accurate ingredient portions.
If you’re on a budget, a basic non-stick skillet works fine, though stainless steel offers better searing. Also, keeping your rice cooker clean and calibrated is key for fluffy rice every time—trust me, I learned this the hard way after a sticky mishap once!
Preparation Method
- Prepare the Sushi Rice (20 minutes): Rinse 1 cup (200g) sushi rice under cold water until water runs clear. Drain well. Combine rice and 1 ¼ cups (300 ml) water in a rice cooker or saucepan. Cook according to rice cooker instructions or bring to a boil, then simmer covered for 18 minutes. Remove from heat, let steam 10 minutes.
- Season the Rice: While rice cooks, whisk 2 tablespoons rice vinegar, 1 tablespoon sugar, and ½ teaspoon salt in a small bowl until dissolved. Transfer cooked rice to a large bowl and gently fold in the seasoning. Avoid smashing grains. Let cool slightly.
- Make the Glaze: In a small saucepan, combine 2 tablespoons soy sauce, 1 tablespoon mirin, and 1 teaspoon fresh lemon juice. Warm over low heat for 2-3 minutes until slightly thickened. Set aside.
- Heat the Pan: Preheat your skillet over medium-high heat and add 1 teaspoon sesame oil. It should shimmer but not smoke.
- Sear the Scallops (5-7 minutes): Pat diver scallops dry again to remove moisture. Season lightly with salt. Place scallops in the hot skillet, leaving space between each. Sear without moving for 2-3 minutes until golden crust forms. Flip carefully and cook 1-2 minutes more. Remove from heat.
- Assemble the Bowl: Spoon a generous portion of sushi rice into bowls. Arrange seared scallops on top. Drizzle with the warm glaze.
- Garnish: Sprinkle sliced green onions and toasted sesame seeds over the bowl. Add pickled ginger on the side if you like.
- Serve Immediately: Enjoy while scallops are warm and the rice is fluffy.
Pro tip: If your scallops stick, your pan wasn’t hot enough or the scallops were too wet. Patting them dry well is a game changer. Also, don’t overcrowd the pan—it cools down the surface and prevents that perfect sear.
Cooking Tips & Techniques
Getting that perfect sear on diver scallops can be tricky, but a couple of simple tricks go a long way. First, make sure your scallops are dry—moisture is the enemy of a good crust. I’ve learned to pat mine down twice with paper towels before hitting the pan.
Use a hot pan but don’t let it smoke. Medium-high heat is ideal. Too hot, and you risk burning the scallops; too low, and they’ll steam instead of sear. Resist moving them around once they hit the pan—let them form a crust.
Timing matters: scallops cook fast. Usually, 2-3 minutes per side is perfect, depending on size. Overcooking makes them rubbery, which nobody wants. I’ve burned a batch before by getting distracted—honestly, keep your eyes on the prize!
When making the glaze, low and slow is your friend. Let it thicken slightly but don’t reduce it to syrup. The glaze should coat the scallops lightly, adding umami and a touch of sweetness without overpowering.
Multitasking tip: while rice cooks, prep your glaze and scallops. Having everything ready before you start searing makes the final assembly smooth and stress-free.
Variations & Adaptations
- Vegetarian Version: Swap scallops for pan-seared king oyster mushroom slices, seasoned and glazed the same way for a meaty, umami-packed plant-based option.
- Spicy Twist: Add a drizzle of sriracha mayo or sprinkle shichimi togarashi over the finished bowl for a kick of heat.
- Seasonal Flair: In spring, toss in blanched asparagus or snap peas for crunch. In autumn, roasted shiitake mushrooms add earthiness.
- Low-Carb Option: Replace sushi rice with cauliflower rice lightly toasted in sesame oil for a lighter bowl.
- Personal Variation: I once stirred in finely chopped fresh shiso leaves into the rice for a refreshing herbal note that balanced the richness beautifully.
Serving & Storage Suggestions
This dish is best served immediately, while the scallops are warm and tender, and the rice is fluffy and lightly vinegared. Serve in shallow bowls to showcase the beautiful seared scallops on top, garnished with green onions and sesame seeds for visual and textural contrast.
Pair it with a crisp cucumber salad or a light miso soup to round out the meal. A chilled sake or a dry white wine like Sauvignon Blanc complements the delicate sweetness of the scallops perfectly.
Leftovers can be stored in an airtight container in the refrigerator for up to 24 hours. Reheat gently in a skillet over low heat to preserve scallop texture—avoid the microwave, which can make seafood rubbery. Note that the rice may firm up slightly but tastes great at room temperature as well.
Flavors tend to mellow and meld after resting, so if you make it ahead, the glaze’s umami notes deepen, making it an even more comforting dish.
Nutritional Information & Benefits
Each serving of this scallop rice bowl provides approximately 350-400 calories, with a good balance of protein, healthy fats, and carbohydrates. Diver scallops are an excellent source of lean protein and are rich in omega-3 fatty acids, which support heart and brain health.
The sushi rice offers energy-sustaining carbs, while ingredients like sesame seeds bring in beneficial minerals such as calcium and magnesium. Using low-sodium soy sauce keeps salt levels moderate, making this dish a well-rounded choice for a nourishing meal.
For those watching gluten, choose tamari or gluten-free soy sauce. This recipe is naturally dairy-free and can be adapted for low-carb diets by substituting cauliflower rice.
Conclusion
This Perfect Omakase-Inspired Seared Diver Scallop Rice Bowl is proof that you don’t need a fancy sushi counter to enjoy exceptional omakase-style flavors at home. It’s approachable, elegant, and packed with the kind of flavor that makes you want to savor every bite.
Feel free to tweak the recipe to suit your taste—add a little heat, swap the rice, or garnish with your favorite herbs. I love this dish because it’s both a comforting meal and a celebration of simple ingredients done right.
Give it a try, and let me know how your scallops turn out! Share your variations or questions in the comments—I’m always excited to hear how you make this recipe your own.
Here’s to making omakase moments in your own kitchen, one perfectly seared scallop at a time.
FAQs About the Perfect Omakase-Inspired Seared Diver Scallop Rice Bowl
What if I can’t find diver scallops? Can I use regular scallops?
Yes, fresh dry-packed sea scallops work well too. Just make sure they’re dry to get the best sear.
How do I prevent scallops from sticking to the pan?
Pat scallops very dry before cooking and ensure your pan is hot enough with a little oil or sesame oil before adding scallops.
Can I make the rice ahead of time?
You can, but sushi rice is best served slightly warm or at room temperature. If making ahead, cover and reheat gently before serving.
Is this recipe suitable for a gluten-free diet?
Absolutely! Use gluten-free tamari instead of soy sauce, and check all other ingredients for gluten content.
How do I know when scallops are perfectly cooked?
They’ll be opaque in the center with a golden crust outside. Typically, 2-3 minutes per side is enough, but avoid overcooking to keep them tender.
For a similar seafood delight with a Japanese twist, you might enjoy my crispy garlic chicken recipe for a hearty main. Also, if you like rice bowls, my recipe for spicy tuna poke bowl offers a fresh, vibrant alternative to try next.
Pin This Recipe!
Perfect Omakase Seared Diver Scallop Rice Bowl
An elegant and comforting rice bowl featuring perfectly seared diver scallops paired with seasoned sushi rice and a subtle soy glaze, inspired by traditional omakase flavors.
- Prep Time: 10 minutes
- Cook Time: 20 minutes
- Total Time: 30 minutes
- Yield: 2 servings 1x
- Category: Main Course
- Cuisine: Japanese
Ingredients
- 6–8 large fresh diver scallops, patted dry
- 1 cup (200g) sushi rice
- 2 tablespoons rice vinegar
- 1 tablespoon sugar
- ½ teaspoon salt
- 2 tablespoons low sodium soy sauce
- 1 tablespoon mirin
- 1 teaspoon fresh lemon juice
- 1 teaspoon sesame oil
- 2 stalks green onions, thinly sliced
- 1 tablespoon toasted sesame seeds
- Pickled ginger (optional, for serving)
Instructions
- Rinse 1 cup (200g) sushi rice under cold water until water runs clear. Drain well.
- Combine rice and 1 ¼ cups (300 ml) water in a rice cooker or saucepan. Cook according to rice cooker instructions or bring to a boil, then simmer covered for 18 minutes. Remove from heat and let steam for 10 minutes.
- While rice cooks, whisk 2 tablespoons rice vinegar, 1 tablespoon sugar, and ½ teaspoon salt in a small bowl until dissolved.
- Transfer cooked rice to a large bowl and gently fold in the seasoning. Avoid smashing grains. Let cool slightly.
- In a small saucepan, combine 2 tablespoons soy sauce, 1 tablespoon mirin, and 1 teaspoon fresh lemon juice. Warm over low heat for 2-3 minutes until slightly thickened. Set aside.
- Preheat skillet over medium-high heat and add 1 teaspoon sesame oil. It should shimmer but not smoke.
- Pat diver scallops dry again to remove moisture. Season lightly with salt.
- Place scallops in the hot skillet, leaving space between each. Sear without moving for 2-3 minutes until golden crust forms.
- Flip carefully and cook 1-2 minutes more. Remove from heat.
- Spoon a generous portion of sushi rice into bowls. Arrange seared scallops on top. Drizzle with the warm glaze.
- Sprinkle sliced green onions and toasted sesame seeds over the bowl. Add pickled ginger on the side if desired.
- Serve immediately while scallops are warm and rice is fluffy.
Notes
Pat scallops very dry before searing to prevent sticking. Do not overcrowd the pan to maintain high heat and achieve a perfect crust. Use low and slow heat to thicken the glaze without reducing it to syrup. For gluten-free, substitute soy sauce with tamari. Leftovers can be stored up to 24 hours and reheated gently in a skillet.
Nutrition
- Serving Size: 1 bowl (approximatel
- Calories: 375
- Sugar: 6
- Sodium: 550
- Fat: 7
- Saturated Fat: 1
- Carbohydrates: 45
- Fiber: 1
- Protein: 25
Keywords: seared scallops, omakase, rice bowl, sushi rice, Japanese recipe, seafood, easy dinner, scallop recipe