Love this? Save it for later!
Share the inspiration with your friends
The fall bake sale was in six hours and I’d completely forgotten. My friend Jenna texted me at 6 AM with a “don’t forget tomorrow!” and my stomach dropped. Everyone else would be bringing those elaborate layer cakes with perfect buttercream rosettes or those fancy French pastries that look like they belong in a magazine. I had a can of pumpkin puree, a block of cream cheese, and a box of gingersnaps that were honestly a little stale. I mean, talk about a recipe disaster waiting to happen.
I stood in my kitchen, still in my pajamas, staring at my pantry like it might magically produce something impressive. Maybe you’ve been there—that moment when you realize you’ve got nothing to bring and your brain just goes blank. I remember my cat, Oliver, weaving between my ankles and meowing because I was late with his breakfast too. It was one of those mornings where everything felt a little chaotic.
But then I spotted those gingersnaps and something clicked. I’d seen a recipe for mini cheesecakes somewhere, and I thought, why not? I crushed up those cookies, mixed them with a little butter, and pressed them into my mini muffin tin. The filling came together in about five minutes—pumpkin, cream cheese, sugar, and a few warm spices. I popped them in the oven and prayed. And honestly? They came out perfect. The little gingersnap crusts held together beautifully, and the pumpkin filling had this silky, creamy texture that was just right. At the bake sale, people kept coming back for seconds, asking for the recipe. I didn’t win any prizes, but I did walk away with empty trays and a new favorite fall dessert. That’s why I keep making these mini pumpkin cheesecakes—they’re the kind of recipe that saves you when you least expect it.
Why You’ll Love This Recipe
These mini pumpkin cheesecakes have become my go-to fall dessert for so many reasons. I’ve tested this recipe at least a dozen times—through different ovens, with different brands of cream cheese, and even with homemade gingersnaps once (more on that later). What I love most is how forgiving and reliable it is. Here’s why I think you’ll feel the same:
- Quick & Easy: These come together in under 45 minutes, including baking time. Perfect for those last-minute gatherings or when a pumpkin craving hits out of nowhere.
- Simple Ingredients: You probably have most of these in your kitchen right now. No fancy grocery store trips needed—just basic baking staples and a can of pumpkin.
- Perfect for Fall Gatherings: Whether it’s a Thanksgiving potluck, a Halloween party, or just a cozy Sunday afternoon, these little cheesecakes fit right in.
- Crowd-Pleaser: I’ve served these to kids, adults, and even my picky aunt who “doesn’t like pumpkin.” They disappear every single time.
- Unbelievably Delicious: The combination of spicy gingersnap crust and creamy pumpkin filling is honestly next-level. It’s like fall in a bite-sized package.
What makes this recipe different from all the other pumpkin cheesecake recipes out there? It’s the crust. Using store-bought gingersnaps gives you that deep, molasses-y flavor without any extra work. And the filling? I use a technique where I blend the cream cheese and pumpkin together slowly, which gives you the smoothest, creamiest texture without any lumps. No water bath needed, no complicated steps—just pure, simple comfort food.
This isn’t just another pumpkin dessert. It’s the kind that makes you close your eyes after the first bite. It’s comfort food reimagined—faster, easier, but with the same soul-soothing satisfaction. Perfect for impressing guests without stress, or turning a simple fall evening into something memorable.
What Ingredients You Will Need
This recipe uses simple, wholesome ingredients to deliver bold flavor and satisfying texture without any fuss. Most of these are pantry staples, especially if you do any fall baking. Let me walk you through each one and share a few tips I’ve learned along the way.
For the Gingersnap Crust
- 1 ½ cups gingersnap cookie crumbs (about 20-24 cookies, crushed finely) — I prefer Nabisco or Annie’s brand for consistent texture. You can also use gluten-free gingersnaps if needed.
- 3 tablespoons unsalted butter, melted — This binds the crumbs together. Use salted butter if that’s all you have, just reduce the added salt by a pinch.
- 1 tablespoon granulated sugar — Adds a touch of sweetness, though gingersnaps are already sweet. You can skip this if you prefer a less sweet crust.
- Pinch of salt — Balances the sweetness and enhances the ginger flavor.
For the Pumpkin Cheesecake Filling
- 8 ounces cream cheese, softened to room temperature — Full-fat cream cheese gives the best texture. I’ve tried low-fat versions and they work, but the filling won’t be as rich or creamy.
- ½ cup granulated sugar — Just enough sweetness without overpowering the pumpkin.
- 1 large egg, room temperature — Helps the filling set properly. Cold egg can cause lumps, so let it sit out for 30 minutes.
- ½ cup pumpkin puree — Not pumpkin pie filling! Make sure you grab the pure 100% pumpkin. Libby’s is my go-to brand.
- 1 teaspoon vanilla extract — Pure vanilla extract adds a warm depth. Imitation works in a pinch.
- ½ teaspoon ground cinnamon — The classic fall spice.
- ¼ teaspoon ground ginger — Complements the gingersnap crust beautifully.
- ⅛ teaspoon ground nutmeg — Freshly grated is amazing if you have it.
- ⅛ teaspoon ground cloves — Optional, but adds that “something extra” to the spice blend.
For the Topping (Optional but Recommended)
- ½ cup heavy whipping cream — For a simple whipped cream topping. You can use store-bought if you’re short on time.
- 1 tablespoon powdered sugar — Sweetens the cream without making it grainy.
- ½ teaspoon vanilla extract — Adds flavor to the whipped cream.
- Ground cinnamon or nutmeg for dusting — A pretty finish.
Substitution Tips: For a gluten-free version, use gluten-free gingersnaps or even gluten-free graham crackers. For a dairy-free option, use dairy-free cream cheese and a plant-based butter substitute. The texture might be slightly different, but the flavor will still be delicious. In summer, I sometimes swap the pumpkin for an equal amount of mashed sweet potato—it works surprisingly well!
Equipment Needed
You don’t need a fancy kitchen to make these mini pumpkin cheesecakes. Here’s what I use and a few alternatives if you’re working with what you’ve got.
- Mini muffin pan (24-cup) — This is essential for the mini size. I use a standard non-stick one from Wilton. If you only have a regular muffin pan, you can make 12 regular-sized cheesecakes—just increase the baking time by 5-7 minutes.
- Mini paper liners — These make removal so much easier. I recommend foil liners for the best results, but standard paper ones work too.
- Food processor or zip-top bag and rolling pin — For crushing the gingersnaps. A food processor gives you the finest crumbs, but a zip-top bag and a rolling pin work perfectly. Honest, I’ve done it both ways.
- Medium mixing bowls (2-3) — One for the crust, one for the filling, and one for the whipped cream.
- Electric hand mixer or stand mixer — For creaming the cream cheese and sugar. A whisk and some elbow grease work too, but it’ll take a bit longer.
- Measuring cups and spoons — Accurate measurements matter in baking.
- Rubber spatula — For scraping down the sides of the bowl and getting every last bit of filling.
- Small cookie scoop or tablespoon — For portioning the crust and filling evenly. A cookie scoop makes it so much faster.
- Cooling rack — For cooling the cheesecakes evenly after baking.
I bought my mini muffin pan at a thrift store for three dollars, and it’s still going strong after years of use. Don’t feel like you need the most expensive equipment. As long as it’s clean and functional, you’re good to go.
Preparation Method
Let me walk you through this step by step. I’ve included all the little details I wish someone had told me the first time I made these. Take your time, and don’t rush—these little cheesecakes are worth every minute.
Step 1: Preheat and Prep
Preheat your oven to 325°F (160°C). Line your mini muffin pan with paper liners. This makes removal so much easier later. I learned this the hard way when my first batch stuck to the pan and I had to dig them out with a fork. Not pretty.
Step 2: Make the Gingersnap Crust
Place the gingersnap cookies in a food processor and pulse until you have fine crumbs. You need about 1½ cups of crumbs. If you don’t have a food processor, put the cookies in a zip-top bag and crush them with a rolling pin. It’s a little more work, but it gets the job done. You can also use the bottom of a heavy glass.
Transfer the crumbs to a medium bowl. Add the melted butter, sugar, and salt. Stir with a fork until the mixture looks like wet sand and holds together when you squeeze it. Press about 1 tablespoon of the crust mixture into each mini muffin cup. Use the bottom of a shot glass or a small measuring cup to press it down firmly. This is important—if the crust is too loose, it will fall apart when you try to remove the cheesecakes. Bake the crusts for 5 minutes at 325°F. They should be just slightly fragrant. Set them aside to cool while you make the filling.
Step 3: Make the Pumpkin Cheesecake Filling
In a large bowl, beat the softened cream cheese with an electric mixer on medium speed until it’s smooth and creamy—about 2 minutes. Scrape down the sides of the bowl with a rubber spatula. Add the sugar and beat for another minute until well combined.
Add the egg, pumpkin puree, vanilla extract, and all the spices. Beat on low speed until just combined. Do not overmix! Overmixing incorporates too much air, which can cause the cheesecakes to puff up and then crack as they cool. I speak from experience—my first few batches looked like little volcanoes. Mix until you don’t see any streaks of cream cheese, then stop.
The mixture should be smooth, thick, and a beautiful orange color. Give it a taste—it should be sweet, spiced, and creamy. If you’re using canned pumpkin, make sure you’ve stirred it well before measuring. Sometimes the liquid separates at the top of the can.
Step 4: Fill and Bake
Spoon about 1 tablespoon of the filling into each crust. The cups should be almost full, but leave a tiny bit of room at the top—about ⅛ inch. The cheesecakes will puff up slightly as they bake, but they won’t overflow if you don’t overfill them.
Bake at 325°F for 15-18 minutes. The edges should look set and slightly puffed, but the centers should still jiggle just a little when you gently shake the pan. This is the sweet spot—baking them until the centers are completely firm will result in dry, crumbly cheesecakes. I remember the first time I made these, I was so nervous about underbaking that I left them in too long. They were edible, but not nearly as creamy as they could have been.
Step 5: Cool and Chill
Let the cheesecakes cool in the pan on a wire rack for 15 minutes. Then carefully transfer them to the refrigerator (still in the pan) and chill for at least 2 hours. Overnight is even better. This step is non-negotiable—the cheesecakes need time to set and develop their flavor. The texture becomes so much creamier after a good chill.
To remove the cheesecakes from the pan, gently lift them out by the edges of the paper liners. If they stick, run a thin knife around the edge of each cup. I’ve had a few stubborn ones that needed a little coaxing, but the liners usually do the trick.
Step 6: Make the Whipped Cream Topping (Optional)
In a chilled bowl, beat the heavy cream, powdered sugar, and vanilla extract with an electric mixer on medium-high speed until soft peaks form. This takes about 2-3 minutes. Be careful not to overbeat, or you’ll end up with butter. Trust me, I’ve done that too.
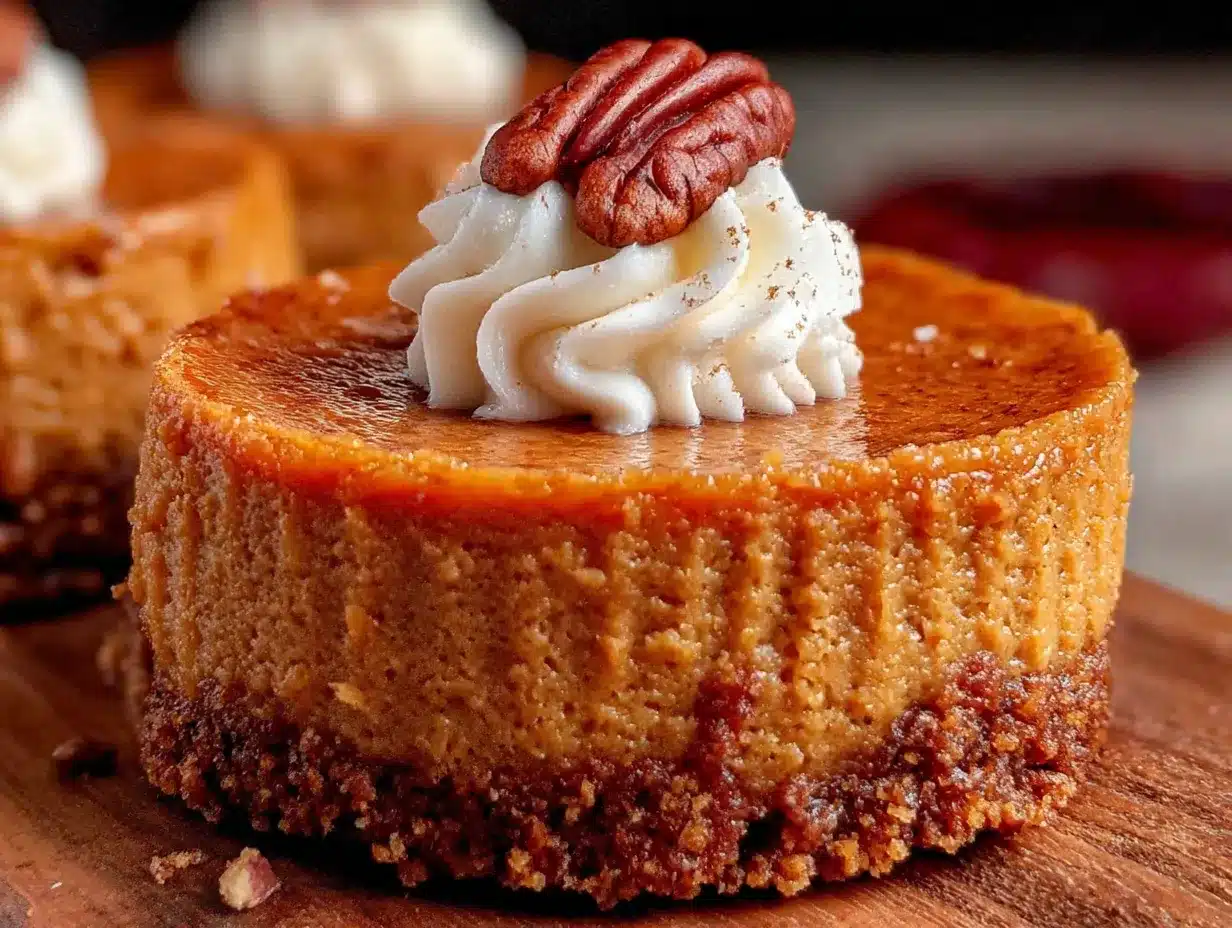
Pipe or spoon a small dollop of whipped cream onto each chilled cheesecake. Dust with a little cinnamon or nutmeg for a pretty finish. Serve immediately or keep refrigerated until ready to serve.
Cooking Tips & Techniques
After making these mini pumpkin cheesecakes more times than I can count, I’ve picked up a few tricks that make a real difference. Let me share what I’ve learned—including a few mistakes I’ve made so you don’t have to.
Room Temperature Ingredients Matter: This is the number one tip I tell everyone. Cold cream cheese creates lumps that are almost impossible to get out. Cold egg can cause the filling to curdle. Let your cream cheese and egg sit on the counter for at least 30 minutes before you start. I set them out when I preheat the oven, and by the time I’m ready to mix, they’re perfect.
Don’t Skip the Pre-Bake for the Crust: I know it’s tempting to skip this step, but pre-baking the crust for just 5 minutes makes it so much sturdier. Without this step, the crust can get soggy from the pumpkin filling. I learned this lesson when I made a batch for a party and the crusts were all mushy. Not my finest moment.
Use a Cookie Scoop for Even Portions: A small cookie scoop (about 1 tablespoon) makes filling the cups so much faster and ensures each cheesecake is the same size. This helps them bake evenly. If you don’t have one, a regular tablespoon works fine—just be consistent.
Watch the Baking Time Closely: Every oven is different. My old oven ran hot and I had to reduce the baking time by 2 minutes. Start checking at 15 minutes. The edges should be set, but the centers should still have a slight jiggle. They will continue to set as they cool.
Chill Overnight for Best Results: If you can wait, chill these overnight. The flavors meld together and the texture becomes incredibly smooth and creamy. I’ve made these a day ahead for Thanksgiving and they were even better the next day. It’s one of those recipes that actually improves with time.
Common Mistake to Avoid: Overmixing the filling. I’ve done this more times than I’d like to admit. When you overmix, you incorporate too much air, which causes the cheesecakes to puff up and then collapse, leaving cracks on the surface. Mix just until everything is combined, then stop. A few small lumps are better than a cracked cheesecake.
Variations & Adaptations
One of the best things about this recipe is how easily it adapts. I’ve tried several variations over the years, and here are my favorites. Feel free to experiment and make these your own.
Gluten-Free Version: Use gluten-free gingersnap cookies for the crust. I’ve tried this with a few different brands, and they all work well. The texture might be a little more delicate, so be gentle when pressing the crust into the cups. Everything else in the recipe is naturally gluten-free.
Vegan Version: Use dairy-free cream cheese (I like Kite Hill or Tofutti) and a plant-based butter substitute. For the egg, use a flax egg (1 tablespoon ground flaxseed mixed with 3 tablespoons water, let sit for 5 minutes). The texture will be slightly different—a little less firm—but the flavor is still delicious. I made these for a vegan friend’s birthday and she loved them.
Pumpkin Spice Latte Twist: Add 1 teaspoon of instant espresso powder to the filling along with the spices. It gives the cheesecakes a subtle coffee flavor that pairs beautifully with the pumpkin and ginger. I tried this on a whim one morning and it’s become my new favorite variation.
Maple Pecan Version: Replace the granulated sugar in the filling with ⅓ cup maple syrup (reduce the pumpkin puree by 2 tablespoons to balance the liquid). Top each cheesecake with a pecan half before baking. The maple and pecan combo is incredible with the gingersnap crust.
Chocolate Drizzle: Melt ¼ cup of semi-sweet chocolate chips with 1 teaspoon of coconut oil and drizzle it over the finished cheesecakes. The chocolate and pumpkin combination is surprisingly good. I was skeptical the first time I tried it, but now I do it all the time.
Serving & Storage Suggestions
These mini pumpkin cheesecakes are versatile when it comes to serving. Here’s what I’ve found works best.
Serving Temperature: Serve them chilled, straight from the refrigerator. They hold their shape best when cold. If you prefer a softer texture, let them sit at room temperature for 10-15 minutes before serving. I like them cold with a dollop of whipped cream on top.
Presentation Tips: Arrange them on a beautiful platter or cake stand. Dust with a little cinnamon or nutmeg for a pretty finish. You can also add a small candied ginger piece on top of each cheesecake for a pop of color and extra ginger flavor. For a fall-themed party, I sometimes place them on a bed of colorful leaves or arrange them on a wooden board with apple slices and cinnamon sticks.
Complementary Dishes: These pair beautifully with a warm cup of coffee, spiced chai, or apple cider. For a dessert spread, serve them alongside pumpkin bread, apple crisp, or a simple vanilla ice cream. They’re also great on a brunch table with quiche and fresh fruit.
Storage Instructions: Store the cheesecakes in an airtight container in the refrigerator for up to 5 days. If you’ve added the whipped cream topping, it’s best to add it just before serving, as the cream can break down over time. Without the topping, the cheesecakes hold up beautifully.
Freezing Instructions: These freeze wonderfully! Place the cooled, unfrosted cheesecakes on a baking sheet and freeze for 1 hour. Then transfer them to a freezer-safe container or zip-top bag, separating layers with wax paper. They’ll keep for up to 3 months. To thaw, place them in the refrigerator overnight. Add the whipped cream topping after thawing.
Flavor Development: The flavors actually deepen and improve after a day or two in the refrigerator. The pumpkin and spice flavors meld together, and the crust softens just slightly, making it easier to bite through. I honestly think these are better on day two than day one.
Nutritional Information & Benefits
While these are definitely a treat, they do offer some nutritional benefits thanks to the pumpkin. Here’s a rough estimate per mini cheesecake (based on 24 servings, without whipped cream topping).
- Calories: 120-130
- Total Fat: 8g
- Saturated Fat: 5g
- Cholesterol: 35mg
- Sodium: 110mg
- Total Carbohydrates: 12g
- Dietary Fiber: 1g
- Sugars: 8g
- Protein: 2g
Health Benefits: Pumpkin is packed with vitamin A, which is great for eye health and immune function. It’s also a good source of fiber and antioxidants. The ginger in the crust has anti-inflammatory properties, and cinnamon can help regulate blood sugar levels. Of course, the cream cheese and butter add fat and calories, but in moderation, these can be part of a balanced diet.
Dietary Considerations: This recipe can be made gluten-free and vegan with the substitutions mentioned above. It is not nut-free due to the potential for cross-contamination in some gingersnap brands, so check labels if you have allergies. The recipe contains dairy and gluten in its standard form.
I’m not a nutritionist, so please take these numbers as rough estimates. If you have specific dietary needs, I recommend calculating the nutritional information based on the exact ingredients you use.
FAQs
Can I make these mini pumpkin cheesecakes ahead of time?
Absolutely! In fact, I recommend it. These cheesecakes need at least 2 hours to chill, but they’re even better after 24 hours in the refrigerator. You can make them up to 3 days ahead of time and store them in an airtight container. Just add the whipped cream topping right before serving.
Can I use fresh pumpkin instead of canned?
Yes, you can use fresh pumpkin puree. Just make sure it’s well-drained. Fresh pumpkin tends to have more water content than canned, which can make the filling too loose. After pureeing the roasted pumpkin, let it sit in a fine-mesh strainer for about 30 minutes to drain excess liquid. You might need to add an extra tablespoon of sugar to compensate for the difference in sweetness.
Why did my cheesecakes crack on top?
Cracks usually happen from overmixing the filling or overbaking. Overmixing incorporates too much air, which causes the cheesecakes to puff up and then collapse. Overbaking dries them out, leading to cracks. Make sure you mix just until combined, and pull them out of the oven when the centers still have a slight jiggle. They’ll continue to set as they cool.
Can I use a different type of cookie for the crust?
Definitely! Graham crackers, vanilla wafers, or even shortbread cookies all work well. If you use a sweeter cookie, you might want to reduce the added sugar in the crust. I’ve also used chocolate wafer cookies for a chocolate-pumpkin combination, and it was delicious. Just keep in mind that the flavor of the crust will change the overall taste of the cheesecake.
How do I know when the cheesecakes are done baking?
The edges should look set and slightly puffed, but the centers should still jiggle when you gently shake the pan. This usually takes 15-18 minutes at 325°F. If the centers are completely firm, they’re overbaked. Don’t worry if they look a little underdone—they’ll firm up beautifully as they chill in the refrigerator.
Conclusion
These mini pumpkin cheesecakes with gingersnap crust have become a fall staple in my kitchen, and I have a feeling they’ll become one in yours too. They’re the kind of recipe that saves you when you’re in a pinch, impresses everyone who tries them, and tastes like you spent hours in the kitchen—even though you didn’t. Honestly, that’s my favorite kind of recipe.
I love that you can make them your own. Add a little extra cinnamon if that’s your thing. Swap the gingersnaps for chocolate wafers if you’re feeling adventurous. Top them with caramel sauce or a sprinkle of sea salt. The possibilities are endless, and that’s what makes cooking so much fun.
So go ahead and give these a try. Whether you’re making them for a holiday gathering, a fall brunch, or just because it’s Tuesday and you deserve a treat, I think you’ll love them. And when you do, I’d love to hear about it. Leave a comment below and let me know how they turned out, or share your own twist on the recipe. Happy baking, friend!
Pin This Recipe!
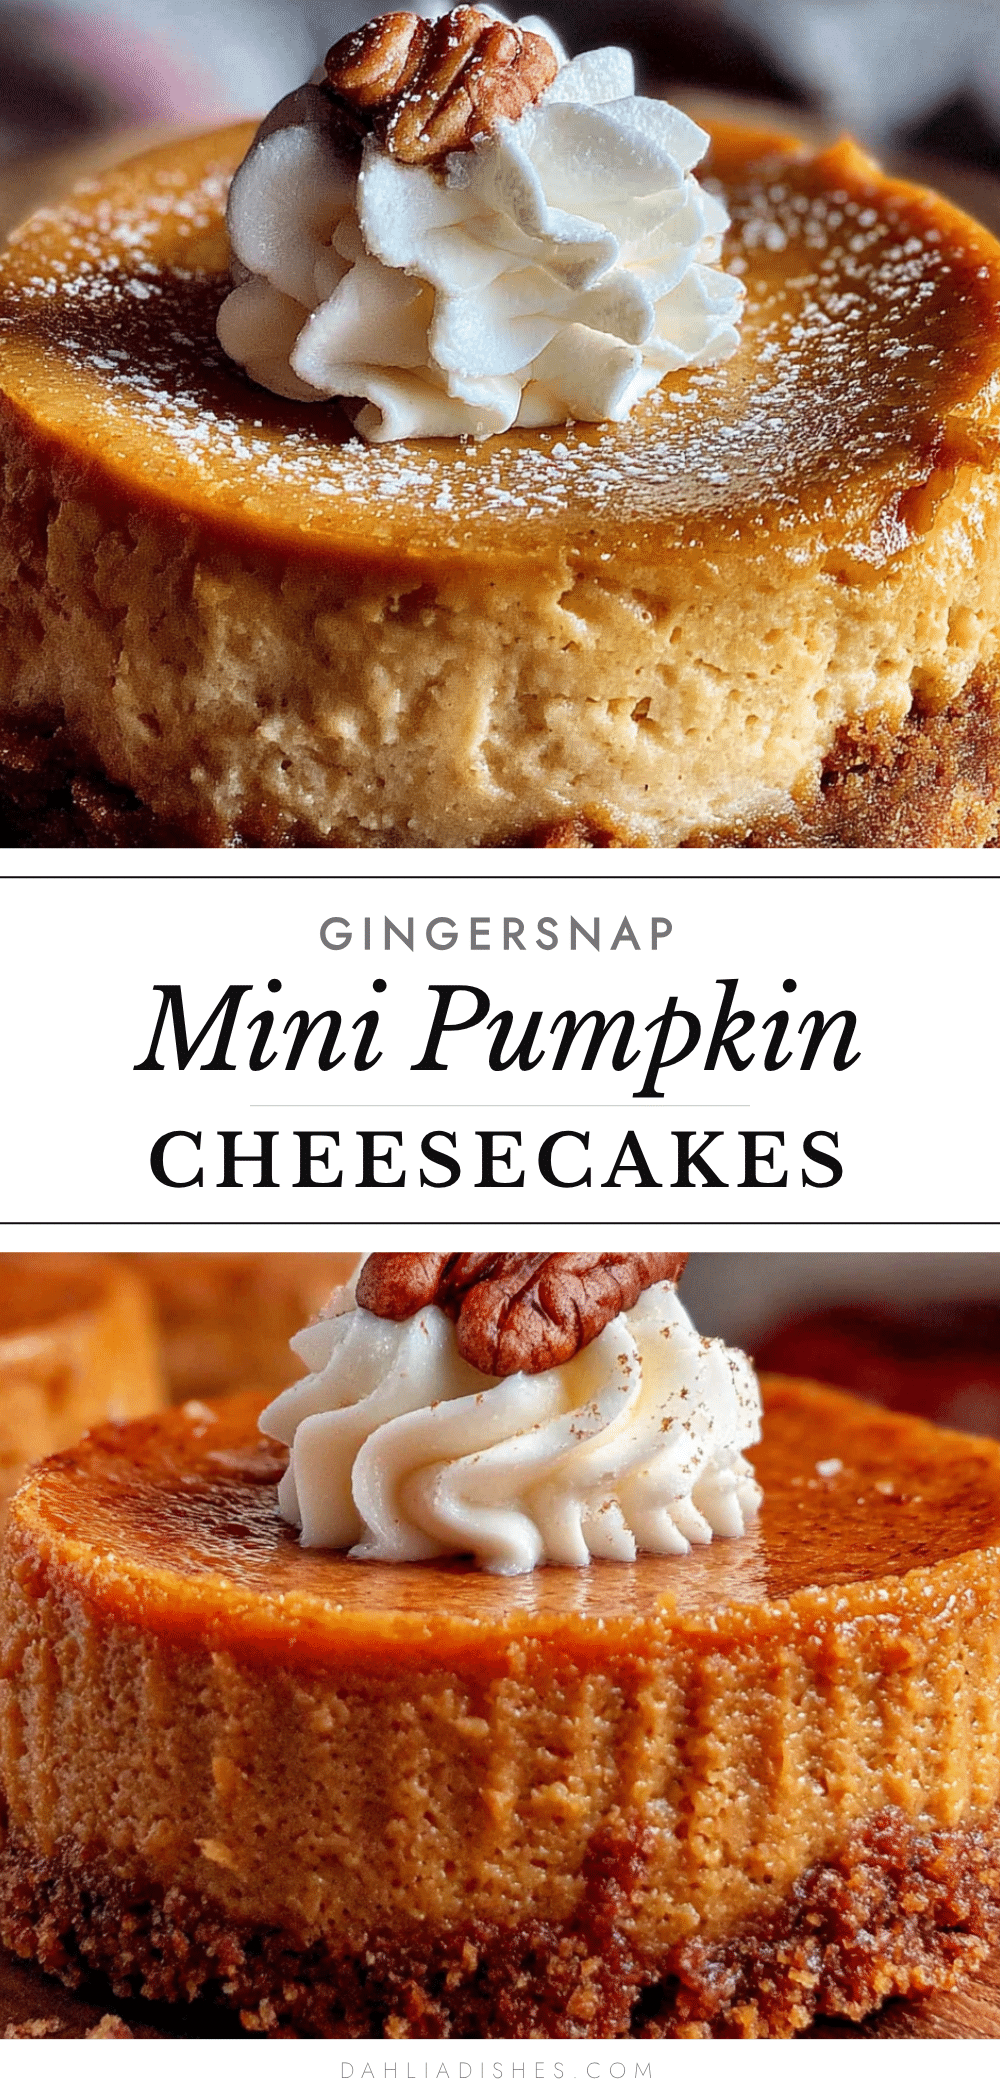
Perfect Mini Pumpkin Cheesecakes – Easy Gingersnap Recipe
These mini pumpkin cheesecakes with a gingersnap crust are quick, easy, and perfect for fall gatherings. They come together in under 45 minutes with simple ingredients and are a crowd-pleaser every time.
- Prep Time: 20 minutes
- Cook Time: 18 minutes
- Total Time: 2 hours 38 minutes (includes 2 hours chilling)
- Yield: 24 mini cheesecakes 1x
- Category: Dessert
- Cuisine: American
Ingredients
- 1 ½ cups gingersnap cookie crumbs (about 20–24 cookies, crushed finely)
- 3 tablespoons unsalted butter, melted
- 1 tablespoon granulated sugar
- Pinch of salt
- 8 ounces cream cheese, softened to room temperature
- ½ cup granulated sugar
- 1 large egg, room temperature
- ½ cup pumpkin puree (not pumpkin pie filling)
- 1 teaspoon vanilla extract
- ½ teaspoon ground cinnamon
- ¼ teaspoon ground ginger
- ⅛ teaspoon ground nutmeg
- ⅛ teaspoon ground cloves (optional)
- ½ cup heavy whipping cream (for topping, optional)
- 1 tablespoon powdered sugar (for topping, optional)
- ½ teaspoon vanilla extract (for topping, optional)
- Ground cinnamon or nutmeg for dusting (for topping, optional)
Instructions
- Preheat your oven to 325°F (160°C). Line a 24-cup mini muffin pan with paper liners.
- Make the crust: Place gingersnap cookies in a food processor and pulse until fine crumbs. Alternatively, crush in a zip-top bag with a rolling pin. Transfer crumbs to a medium bowl. Add melted butter, 1 tablespoon sugar, and a pinch of salt. Stir until mixture resembles wet sand and holds together when squeezed.
- Press about 1 tablespoon of crust mixture into each mini muffin cup. Use the bottom of a shot glass or small measuring cup to press firmly. Bake for 5 minutes at 325°F. Set aside to cool.
- Make the filling: In a large bowl, beat softened cream cheese with an electric mixer on medium speed until smooth and creamy, about 2 minutes. Scrape down sides. Add ½ cup sugar and beat for another minute until combined.
- Add egg, pumpkin puree, vanilla extract, cinnamon, ginger, nutmeg, and cloves (if using). Beat on low speed until just combined. Do not overmix.
- Spoon about 1 tablespoon of filling into each crust. Cups should be almost full, leaving about ⅛ inch at the top.
- Bake at 325°F for 15-18 minutes. Edges should be set and slightly puffed, but centers should still jiggle slightly when shaken.
- Cool in the pan on a wire rack for 15 minutes. Then refrigerate (still in pan) for at least 2 hours, or overnight for best results.
- To remove, gently lift cheesecakes by the edges of the paper liners. If stuck, run a thin knife around the edge.
- Optional topping: In a chilled bowl, beat heavy cream, powdered sugar, and vanilla extract on medium-high speed until soft peaks form, about 2-3 minutes. Pipe or spoon a dollop onto each chilled cheesecake. Dust with cinnamon or nutmeg.
Notes
Room temperature ingredients are crucial for a smooth filling. Pre-baking the crust prevents sogginess. Do not overmix the filling to avoid cracks. Chill overnight for best flavor and texture. For gluten-free, use gluten-free gingersnaps. For vegan, use dairy-free cream cheese, plant-based butter, and a flax egg.
Nutrition
- Serving Size: 1 mini cheesecake
- Calories: 125
- Sugar: 8
- Sodium: 110
- Fat: 8
- Saturated Fat: 5
- Carbohydrates: 12
- Fiber: 1
- Protein: 2
Keywords: mini pumpkin cheesecakes, gingersnap crust, fall dessert, pumpkin dessert, easy cheesecake recipe, mini cheesecakes, Thanksgiving dessert