Love this? Save it for later!
Share the inspiration with your friends
The neighborhood fall block party was in six hours and I’d completely forgotten my assigned dish. Everyone else would be bringing those Pinterest-perfect pies with lattice crusts and fancy leaf cutouts. I had a block of cream cheese that was about to expire, a can of pumpkin puree I’d bought on a whim, and a bag of gingersnaps that my toddler had been using as teething biscuits. Honestly, I almost just grabbed a store-bought pie and called it a day. But something about the cool October air and the smell of cinnamon from someone’s kitchen made me want to try.
I remember standing there, staring into my pantry, thinking there was no way this was going to work. The cream cheese was soft, the gingersnaps were slightly crushed from being dropped, and I had exactly two eggs left. Not exactly the makings of a showstopper. But I figured, you know what? Let me just see what happens. I mashed up those cookies with some butter, mixed the filling by hand because my mixer was buried somewhere, and threw it all in the oven hoping for the best.
When I pulled those bars out, the kitchen smelled incredible — all warm spice and toasted sugar. I let them cool (barely), cut them into uneven squares, and walked over to the party feeling like I was showing up empty-handed. But then people started grabbing them. And then they started asking for the recipe. By the end of the night, the plate was empty, and someone actually asked if I could make them for Thanksgiving. That’s when I knew these pumpkin cheesecake bars with gingersnap crust were something special. Now they’re my go-to for every fall gathering, and I never stress about forgetting my dish anymore.
Why You’ll Love This Recipe
Let me tell you why these bars have earned a permanent spot in my fall baking rotation. They solve so many problems at once, and they do it with style.
- Quick & Easy: From start to finish, these come together in about 45 minutes of active time. No water bath, no fussy crust rolling, no complicated techniques. Perfect for when you need a dessert that looks impressive without the stress.
- Simple Ingredients: You probably have most of these in your kitchen right now. Gingersnaps, cream cheese, pumpkin puree, eggs, sugar, and spices. No weird specialty items that you’ll use once and forget about.
- Perfect for Fall Gatherings: Whether it’s Thanksgiving, a Friendsgiving potluck, or just a cozy Sunday with family, these bars fit right in. They travel well, they slice cleanly, and they disappear fast.
- Crowd-Pleaser: I’ve served these to kids who claim they don’t like pumpkin and adults who say they’re “not dessert people.” Everyone goes back for seconds. The combination of tangy cheesecake, spiced pumpkin, and crunchy gingersnap crust is just irresistible.
- Unbelievably Delicious: The texture is what gets me every time. That creamy, smooth filling against the crunchy, buttery crust — it’s pure comfort in every bite. And the flavor? The ginger in the crust plays off the pumpkin spice in the filling in a way that’s honestly genius.
What makes these different from every other pumpkin cheesecake bar recipe out there is the crust. Most recipes use graham crackers, which are fine, but gingersnaps bring this warm, spicy kick that takes the whole thing to another level. Plus, I’ve tested this exact ratio about a dozen times to get that perfect balance where the crust stays crunchy even after a day in the fridge. This isn’t just another version — it’s the one you’ll come back to year after year.
What Ingredients You Will Need
This recipe uses simple, wholesome ingredients that work together to create something truly special. Most are pantry staples, and the few that aren’t are easy to find at any grocery store.
For the Gingersnap Crust
- 2 cups (240g) crushed gingersnap cookies — I prefer Nabisco or a store brand with strong ginger flavor. You want about 30 cookies. Pulse them in a food processor or crush them in a bag with a rolling pin.
- 6 tablespoons (85g) unsalted butter, melted — Salted butter works too, just reduce the added salt slightly.
- 2 tablespoons (25g) granulated sugar — This helps the crust hold together and adds a touch of sweetness.
- ¼ teaspoon salt — Only if using unsalted butter. It balances the sweetness.
For the Cheesecake Filling
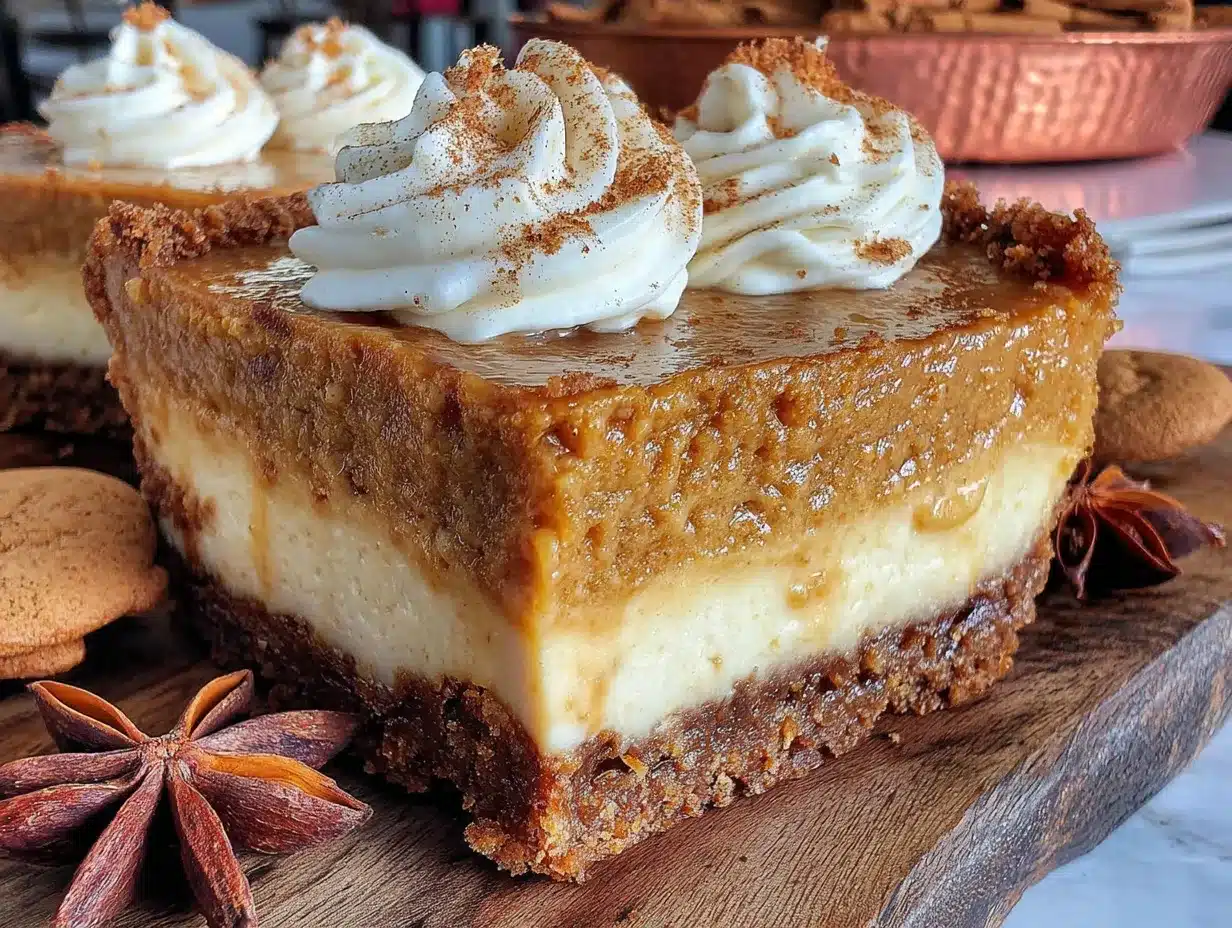
- 16 ounces (450g) cream cheese, softened — Full-fat is best for that creamy texture. Let it sit out for at least 30 minutes before starting.
- ¾ cup (150g) granulated sugar — Regular white sugar works perfectly here.
- 2 large eggs, room temperature — Cold eggs can make the filling lumpy. Let them sit in warm water for 5 minutes if you’re in a hurry.
- 1 teaspoon vanilla extract — Pure vanilla is best, but imitation works in a pinch.
- 1 cup (245g) pumpkin puree — Not pumpkin pie filling. Make sure it’s 100% pure pumpkin. Libby’s is my go-to brand.
- 1 teaspoon ground cinnamon — Fresh spices make a difference here.
- ½ teaspoon ground ginger — This echoes the gingersnap crust beautifully.
- ¼ teaspoon ground nutmeg — Freshly grated if you have it, but pre-ground is fine.
- ¼ teaspoon ground cloves — Just a touch for warmth.
- Pinch of salt — Enhances all the flavors.
For the Topping (Optional but Recommended)
- ½ cup (120ml) heavy cream — For whipped cream. Or use store-bought if you’re short on time.
- 1 tablespoon powdered sugar — To sweeten the cream.
- ¼ teaspoon vanilla extract — For flavor.
- Optional: Caramel sauce or crushed gingersnaps for garnish
Equipment Needed
You don’t need a fancy kitchen to make these bars. Here’s what you’ll need:
- 9×9-inch baking pan — An 8×8 works too, but the bars will be slightly thicker and may need a few extra minutes of baking.
- Parchment paper — This is non-negotiable for easy removal. Let the edges hang over the sides for handles.
- Food processor or zip-top bag and rolling pin — For crushing the gingersnaps. I use a food processor because it’s faster, but the bag method works great and is oddly satisfying.
- Medium mixing bowl — For the crust.
- Large mixing bowl — For the cheesecake filling.
- Electric hand mixer or stand mixer — A whisk and some elbow grease work too, but a mixer makes it much easier to get that smooth, lump-free texture.
- Rubber spatula — For scraping the bowl and spreading the filling.
- Measuring cups and spoons — Accurate measurements matter in baking.
If you don’t have a food processor, don’t worry. I’ve crushed gingersnaps with a rolling pin more times than I can count. Just put them in a sturdy bag, seal it, and go to town. It’s a great way to work out any frustration, honestly.
Preparation Method
Alright, let’s make these pumpkin cheesecake bars with gingersnap crust. Follow these steps carefully, and you’ll have a dessert that looks like it came from a bakery.
Step 1: Prep Your Pan and Preheat
Preheat your oven to 350°F (175°C). Line your 9×9-inch baking pan with parchment paper, leaving about 2 inches hanging over two opposite sides. This creates handles that make lifting the bars out so much easier. Lightly spray the parchment with non-stick spray just to be safe.
Step 2: Make the Crust
In a food processor, pulse the gingersnap cookies until they become fine crumbs. You should have about 2 cups. Transfer the crumbs to a medium bowl. Add the melted butter, sugar, and salt, and stir with a fork until everything is evenly moistened. It should look like wet sand and hold together when you squeeze it.
Press the mixture firmly into the bottom of your prepared pan. I use the bottom of a measuring cup to really pack it down. This is important — a loose crust will fall apart when you cut the bars. Bake for 10 minutes, then set aside to cool slightly while you make the filling. Leave the oven on.
Step 3: Make the Cheesecake Filling
In a large bowl, beat the softened cream cheese with an electric mixer on medium speed until smooth and creamy, about 2 minutes. Scrape down the sides and the bottom of the bowl. Add the sugar and beat for another minute until well combined.
Add the eggs one at a time, beating on low speed after each addition just until incorporated. Don’t overmix here — you don’t want to incorporate too much air, which can cause cracks. Add the vanilla and beat briefly.
In a separate small bowl, whisk together the pumpkin puree, cinnamon, ginger, nutmeg, cloves, and salt. Add this pumpkin mixture to the cream cheese mixture and beat on low speed until just combined. Scrape the bowl again and give it one final stir by hand to make sure everything is evenly mixed. The batter should be smooth, thick, and a beautiful pale orange color.
Step 4: Assemble and Bake
Pour the cheesecake filling over the pre-baked crust. Use a spatula to spread it evenly to the edges. Give the pan a gentle tap on the counter to release any air bubbles.
Bake at 350°F (175°C) for 35-40 minutes. The edges should be set and slightly puffed, but the center should still jiggle slightly when you gently shake the pan. This is the sweet spot — overbaking leads to dry, cracked cheesecake. Don’t worry if there’s a tiny jiggle; it will continue to set as it cools.
Let the bars cool completely in the pan on a wire rack. This takes about 1-2 hours. Then refrigerate for at least 4 hours, but overnight is even better. Chilling is crucial for clean slices and the best texture. I know it’s hard to wait, but trust me on this.
Step 5: Slice and Serve
Once fully chilled, use the parchment handles to lift the entire block out of the pan. Place it on a cutting board. Use a sharp knife to slice into 16 squares (4 rows by 4 rows). For the cleanest cuts, wipe the knife clean between each slice. I run it under hot water and dry it off. It makes a huge difference.
Top each bar with a dollop of whipped cream, a drizzle of caramel sauce, and a sprinkle of crushed gingersnaps if you’re feeling fancy. Serve cold or at room temperature — both are delicious.
Cooking Tips & Techniques
Over the years, I’ve made plenty of mistakes with cheesecake bars so you don’t have to. Here are the most important things I’ve learned:
- Room temperature ingredients are non-negotiable. Cold cream cheese creates lumps that are nearly impossible to get rid of. Cold eggs can seize the batter. Set everything out 30-60 minutes before you start. Your future self will thank you.
- Don’t overmix the filling. Once you add the eggs, mix on low speed and stop as soon as everything comes together. Overmixing incorporates too much air, which causes the cheesecake to puff up and then crack as it cools.
- The water bath myth. You don’t need a water bath for these bars because they’re thin enough to bake evenly without one. Just don’t overbake them. That jiggle in the center is your friend.
- Patience is a virtue. I know you want to eat these right away, but the chilling time is when the magic happens. The flavors meld, the texture firms up, and the crust stays crunchy. Cutting into warm cheesecake bars is a recipe for a gooey mess.
- Use a hot knife for clean slices. Run your knife under hot water, dry it off, and make your cut. Repeat for each slice. It takes an extra minute but gives you those beautiful, bakery-style edges.
I once forgot to let my cream cheese soften and ended up with lumpy filling. I tried to fix it by mixing longer, which just made it worse. The bars still tasted fine, but the texture was off. Learn from my mistake — take the time to bring everything to room temperature.
Variations & Adaptations
This recipe is wonderfully versatile. Here are some ways to make it your own:
- Gluten-Free Version: Use gluten-free gingersnap cookies for the crust. Many brands are available now, and the recipe works exactly the same. No other changes needed.
- Dairy-Free Adaptation: Substitute the cream cheese with a high-quality dairy-free version (I like Miyoko’s or Kite Hill). Use coconut oil or a dairy-free butter alternative for the crust. The texture will be slightly different but still delicious.
- Pumpkin Spice Latte Twist: Add 1 tablespoon of instant espresso powder dissolved in 1 tablespoon of hot water to the filling. It deepens the pumpkin flavor and adds a subtle coffee kick that’s amazing with the gingersnap crust.
- Chocolate Lover’s Version: Melt 4 ounces of dark chocolate and swirl it into the filling before baking. Or add a layer of chocolate ganache on top after chilling. The pumpkin and chocolate combo is underrated.
- Mini Bar Bites: Use a mini muffin tin lined with paper liners. Press about a tablespoon of crust into each cup, then fill with cheesecake batter. Bake for 15-18 minutes. Perfect for parties or portion control.
I once tried a version with a pecan shortbread crust instead of gingersnaps, and it was incredible. The nutty, buttery flavor paired beautifully with the pumpkin. Don’t be afraid to experiment — that’s half the fun of baking.
Serving & Storage Suggestions
These pumpkin cheesecake bars with gingersnap crust are best served cold, straight from the fridge. The texture is firm and creamy, and the crust stays perfectly crunchy. If you prefer a softer texture, let them sit at room temperature for about 15 minutes before serving.
For presentation, I like to arrange the bars on a white platter with a dusting of cinnamon and a few whole gingersnaps scattered around. A dollop of whipped cream on each bar makes them look extra special. If you’re bringing them to a gathering, keep them chilled until you’re ready to serve.
These bars pair beautifully with a hot cup of coffee, a spiced chai latte, or even a glass of cold milk. For a dessert spread, serve them alongside apple cider donuts, pecan pie, or pumpkin bread. They also freeze beautifully, which makes them perfect for holiday prep.
Storage Instructions: Store leftover bars in an airtight container in the refrigerator for up to 5 days. Place a layer of parchment paper between stacked bars to prevent sticking. The flavors actually get better after a day or two as they meld together.
Freezer Instructions: To freeze, wrap individual bars tightly in plastic wrap, then place them in a freezer-safe bag or container. They’ll keep for up to 3 months. To thaw, transfer to the refrigerator overnight. Don’t thaw at room temperature, as the texture can become watery.
Reheating: These bars are meant to be served cold, but if you want a warm dessert, microwave a single bar for about 10-15 seconds. The crust will soften slightly, and the filling will become extra creamy. Top with a scoop of vanilla ice cream for an indulgent treat.
Nutritional Information & Benefits
Here’s the approximate nutritional breakdown for one bar (based on 16 servings, without optional toppings):
| Nutrient | Amount per Serving |
|---|---|
| Calories | 285 |
| Total Fat | 18g |
| Saturated Fat | 10g |
| Cholesterol | 70mg |
| Sodium | 220mg |
| Total Carbohydrates | 28g |
| Dietary Fiber | 2g |
| Sugars | 18g |
| Protein | 5g |
| Vitamin A | 45% DV |
| Calcium | 6% DV |
| Iron | 8% DV |
Pumpkin is packed with vitamin A, which supports eye health and immune function. The ginger in the crust has anti-inflammatory properties, and the cream cheese provides calcium and protein. While these bars are definitely a treat, they offer more nutritional value than your average dessert. If you’re watching your sugar intake, you can reduce the sugar to ½ cup in the filling without compromising the texture too much.
Frequently Asked Questions
Can I use pumpkin pie filling instead of pumpkin puree?
No, I wouldn’t recommend it. Pumpkin pie filling is already sweetened and spiced, so it will throw off the balance of the recipe. Stick with 100% pure pumpkin puree for the best results. Libby’s is my go-to brand.
Why did my cheesecake crack?
Cracks usually happen from overbaking or overmixing. Make sure you remove the bars when the center still has a slight jiggle. Also, avoid beating the filling on high speed after adding the eggs. If cracks do appear, don’t worry — a layer of whipped cream or caramel sauce covers them beautifully.
Can I make these bars ahead of time?
Absolutely! In fact, they taste better the next day. You can make them up to 3 days ahead and keep them refrigerated. They also freeze well for up to 3 months. Just wrap them tightly and thaw in the fridge overnight.
Can I use a different cookie for the crust?
Yes, but the flavor will change. Graham crackers work well, but you’ll lose that spicy ginger kick. Shortbread cookies or vanilla wafers are also good options. If you use a sweeter cookie, you might want to reduce the sugar in the crust slightly.
How do I get clean, neat slices?
Chill the bars for at least 4 hours (overnight is better). Use a sharp knife and wipe it clean between each slice. I run the knife under hot water and dry it off before each cut. This gives you those beautiful, bakery-style edges.
Conclusion
These pumpkin cheesecake bars with gingersnap crust have become a fall tradition in my kitchen, and I have a feeling they’ll become one in yours too. They’re everything you want in a seasonal dessert — creamy, spiced, crunchy, and just the right amount of indulgent. Plus, they’re so much easier than a full cheesecake, which means you can enjoy them without spending all day in the kitchen.
What I love most about this recipe is how forgiving it is. Even if your crust isn’t perfectly packed or your filling has a few lumps, these bars still taste amazing. They’re the kind of dessert that makes people close their eyes and smile after the first bite. And honestly, that’s what cooking is all about.
I’d love to hear how yours turn out. Did you try a variation? Did you serve them at a holiday gathering? Drop a comment below and let me know. And if you have a friend who’s intimidated by baking cheesecake, send them this recipe — it’s the perfect place to start. Happy baking, friends!
Pin This Recipe!
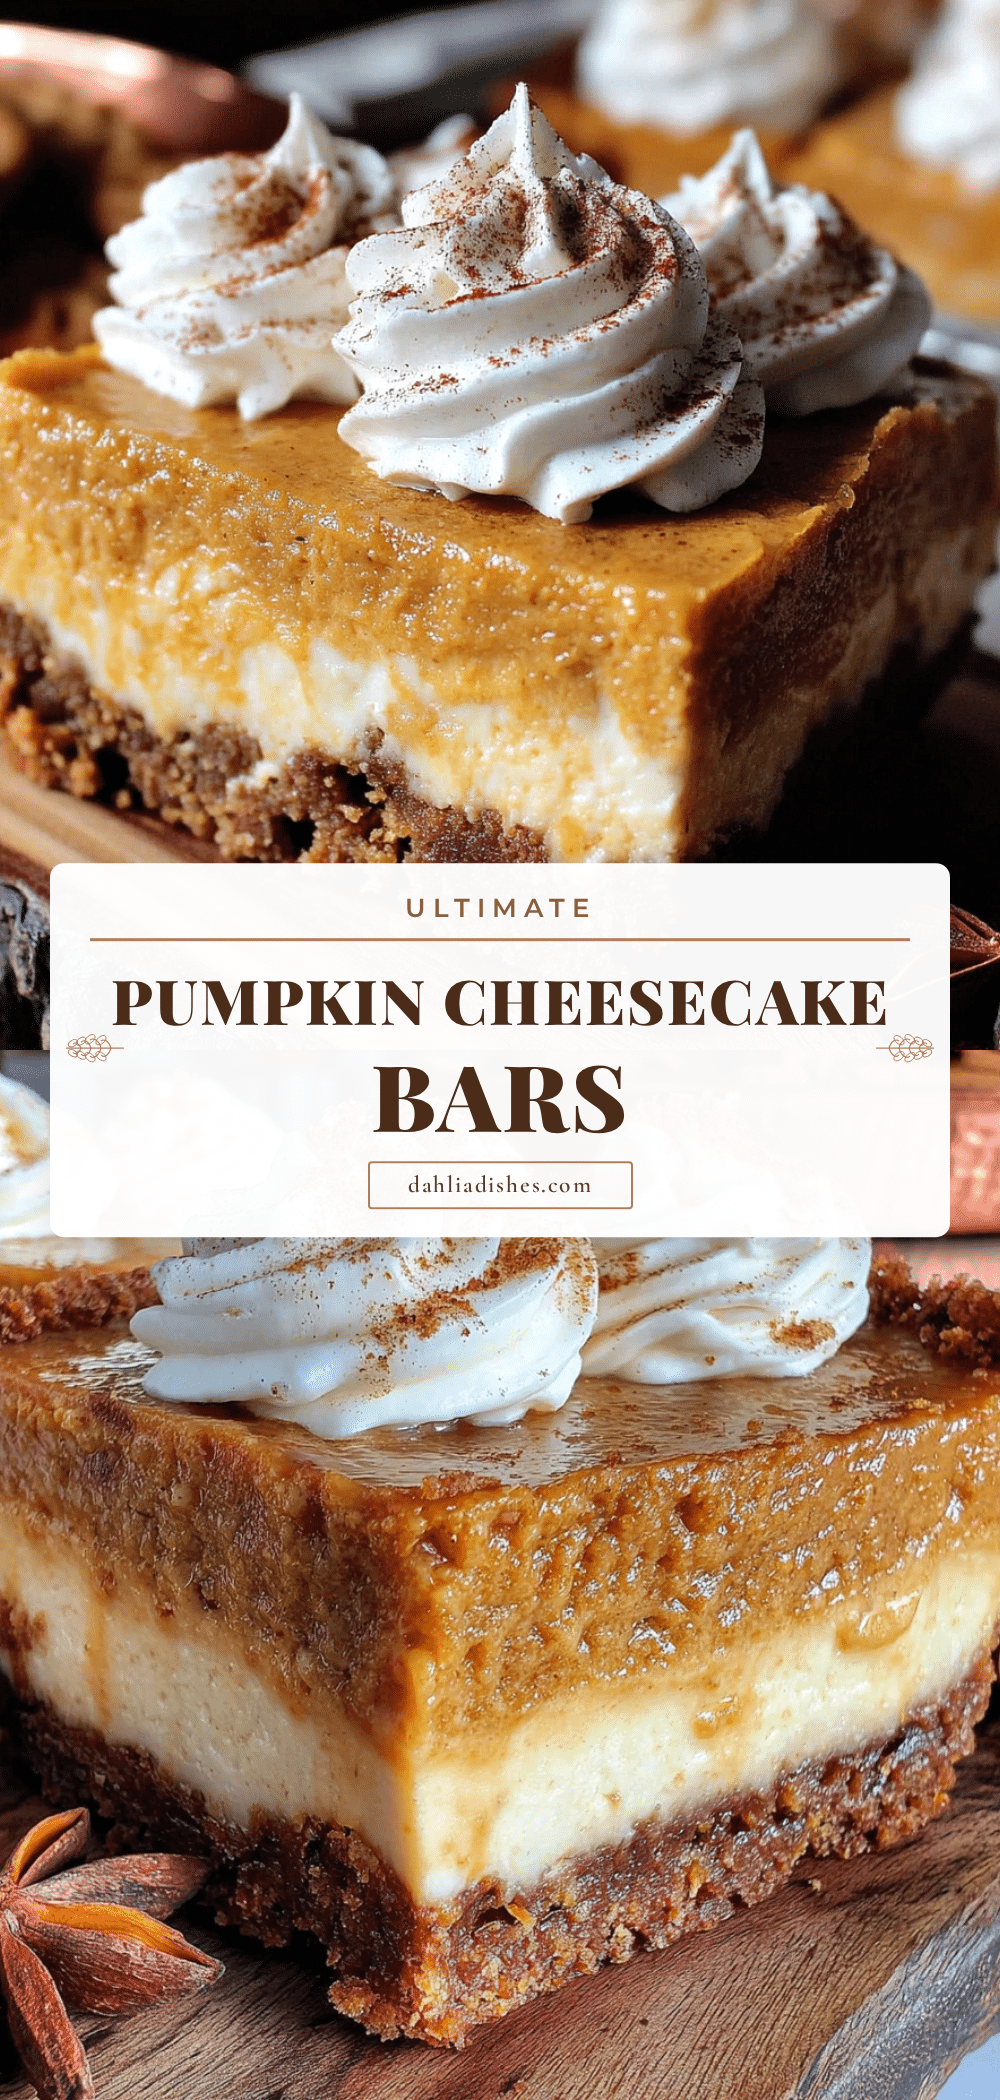
Best Pumpkin Cheesecake Bars with Gingersnap Crust
These pumpkin cheesecake bars feature a crunchy gingersnap crust and a creamy, spiced pumpkin filling. They’re quick, easy, and perfect for fall gatherings, with no water bath required.
- Prep Time: 45 minutes
- Cook Time: 35-40 minutes
- Total Time: 5 hours 20 minutes (including chilling)
- Yield: 16 servings 1x
- Category: Dessert
- Cuisine: American
Ingredients
- 2 cups (240g) crushed gingersnap cookies
- 6 tablespoons (85g) unsalted butter, melted
- 2 tablespoons (25g) granulated sugar
- ¼ teaspoon salt
- 16 ounces (450g) cream cheese, softened
- ¾ cup (150g) granulated sugar
- 2 large eggs, room temperature
- 1 teaspoon vanilla extract
- 1 cup (245g) pumpkin puree
- 1 teaspoon ground cinnamon
- ½ teaspoon ground ginger
- ¼ teaspoon ground nutmeg
- ¼ teaspoon ground cloves
- Pinch of salt
- ½ cup (120ml) heavy cream (optional, for topping)
- 1 tablespoon powdered sugar (optional, for topping)
- ¼ teaspoon vanilla extract (optional, for topping)
- Caramel sauce or crushed gingersnaps for garnish (optional)
Instructions
- Preheat oven to 350°F (175°C). Line a 9×9-inch baking pan with parchment paper, leaving overhang on two sides. Lightly spray with non-stick spray.
- In a food processor, pulse gingersnap cookies into fine crumbs. Transfer to a medium bowl. Add melted butter, 2 tablespoons sugar, and ¼ teaspoon salt. Stir until evenly moistened and resembles wet sand.
- Press crust mixture firmly into the bottom of the prepared pan using the bottom of a measuring cup. Bake for 10 minutes. Set aside to cool slightly. Keep oven on.
- In a large bowl, beat softened cream cheese with an electric mixer on medium speed until smooth, about 2 minutes. Scrape down sides. Add ¾ cup sugar and beat for 1 minute until combined.
- Add eggs one at a time, beating on low speed after each addition just until incorporated. Add 1 teaspoon vanilla and beat briefly.
- In a small bowl, whisk together pumpkin puree, cinnamon, ginger, nutmeg, cloves, and a pinch of salt. Add to cream cheese mixture and beat on low speed until just combined. Scrape bowl and stir by hand to ensure even mixing.
- Pour cheesecake filling over pre-baked crust. Spread evenly with a spatula. Gently tap pan on counter to release air bubbles.
- Bake at 350°F (175°C) for 35-40 minutes. Edges should be set and slightly puffed, but center should jiggle slightly when shaken.
- Cool completely in pan on a wire rack (1-2 hours). Refrigerate for at least 4 hours, preferably overnight.
- Use parchment handles to lift the block out of the pan. Place on a cutting board. Slice into 16 squares using a sharp knife, wiping clean between cuts.
- Optional: Top each bar with whipped cream (made by beating heavy cream, powdered sugar, and vanilla), caramel sauce, and crushed gingersnaps. Serve cold or at room temperature.
Notes
Room temperature ingredients are crucial for a smooth filling. Don’t overmix after adding eggs to prevent cracks. The center should jiggle slightly when done; it will set as it cools. Chill at least 4 hours for clean slices. For gluten-free, use gluten-free gingersnaps. For dairy-free, use dairy-free cream cheese and butter alternative.
Nutrition
- Serving Size: 1 bar
- Calories: 285
- Sugar: 18
- Sodium: 220
- Fat: 18
- Saturated Fat: 10
- Carbohydrates: 28
- Fiber: 2
- Protein: 5
Keywords: pumpkin cheesecake bars, gingersnap crust, fall dessert, Thanksgiving dessert, easy cheesecake bars


