Love this? Save it for later!
Share the inspiration with your friends
“I wasn’t expecting to find a dessert that could steal the show at my summer BBQ, especially one that required zero baking,” I confessed to my friend Lisa last July. It all started when I stumbled upon a recipe scribbled on the back of an old grocery list tucked inside a thrift store cookbook. The list was smudged, the handwriting a little shaky, but the title caught my eye: Easy No-Bake Flag Pudding with 5 Layers of Creamy Goodness.
Curious and admittedly skeptical—because let’s face it, layered desserts that don’t involve an oven sometimes fall flat—I decided to give it a try the night before my annual neighborhood cookout. The kitchen was a mess (I forgot to grab the vanilla extract at first, so there was a frantic dash to the store under the glow of streetlights), but the end result? Honestly, it was a hit beyond anything I’d imagined.
Maybe you’ve been there too—wanting that wow-factor dessert, but without the hassle of heating up the kitchen or standing over the stove all afternoon. What makes this no-bake flag pudding special is the five luscious layers that come together effortlessly, each one creamy and flavorful in its own right. I keep making it not just because it’s easy, but because every bite reminds me of that unexpected summer night, the laughter from my neighbors, and the sweet surprise of a recipe discovered in the most unlikely place.
Why You’ll Love This Recipe
This Easy No-Bake Flag Pudding recipe quickly became my go-to for gatherings, and here’s why it might just become yours too:
- Quick & Easy: Ready in under 30 minutes, perfect for those last-minute dessert needs or busy weeknights when time is tight.
- Simple Ingredients: No fancy or hard-to-find items here—most are pantry staples you probably have on hand already.
- Perfect for Patriotic Holidays: Whether it’s the Fourth of July, Memorial Day, or any festive occasion, the flag design adds a fun, celebratory touch.
- Crowd-Pleaser: Both kids and adults rave over the creamy layers and the playful presentation.
- Unbelievably Delicious: The combination of creamy pudding, whipped topping, and fresh fruit layers is pure comfort food with a fresh twist.
What really sets this recipe apart, though, is the layering technique that gives each bite a perfect balance of textures and flavors. The pudding is smooth yet thick, the whipped cream adds lightness, and the fresh berries bring in a natural sweetness and a pop of color. It’s not just another layered dessert—it’s a conversation starter and a guaranteed crowd favorite.
Honestly, this no-bake flag pudding makes me close my eyes after the first bite, savoring the cool, creamy goodness. It’s the kind of recipe that turns a simple potluck into a memorable celebration, without any stress.
What Ingredients You Will Need
This recipe uses straightforward, wholesome ingredients that come together beautifully to create those five creamy layers without fuss. You can find everything in most grocery stores, and substitutions are simple if needed.
- Instant Vanilla Pudding Mix (2 packets, about 3.4 oz or 96g each) – This forms the base flavor; I like Jell-O brand for its smoothness.
- Cold Milk (4 cups / 960 ml) – Whole milk works best for creaminess, but 2% is fine too.
- Whipped Topping (2 cups / 480 ml), thawed – I prefer store-bought frozen whipped topping like Cool Whip for convenience, but homemade whipped cream is great if you have the time.
- Strawberries (2 cups, sliced) – Fresh and ripe strawberries give that bright red layer; frozen berries aren’t quite the same here.
- Blueberries (1 cup) – The perfect blue layer for the flag look.
- Bananas (2 medium, sliced) – Adds a creamy, natural sweetness to one of the layers.
- Vanilla Extract (1 teaspoon) – Boosts the pudding’s flavor.
- Sugar (optional, 2 tablespoons) – If you like things sweeter, feel free to add this when mixing the pudding.
Ingredient Tips: For the best texture, choose firm strawberries and ripe bananas that aren’t mushy. If dairy is a concern, swap milk for almond or oat milk and use dairy-free whipped topping alternatives. For a gluten-free version, this recipe is naturally safe as long as your pudding mix doesn’t contain gluten additives.
Equipment Needed
- Large Mixing Bowl: To whisk the pudding and milk together smoothly. A glass or metal bowl works well.
- Electric Mixer or Whisk: An electric mixer makes preparing the whipped topping and pudding easier, but a sturdy whisk will do if you don’t have one.
- 9×13 Inch (23×33 cm) Glass Baking Dish: Ideal for layering the pudding, but any clear dish that allows you to see the layers works.
- Spatula or Spoon: For spreading layers evenly.
- Measuring Cups and Spoons: Accurate measurements help the pudding set perfectly.
If you don’t have a 9×13 dish, a trifle bowl or individual clear cups can make cute single-serving layers. I once used a large Pyrex bowl when I forgot my baking dish, and honestly, it made for a fun, rustic twist.
Preparation Method
- Mix the pudding: In your large bowl, whisk together the 2 packets of instant vanilla pudding mix with 4 cups (960 ml) cold milk. Whisk vigorously for about 2 minutes until the pudding thickens. Let it sit for 5 minutes to fully set.
- Prepare the whipped topping: If you’re using store-bought, just thaw it according to package instructions. If making homemade, whip 2 cups (480 ml) of heavy cream with 1 teaspoon vanilla extract until soft peaks form.
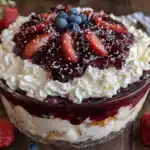
- Layer 1 – Pudding Base: Spread half of the prepared pudding evenly into the bottom of your 9×13 inch dish. It should be smooth and glossy.
- Layer 2 – Sliced Bananas: Arrange the sliced bananas evenly over the pudding. This adds creamy sweetness and a nice texture contrast.
- Layer 3 – Whipped Topping: Spread half of your whipped topping over the bananas. Use a spatula to gently smooth it out, so it’s even but fluffy.
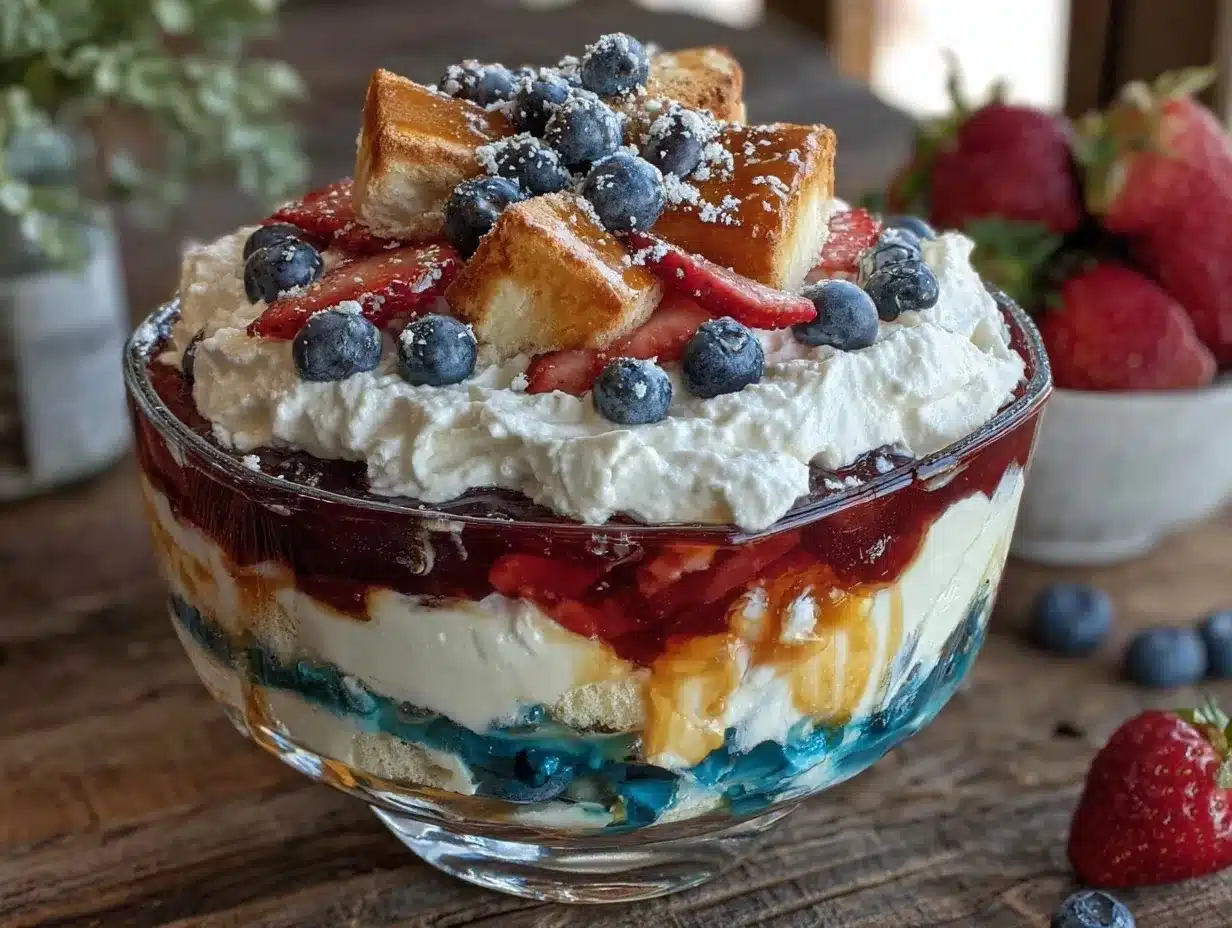
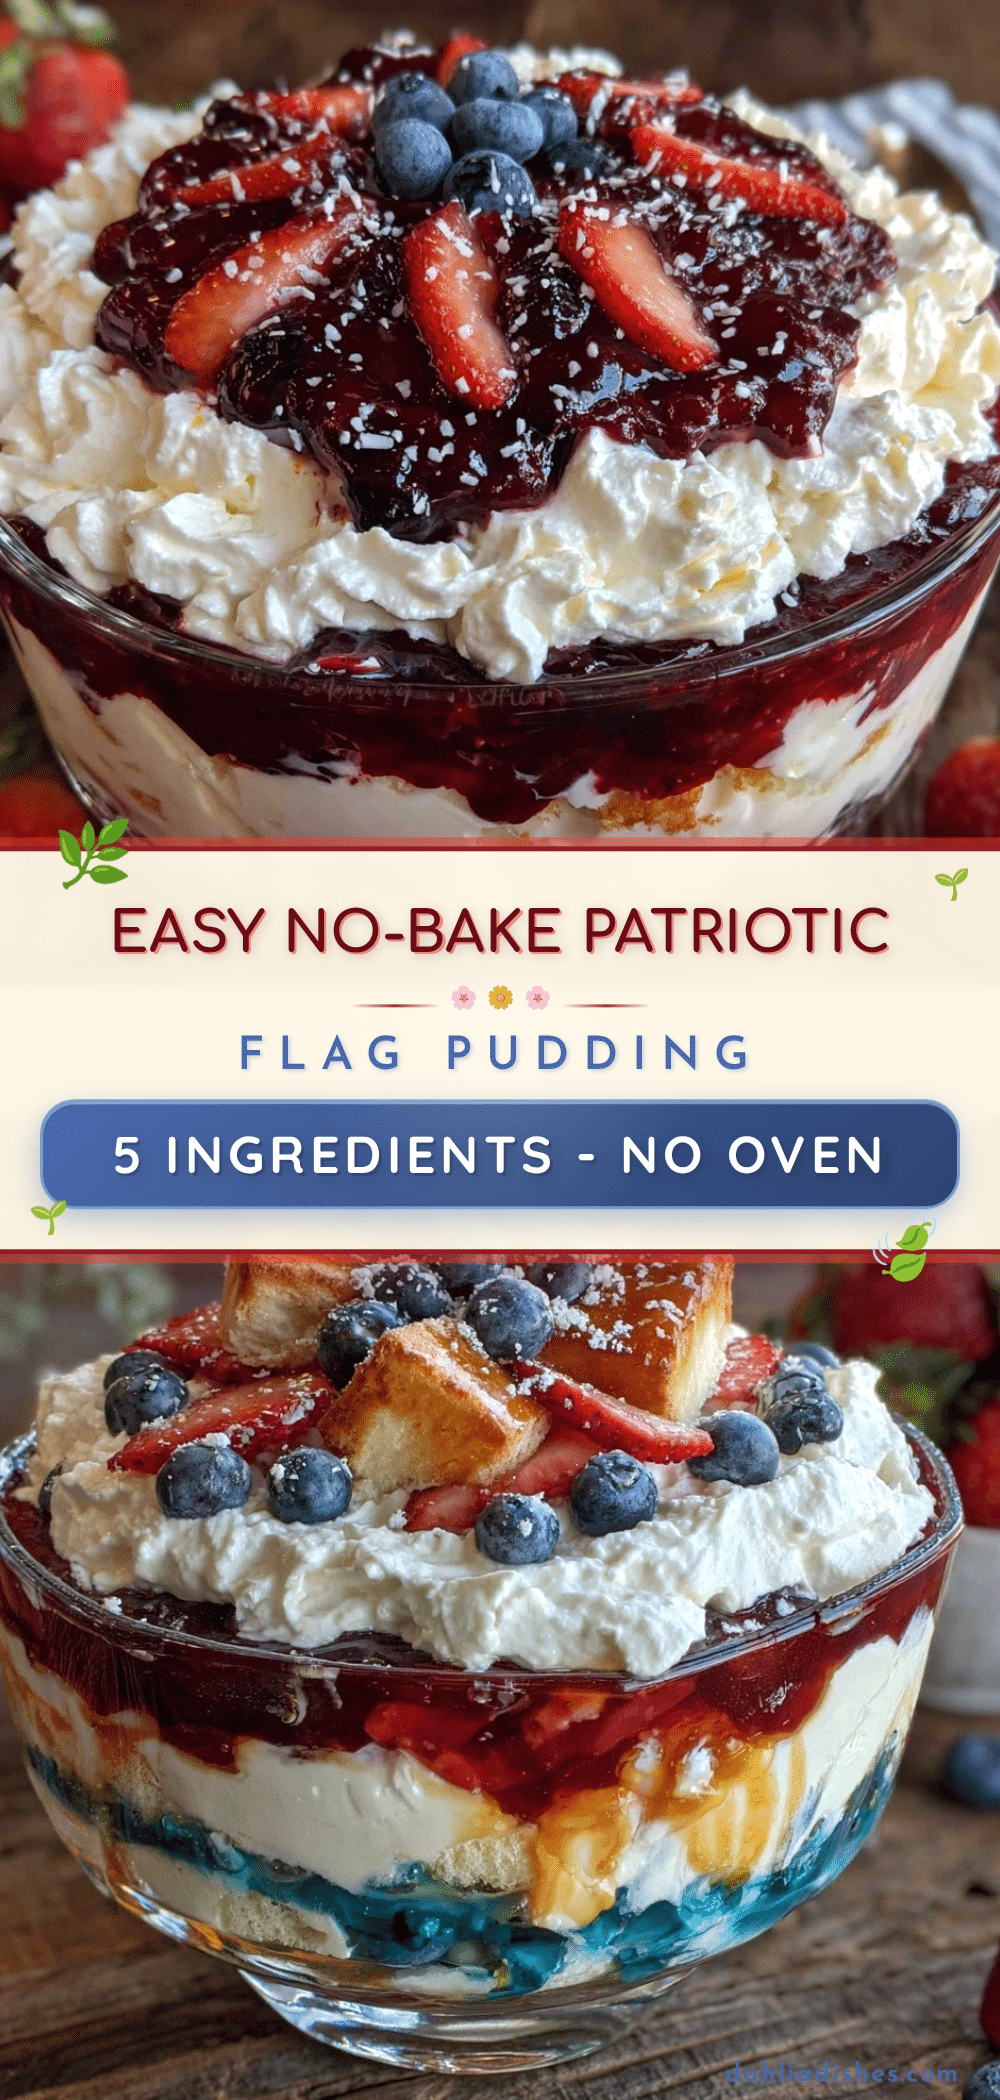
- Layer 4 – Strawberries & Blueberries: Create your flag colors: place sliced strawberries on one half of the dish and blueberries on the other. Don’t worry if it’s not perfect—rustic charm counts here! This layer gives the dessert its signature look.
- Layer 5 – Final Pudding & Whipped Topping: Spread the remaining pudding over the fruit layer, then top with the last of the whipped topping. This seals in the flavors and keeps everything creamy.
- Chill: Cover the dish with plastic wrap and refrigerate for at least 4 hours, or overnight. This step is crucial—it lets the layers meld and the flavors develop.
Pro Tip: If your bananas brown too quickly, toss slices in a little lemon juice before layering. Also, don’t rush the chilling—it really makes the pudding set just right.
Cooking Tips & Techniques
When making no-bake layered desserts like this, timing and texture are everything. Here are some tips I’ve learned the hard way:
- Whisking puddings: You want a smooth, lump-free pudding. Whisk quickly but steadily. If you stop too soon, you’ll end up with clumps that spoil the silky texture.
- Layering gently: Use a spatula to spread layers carefully. You’re aiming for visible layers but not mixing them together.
- Fruit prep matters: Fresh fruit should be dry to avoid watery layers. Pat berries and banana slices with paper towels if needed.
- Chilling time: Resist the urge to serve early—pudding thickens and flavors harmonize best after several hours.
- Multitasking: While the pudding sets, you can prep other dishes or clean up. This recipe is perfect for busy cooks who want a killer dessert without babysitting the oven.
I once tried rushing the chilling step and ended up with a runny mess that no one wanted to touch. Lesson learned: patience pays off deliciously every time.
Variations & Adaptations
This no-bake flag pudding recipe is pretty flexible, so feel free to adapt it to your taste or dietary needs.
- Seasonal Fruit Swap: Use raspberries and blackberries instead of strawberries and blueberries for a late summer twist.
- Dairy-Free Version: Substitute coconut milk for regular milk and use a dairy-free whipped topping like So Delicious brand. The coconut flavor pairs surprisingly well.
- Chocolate Layer: Add a layer of chocolate pudding in place of one vanilla layer for a rich surprise.
- Lower Sugar: Use sugar-free pudding mix and skip the extra sugar if you want a lighter dessert.
One time, I swapped bananas for thinly sliced kiwi, which added a tart contrast that my family loved. Don’t be afraid to get creative with the layers!
Serving & Storage Suggestions
Serve this flag pudding chilled straight from the fridge for the creamiest texture and freshest flavor. It’s a fantastic centerpiece for summer parties or casual get-togethers.
Pair it with a light sparkling beverage or a fresh iced tea to balance the richness. I recall one afternoon when I served this alongside a tangy lemon sorbet, and the combo was surprisingly delightful.
To store, cover with plastic wrap and refrigerate for up to 3 days. The layers may soften slightly, but the flavors actually deepen overnight. Avoid freezing, as the pudding texture doesn’t hold up well in the freezer.
When reheating (if you want it a little softer), just let it sit at room temperature for 10-15 minutes—no microwave needed.
Nutritional Information & Benefits
This dessert is more than just tasty—it offers some nutritional perks too. With fresh fruit in every layer, you’re getting a boost of vitamins, antioxidants, and fiber alongside the creamy indulgence.
Per serving (about 1 cup / 250 ml), you can expect roughly:
| Nutrient | Amount |
|---|---|
| Calories | 220-270 kcal |
| Fat | 9-12 g |
| Carbohydrates | 30-35 g |
| Protein | 4-6 g |
The recipe is naturally gluten-free, but be sure to check your pudding mix if you have allergies. The fresh fruit adds natural sweetness with less need for added sugar, making it a balanced treat you can feel good about sharing.
Conclusion
If you want a dessert that’s as simple as it is stunning, this Easy No-Bake Flag Pudding with 5 Layers of Creamy Goodness is your answer. It’s a recipe that’s stayed with me for years—not just because it’s fuss-free, but because every layer tells a story of flavor, texture, and happy memories.
Feel free to tweak the fruits or swap ingredients to suit your taste. I love how this pudding invites creativity, so make it your own, and don’t forget to savor every creamy, fruity bite!
Got your own twist on this dessert or a question about the layers? Drop a comment below—I’m excited to hear how your pudding turns out!
Here’s to easy, delicious, no-bake treats that bring people together—one spoonful at a time.
FAQs
Can I make the Easy No-Bake Flag Pudding ahead of time?
Yes! In fact, chilling it overnight helps the layers set beautifully and the flavors meld. Just cover it tightly with plastic wrap and keep refrigerated.
What if I don’t have instant pudding mix?
You can make homemade vanilla pudding using cornstarch, sugar, milk, and vanilla, but it will require cooking and cooling, so it’s not as quick. Instant pudding keeps this recipe super easy.
Can I use frozen fruit instead of fresh?
It’s best to use fresh fruit for the flag colors since frozen berries can release extra moisture and make the layers watery, but if you thaw and drain them well, it can work in a pinch.
Is this recipe suitable for kids?
Absolutely! Kids love the colorful layers and creamy taste. It’s also a fun way to introduce them to simple no-bake desserts.
How do I keep bananas from browning in the pudding?
Toss banana slices in a little lemon juice before layering to slow browning and keep them looking fresh longer.
Pin This Recipe!
Easy No-Bake Flag Pudding Recipe with 5 Creamy Layers to Impress
A quick and easy no-bake layered dessert featuring five creamy layers with fresh fruit, perfect for patriotic holidays and summer gatherings.
- Prep Time: 15 minutes
- Cook Time: 0 minutes
- Total Time: 4 hours 15 minutes
- Yield: 12 servings 1x
- Category: Dessert
- Cuisine: American
Ingredients
- 2 packets instant vanilla pudding mix (about 3.4 oz or 96g each)
- 4 cups cold milk (whole milk preferred, 2% acceptable)
- 2 cups whipped topping, thawed (store-bought like Cool Whip or homemade whipped cream)
- 2 cups sliced fresh strawberries
- 1 cup blueberries
- 2 medium bananas, sliced
- 1 teaspoon vanilla extract
- 2 tablespoons sugar (optional)
Instructions
- In a large mixing bowl, whisk together the 2 packets of instant vanilla pudding mix with 4 cups (960 ml) cold milk. Whisk vigorously for about 2 minutes until the pudding thickens. Let it sit for 5 minutes to fully set.
- Prepare the whipped topping: thaw store-bought whipped topping or whip 2 cups (480 ml) of heavy cream with 1 teaspoon vanilla extract until soft peaks form.
- Spread half of the prepared pudding evenly into the bottom of a 9×13 inch (23×33 cm) glass baking dish.
- Arrange the sliced bananas evenly over the pudding layer.
- Spread half of the whipped topping over the bananas, smoothing it gently with a spatula.
- Create the flag colors by placing sliced strawberries on one half of the dish and blueberries on the other half.
- Spread the remaining pudding over the fruit layer, then top with the remaining whipped topping.
- Cover the dish with plastic wrap and refrigerate for at least 4 hours or overnight to let the layers set and flavors meld.
Notes
Toss banana slices in lemon juice before layering to prevent browning. Use fresh fruit for best texture and appearance. Chill for at least 4 hours or overnight for best results. Can substitute dairy-free milk and whipped topping for a dairy-free version. Avoid freezing as pudding texture will be compromised.
Nutrition
- Serving Size: About 1 cup (250 ml)
- Calories: 220270
- Fat: 912
- Carbohydrates: 3035
- Protein: 46
Keywords: no-bake dessert, flag pudding, layered pudding, summer dessert, patriotic dessert, easy pudding recipe, creamy dessert, fruit pudding