Love this? Save it for later!
Share the inspiration with your friends
“I wasn’t planning a fancy dessert that night,” I remember saying to myself as I rummaged through my fridge looking for a quick fix after a long day. It was one of those evenings where I had no energy to bake or fuss over complicated recipes. Honestly, I almost settled for store-bought pudding when my phone rang. My best friend, Jenna, was stopping by with her kids in just 30 minutes. Panic set in—no dessert, guests arriving, and zero prep time.
Then, I spotted a jar of dulce de leche hiding behind the milk carton and a block of dark chocolate I’d meant to use weeks ago but forgot. “Why not try something simple, no bake?” I thought, tossing those ingredients together with some whipped cream. The kitchen turned into a bit of a mess—spilled dulce de leche on the counter, a cracked bowl (don’t ask), and a timer that I accidentally set for 15 minutes instead of 5. But when I spooned that first creamy bite into my mouth, I was hooked.
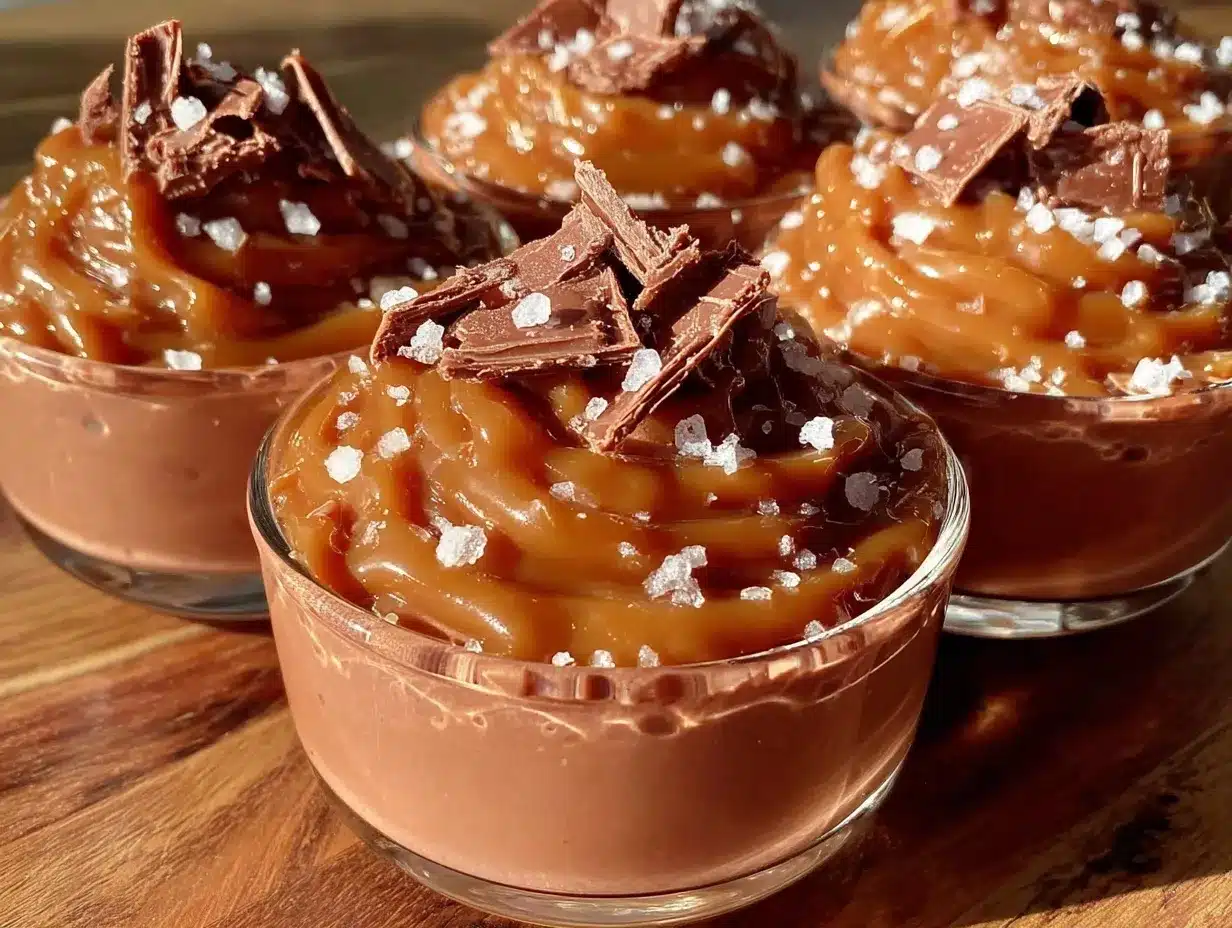
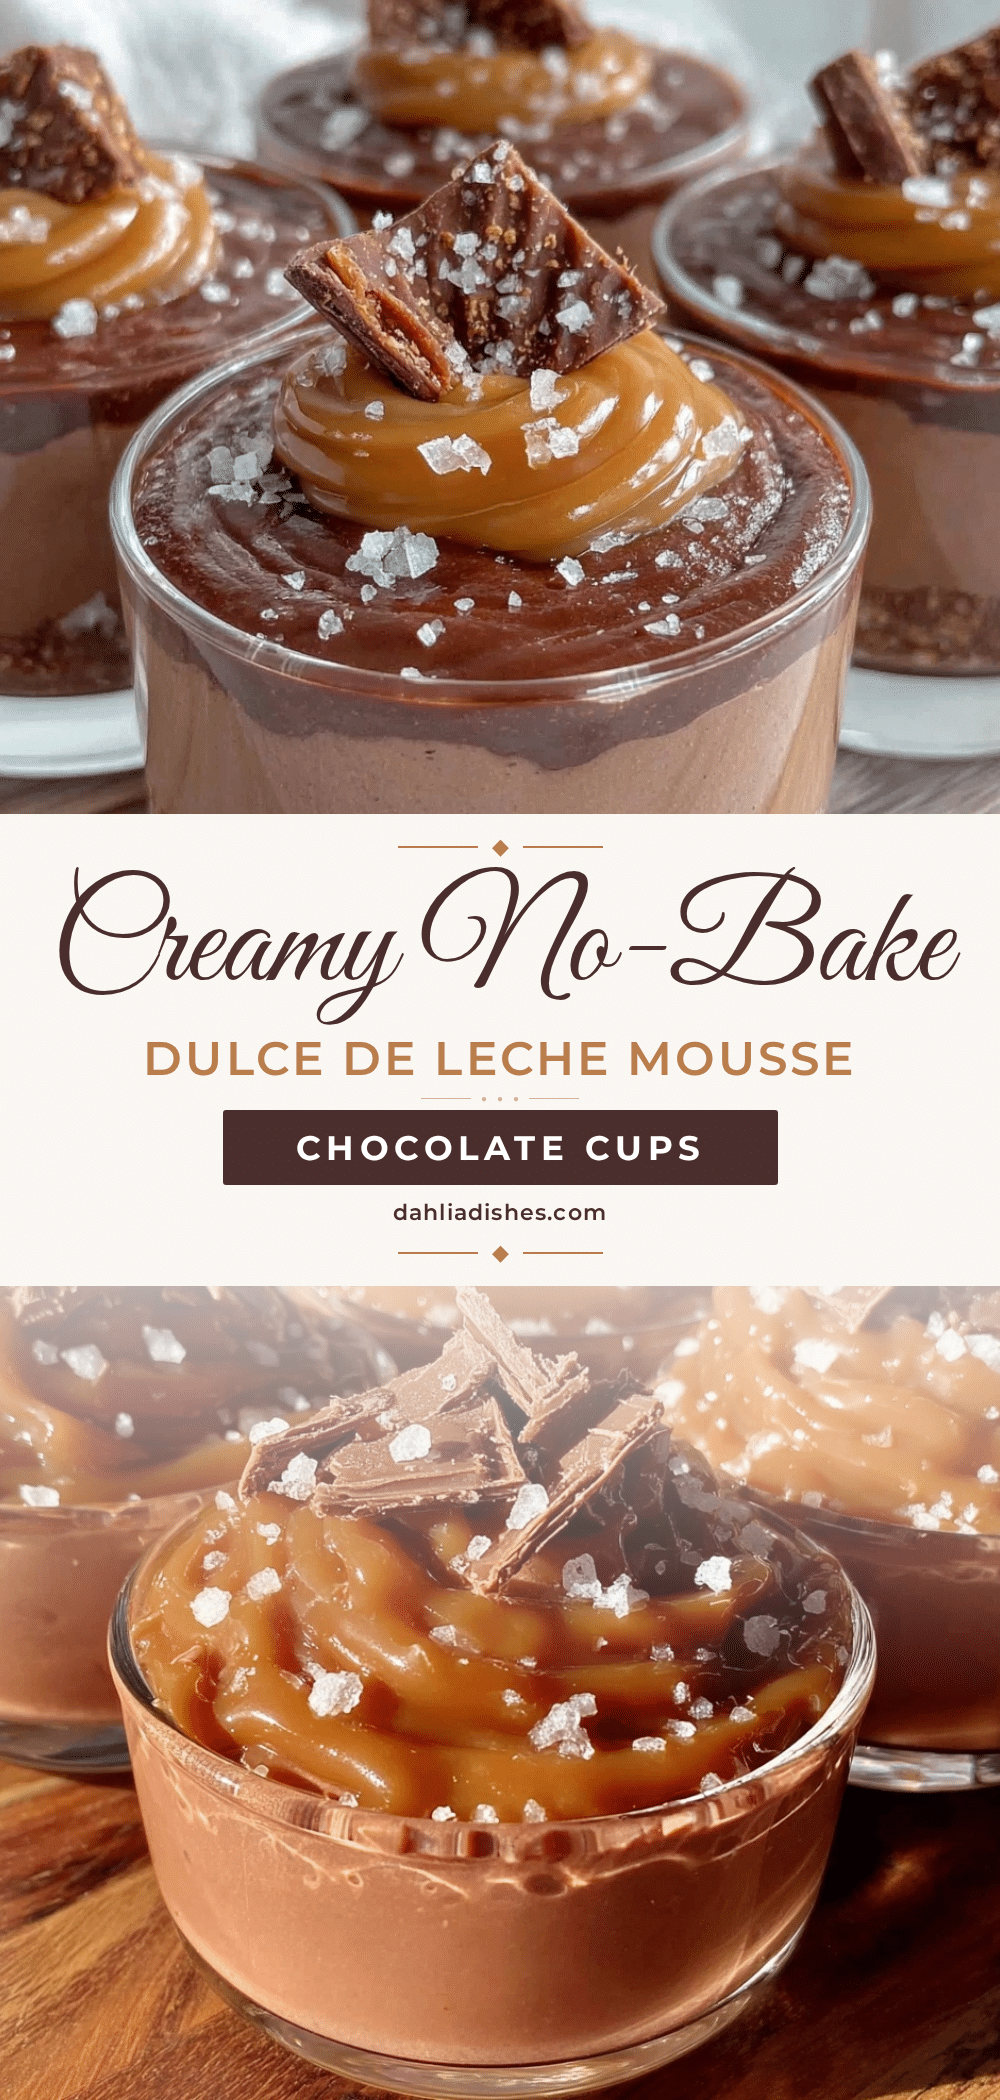
Those creamy no-bake dulce de leche chocolate mousse cups became an instant favorite. Maybe you’ve been there—needing a quick dessert that feels indulgent but doesn’t have you turning the kitchen upside down. This recipe is exactly that: a little sweet magic made without an oven, without stress, and with a whole lot of heart. Since that night, I’ve made it countless times for friends, potlucks, and even quiet solo treats. It’s rich, smooth, and perfectly balanced between caramel sweetness and deep chocolate flavor—a combo that just feels like a warm hug, you know?
So, if you’re craving an easy-to-make dessert that looks impressive but won’t take all evening, let me tell you, these mousse cups will become your go-to. I still laugh thinking about that cracked bowl and the frantic moments before Jenna arrived, but honestly, those little kitchen mishaps led me to a recipe worth sharing with you today.
Why You’ll Love This Creamy No-Bake Dulce de Leche Chocolate Mousse Cups Recipe
This recipe isn’t just another chocolate mousse. I’ve tested it over and over—sometimes with slightly less dulce de leche, sometimes swapping in whipped coconut cream for a dairy-free version—and it always turns out dreamy. Here’s why you’ll want to keep this one in your dessert rotation:
- Quick & Easy: Ready in under 20 minutes, perfect for last-minute guests or those cozy dessert cravings.
- Simple Ingredients: No specialty stores needed—just pantry staples like dark chocolate, dulce de leche, and heavy cream.
- Perfect for Any Occasion: Whether it’s a casual weeknight treat or a fancy dinner party finale, these mousse cups fit right in.
- Crowd-Pleaser: Rich chocolate and caramel flavors always get rave reviews from kids and adults alike.
- Unbelievably Delicious: The silky texture combined with that sweet, caramel note makes this mousse truly special.
What makes this recipe stand out? It’s the smooth integration of luscious dulce de leche into a classic chocolate mousse base, creating a flavor profile that’s both familiar and exciting. Plus, no baking means less worry about timing or burnt edges. Honestly, the mousse’s melt-in-your-mouth texture is what keeps me coming back, especially on those evenings when I want something fancy but fuss-free.
So, whether you’re a seasoned dessert maker or just looking for a sweet win, this recipe is an easy way to impress without the stress. And hey, if you’re a fan of chocolate avocado mousse or want to try something similar but with a caramel twist, this will be right up your alley.
What Ingredients You Will Need
This recipe uses simple, wholesome ingredients to deliver bold flavor and that perfect creamy texture without the fuss. Most of these are pantry staples, but if you want a little extra flair, I’ll share some of my favorite brands and tips below.
- Dark Chocolate (6 oz / 170 g): Use good-quality semi-sweet or bittersweet chocolate. I like Ghirardelli or Valrhona for their smooth melting properties.
- Dulce de Leche (1 cup / 240 ml): This is the star—look for a thick, creamy caramel spread. Homemade or store-bought both work, but avoid runny versions for best results.
- Heavy Cream (1 ½ cups / 360 ml): Chilled, for whipping. You can substitute with coconut cream if you need dairy-free.
- Powdered Sugar (2 tbsp / 25 g): Helps stabilize the whipped cream and adds just the right sweetness.
- Vanilla Extract (1 tsp / 5 ml): Adds warmth and depth to the mousse.
- Sea Salt (a pinch): Optional but highly recommended to balance the sweetness.
For a little crunch or garnish, you might want to keep some chopped nuts, chocolate shavings, or crushed cookies handy. I personally often sprinkle a few toasted hazelnuts on top—it adds a nice texture contrast.
Substitution tips: If you can’t find dulce de leche, sweetened condensed milk slowly cooked until caramelized works well. For a lighter version, try swapping half the heavy cream with Greek yogurt (though it changes the texture a bit). This recipe is forgiving, so feel free to experiment!
Equipment Needed
- Mixing Bowls: At least two—one for whipping cream and one for melting chocolate.
- Electric Mixer or Whisk: An electric hand mixer is ideal for whipping heavy cream to soft peaks, but a sturdy whisk works if you have the arm strength.
- Heatproof Bowl: For melting chocolate over simmering water (double boiler method) or use a microwave-safe bowl.
- Spoons or Spatulas: Silicone spatulas are perfect for folding ingredients without deflating the mousse.
- Serving Cups or Glasses: Small dessert cups, ramekins, or even mason jars work well for individual servings.
If you don’t have a double boiler, no worries—microwaving chocolate in short bursts (20-30 seconds) and stirring often is a safe alternative. Personally, I like using a glass bowl over a saucepan of simmering water because it’s gentle and keeps the chocolate silky smooth without burning.
Preparation Method
- Melt the Chocolate: Chop 6 oz (170 g) of dark chocolate finely. Place it in a heatproof bowl over simmering water (double boiler) or microwave in 20-second intervals, stirring each time until fully melted and smooth. This should take about 5 minutes. Be careful not to overheat—it should be glossy and silky, not grainy.
- Whip the Cream: In a chilled mixing bowl, combine 1 ½ cups (360 ml) heavy cream, 2 tbsp (25 g) powdered sugar, and 1 tsp (5 ml) vanilla extract. Whip with an electric mixer or whisk until soft peaks form. This usually takes around 3 to 5 minutes. Don’t overbeat or it will turn to butter—soft peaks mean the cream holds shape but still looks slightly glossy.
- Fold in Dulce de Leche: Gently fold 1 cup (240 ml) of dulce de leche into the whipped cream. Use a spatula and slow, sweeping motions to keep the air in. This step takes about 2 minutes. The mixture should look smooth and creamy with a beautiful caramel tint.
- Combine Chocolate and Dulce Cream: Slowly pour the melted chocolate into the dulce de leche cream mixture. Fold carefully until fully combined and uniform in color. This step is critical to maintain the mousse’s light texture—take your time and don’t stir too vigorously.
- Portion the Mousse: Spoon the mousse evenly into 6 small cups or ramekins. Smooth the tops with a spatula or back of a spoon for a neat presentation. This takes about 5 minutes.
- Chill: Refrigerate the mousse cups for at least 2 hours or overnight. The mousse firms up and the flavors meld beautifully during this time.
- Serve: Just before serving, sprinkle with a pinch of sea salt or garnish with chocolate shavings, chopped nuts, or a dollop of whipped cream.
Pro tip: If your dulce de leche is a bit stiff or crystallized, warm it gently before folding to make it easier to incorporate. And if the mousse feels too dense after chilling, let it sit at room temperature for 10 minutes before serving—it softens perfectly.
Cooking Tips & Techniques for Perfect Mousse Every Time
Making mousse might sound fancy, but mastering a few simple techniques can make it foolproof. Here are some of my best tips:
- Chocolate Tempering: Melt chocolate gently to avoid seizing. If your chocolate does seize (gets grainy), adding a teaspoon of warm cream can help smooth it out.
- Whipping Cream: Chill your bowl and beaters beforehand for fluffier whipped cream. Stop whipping the moment soft peaks form—overwhipping leads to curdled texture.
- Folding: Use a gentle folding motion with a rubber spatula—cut through the middle, scoop around the edges, and turn the bowl. This keeps the mousse airy.
- Mixing Order: Always fold dulce de leche into the whipped cream before adding melted chocolate. This layering helps maintain texture and prevents the mousse from becoming too dense.
- Timing: Chill mousse at least 2 hours; overnight is best for flavor development. If in a rush, freeze for 30 minutes but watch closely to avoid freezing solid.
I remember my first attempt ignoring the chilling step—what a mistake! The mousse was runny and sad. You know that feeling when you’re so eager to taste but patience is key? Definitely worth the wait.
Variations & Adaptations
This creamy no-bake dulce de leche chocolate mousse recipe is pretty flexible. Here are some ways to switch it up to suit your taste or dietary needs:
- Dairy-Free Version: Use full-fat coconut cream instead of heavy cream and check that your chocolate is dairy-free. The mousse will have a subtle coconut undertone, which pairs surprisingly well with dulce de leche’s caramel flavor.
- Seasonal Twist: Add a teaspoon of cinnamon or orange zest into the whipped cream for a warm, festive touch. In summer, garnish with fresh berries to brighten the richness.
- Extra Crunch: Fold in crushed cookies, toasted nuts, or bits of toffee for texture contrast. I once added crushed crispy garlic chicken skin as a savory experiment—okay, that’s a joke, but imagine the sweet crunch options!
- Lower Sugar: Swap powdered sugar for a natural sweetener like maple syrup or honey. Adjust to taste, since dulce de leche is already quite sweet.
Personally, I tried mixing in a tablespoon of espresso powder once for a mocha mousse version. It was a hit at brunch with friends—so feel free to get creative!
Serving & Storage Suggestions
Serve these mousse cups chilled, straight from the fridge. The creamy texture and rich flavor are best enjoyed cold but not icy. For presentation, clear glasses or small jars showcase the beautiful caramel-hued mousse perfectly.
Pair the mousse with a light, crisp dessert wine or a fresh espresso to balance the sweetness. Simple fresh berries or a sprig of mint add a refreshing pop of color and flavor.
Storage is easy: cover the cups tightly with plastic wrap or lids and refrigerate for up to 3 days. If you want to keep them longer, freeze for up to one month. When reheating from frozen, thaw in the fridge overnight and bring to room temperature before serving for best texture.
Fun fact: the flavors actually deepen if you let the mousse sit overnight, making it even more luscious the next day. So if you’re prepping ahead, you’re in for a treat!
Nutritional Information & Benefits
Each serving of these creamy no-bake dulce de leche chocolate mousse cups (about 1/6th of the recipe) roughly contains:
| Calories | 320 kcal |
|---|---|
| Fat | 24 g |
| Saturated Fat | 14 g |
| Sugar | 22 g |
| Protein | 4 g |
This dessert is rich and indulgent, thanks mainly to the heavy cream and chocolate. Dulce de leche adds sugar and some calcium. If you choose coconut cream or substitute sweeteners, you can tweak the nutritional profile to fit your needs.
While not a health food, it’s a comforting treat that satisfies that sweet tooth without complicated ingredients. For those with gluten intolerance, this recipe is naturally gluten-free if you avoid cookie garnishes. Just watch out for dairy allergies if you’re not using substitutions.
Conclusion
If you want a dessert that’s creamy, decadent, and as easy as it is impressive, these creamy no-bake dulce de leche chocolate mousse cups are a winner. They’ve saved me countless times when I needed something quick but special, and I bet they’ll do the same for you.
Feel free to tweak the sweetness, experiment with toppings, or try my dairy-free twist. Honestly, once you make this, you might find yourself sneaking bites straight from the fridge like I do! I’d love to hear how your mousse cups turn out, so drop a comment or share your favorite variations.
Remember, dessert doesn’t have to be complicated to be unforgettable. Happy indulging!
FAQs About Creamy No-Bake Dulce de Leche Chocolate Mousse Cups
Can I make this mousse ahead of time?
Absolutely! It tastes even better after chilling overnight. Just cover and refrigerate until ready to serve.
What if I don’t have dulce de leche?
You can use sweetened condensed milk heated gently until caramelized as a substitute. It won’t be exactly the same but still delicious.
Is there a vegan version of this mousse?
Yes! Use coconut cream instead of heavy cream and dairy-free chocolate. Just make sure your dulce de leche substitute is vegan-friendly or try a homemade coconut caramel.
How do I prevent the mousse from getting grainy?
Make sure to melt the chocolate slowly and fold ingredients gently to keep the mousse smooth and airy.
Can I double the recipe for a bigger crowd?
Definitely! Just double all ingredients and mix in a larger bowl. Chill the mousse cups in batches or use larger serving dishes.
Pin This Recipe!
Creamy No-Bake Dulce de Leche Chocolate Mousse Cups

A quick and easy no-bake dessert combining rich dark chocolate and luscious dulce de leche for a creamy, indulgent mousse perfect for any occasion.
- Prep Time: 10 minutes
- Cook Time: 5 minutes
- Total Time: 2 hours 15 minutes
- Yield: 6 servings 1x
- Category: Dessert
- Cuisine: International
Ingredients
- 6 oz (170 g) dark chocolate (semi-sweet or bittersweet)
- 1 cup (240 ml) dulce de leche
- 1 ½ cups (360 ml) heavy cream, chilled
- 2 tbsp (25 g) powdered sugar
- 1 tsp (5 ml) vanilla extract
- Pinch of sea salt (optional)
- Optional garnishes: chopped nuts, chocolate shavings, crushed cookies, whipped cream
Instructions
- Chop 6 oz (170 g) dark chocolate finely. Melt it in a heatproof bowl over simmering water (double boiler) or microwave in 20-second intervals, stirring until smooth and glossy, about 5 minutes.
- In a chilled mixing bowl, whip 1 ½ cups (360 ml) heavy cream with 2 tbsp (25 g) powdered sugar and 1 tsp (5 ml) vanilla extract until soft peaks form, about 3 to 5 minutes.
- Gently fold 1 cup (240 ml) dulce de leche into the whipped cream using a spatula with slow, sweeping motions until smooth and creamy.
- Slowly pour the melted chocolate into the dulce de leche cream mixture and fold carefully until fully combined and uniform in color.
- Spoon the mousse evenly into 6 small cups or ramekins and smooth the tops with a spatula or spoon.
- Refrigerate the mousse cups for at least 2 hours or overnight to firm up and meld flavors.
- Before serving, sprinkle with a pinch of sea salt or garnish with chocolate shavings, chopped nuts, or whipped cream.
Notes
Warm dulce de leche gently if stiff before folding. Let mousse sit at room temperature for 10 minutes if too dense after chilling. Use gentle folding to keep mousse airy. Chill at least 2 hours or overnight for best flavor. Can substitute coconut cream and dairy-free chocolate for a vegan version.
Nutrition
- Serving Size: About 1 mousse cup (
- Calories: 320
- Sugar: 22
- Sodium: 50
- Fat: 24
- Saturated Fat: 14
- Carbohydrates: 28
- Fiber: 2
- Protein: 4
Keywords: no-bake, dulce de leche, chocolate mousse, easy dessert, quick dessert, creamy mousse, caramel chocolate dessert