Love this? Save it for later!
Share the inspiration with your friends
“I wasn’t expecting to become the unofficial cake decorator of my friend group,” I confessed to Emma as we scrambled around the kitchen the night before graduation. It was a late Thursday evening, and the party was less than 12 hours away. The plan was simple: bring something sweet that screamed celebration. Then I remembered the idea for a chocolate drip cake shaped like a graduation cap—complete with shimmering gold glitter that I’d spotted at a boutique bakery downtown. Problem was, I’d never made a drip cake before, and the gold glitter was still sitting on my counter, unopened.
The sizzle of melting chocolate mixed with the faint hum of the fridge became the soundtrack of that hectic night. I had no fancy equipment, and honestly, my first attempt was a bit messy—there was chocolate where it shouldn’t be, and the glitter fell a little unevenly. But when I stepped back and looked at the cake, it was like the whole room lit up. That “wow” moment made all the chaos worth it, and surprisingly, the cake was a hit at the party.
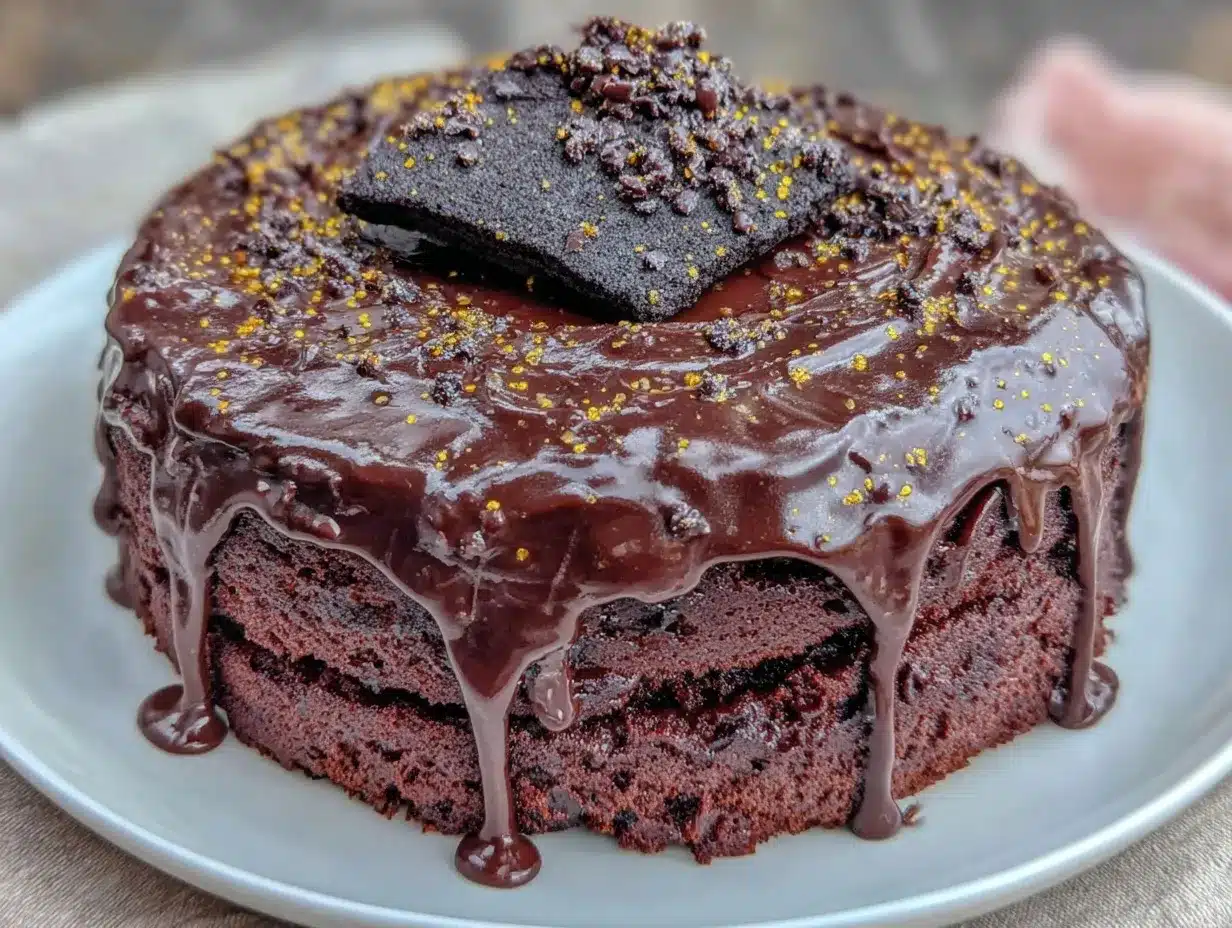
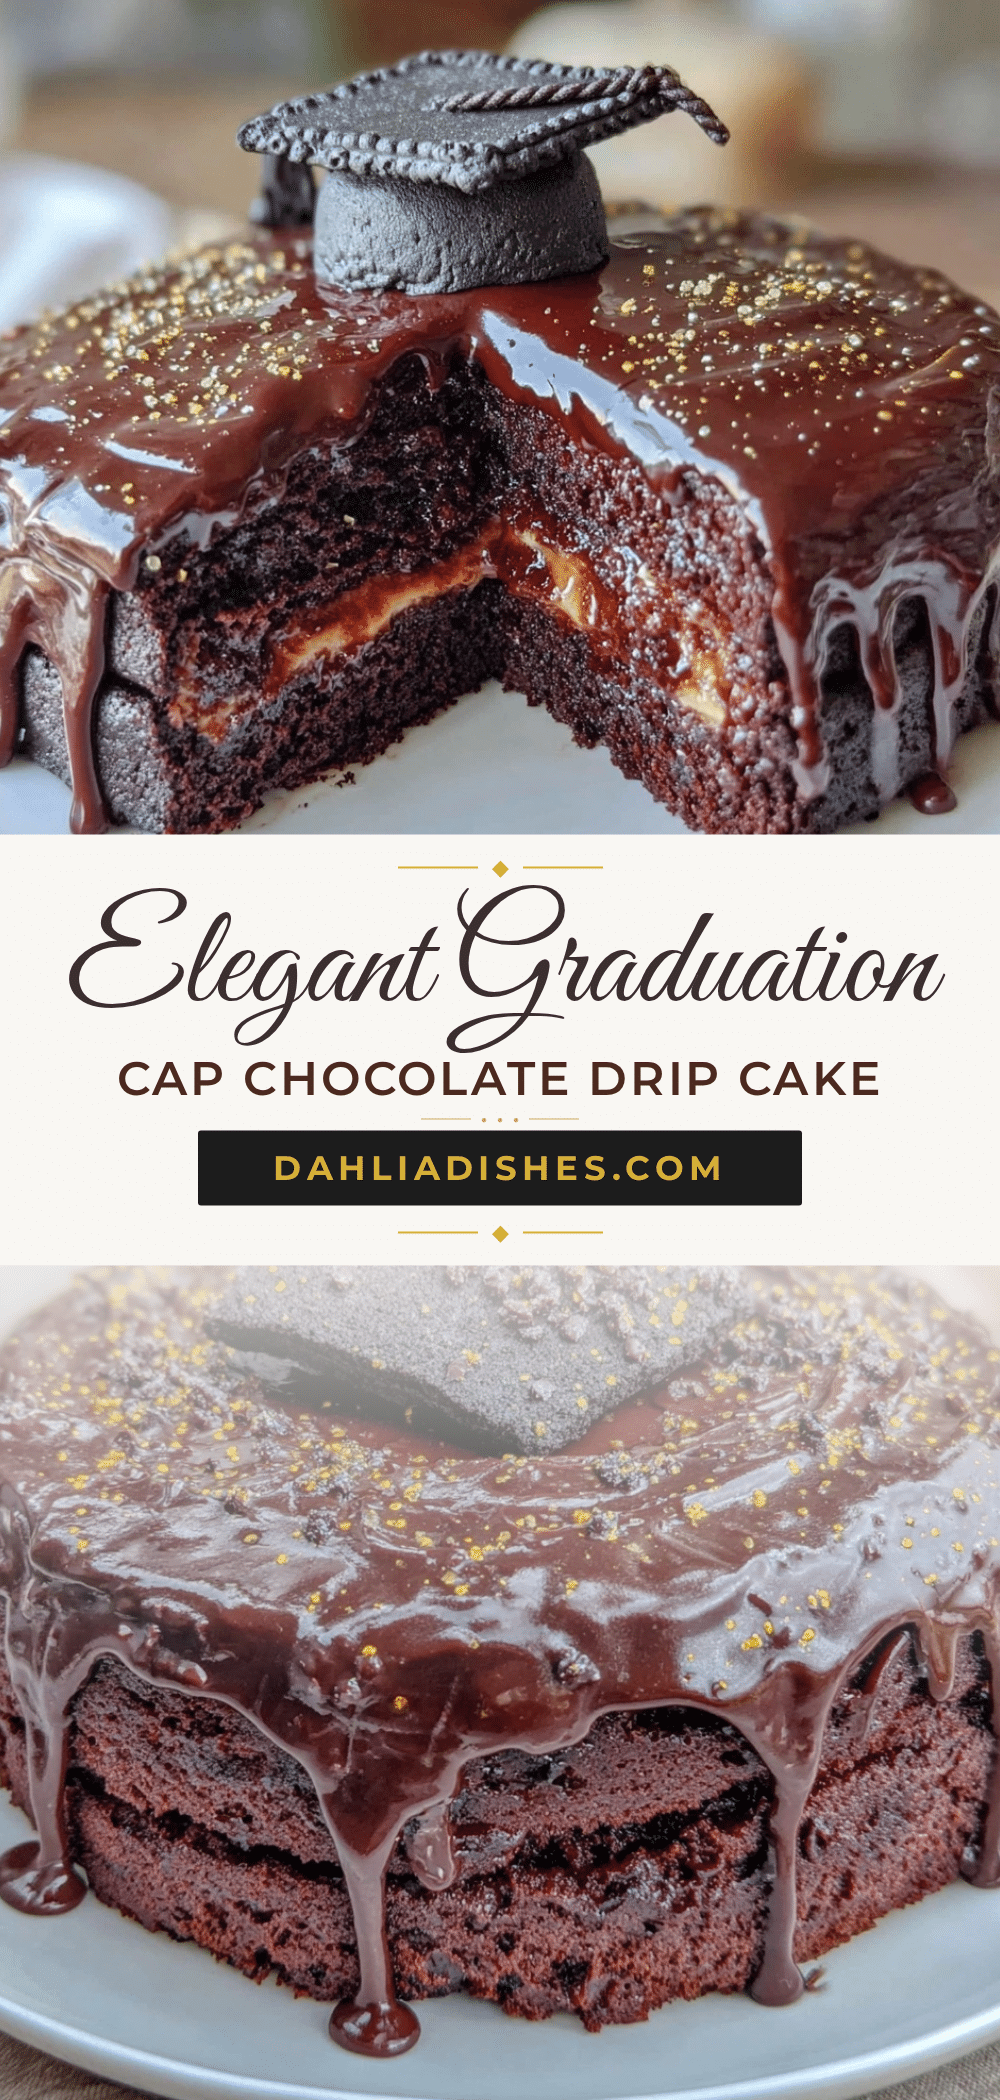
Maybe you’ve been there—the clock’s ticking, you want something stunning but quick, and the pressure is real. This Perfect Graduation Cap Chocolate Drip Cake with Gold Glitter has stuck with me ever since because it’s fun, festive, and honestly, not as complicated as it seems. So let me tell you how to bring a bit of that magic to your celebration table, with less mess and all the sparkle.
Why You’ll Love This Recipe
After testing this recipe multiple times (trust me, I’ve learned a thing or two through the trial and error), it’s become a favorite for marking milestones with a delicious bang. Here’s why you’ll want to make this Perfect Graduation Cap Chocolate Drip Cake with Gold Glitter your go-to celebration centerpiece:
- Quick & Easy: Comes together in under 2 hours, making it ideal for last-minute party planning or spontaneous celebrations.
- Simple Ingredients: Uses pantry staples like cocoa powder, butter, and sugar—no hunting for exotic items.
- Perfect for Graduation Parties: The cap design and gold glitter add that extra festive touch, perfect for honoring graduates.
- Crowd-Pleaser: Chocolate lovers of all ages rave about the moist layers and silky drip.
- Unbelievably Delicious: The rich chocolate cake paired with the glossy ganache drip creates a texture and flavor combo that’s pure comfort food.
This isn’t just any chocolate drip cake. The special twist? The homemade gold glitter, which is edible and adds a classy shimmer without any weird aftertaste. Plus, the way the drip cascades naturally over the edges without fuss makes it approachable even if you’re new to cake decorating. Honestly, it’s the kind of dessert that makes guests pause and say, “Wow, did you make this?” (Yes, you did!)
What Ingredients You Will Need
This recipe uses simple, wholesome ingredients to deliver bold flavor and that perfect moist texture without the fuss. Most items are pantry staples, so you probably have them on hand already.
- For the Chocolate Cake:
- All-purpose flour, 2 cups (240g)
- Granulated sugar, 2 cups (400g)
- Unsweetened cocoa powder, 3/4 cup (65g) – I prefer Valrhona for its deep flavor
- Baking powder, 1 1/2 tsp
- Baking soda, 1 1/2 tsp
- Salt, 1 tsp
- Large eggs, 2, room temperature
- Whole milk, 1 cup (240ml)
- Vegetable oil, 1/2 cup (120ml)
- Vanilla extract, 2 tsp
- Boiling water, 1 cup (240ml) – adds moisture and intensifies the chocolate
- For the Chocolate Ganache Drip:
- Heavy cream, 1 cup (240ml)
- Semisweet chocolate chips, 8 oz (230g) – use Ghirardelli for a smooth finish
- Unsalted butter, 2 tbsp, room temperature (adds shine)
- For the Buttercream Frosting:
- Unsalted butter, 1 cup (227g), softened
- Powdered sugar, 4 cups (480g)
- Unsweetened cocoa powder, 1/2 cup (43g)
- Heavy cream or whole milk, 3-4 tbsp (to adjust consistency)
- Vanilla extract, 1 tsp
- Pinch of salt
- For Decoration:
- Edible gold glitter – homemade from a simple mix of sugar and edible gold dust (recipe below)
- Black fondant or modeling chocolate (to create the graduation cap topper)
- White fondant or royal icing (for the tassel)
If you want a gluten-free option, swap the all-purpose flour with a gluten-free baking blend that measures cup-for-cup. For dairy-free, substitute the milk and cream with coconut or almond milk, and use dairy-free butter alternatives.
Equipment Needed
- Two 8-inch (20 cm) round cake pans – non-stick or greased and lined with parchment paper
- Mixing bowls (large and medium)
- Electric mixer or stand mixer – hand beaters work, but the mixer saves time and effort
- Measuring cups and spoons – accuracy matters here
- Spatulas (rubber and offset) – the offset spatula helps with smooth frosting
- Saucepan for ganache
- Wire rack – for cooling the cake layers
- Bench scraper or cake smoother – optional but helpful for clean frosting edges
- Piping bag (optional) – for decorating tassels or precise frosting details
If you don’t have a cake smoother, a flat spatula or even the back of a spoon can do the trick in a pinch. I once made this cake using mismatched bowls and a hand whisk because my mixer was out of commission—and it turned out just fine, though it took a bit longer!
Preparation Method
- Preheat your oven to 350°F (175°C). Grease and line two 8-inch round cake pans with parchment paper. This step ensures your cakes will release easily.
- Mix dry ingredients: In a large bowl, sift together 2 cups flour, 2 cups sugar, 3/4 cup cocoa powder, 1 1/2 tsp baking powder, 1 1/2 tsp baking soda, and 1 tsp salt. Give it a quick whisk to combine evenly.
- Combine wet ingredients: In a separate bowl, whisk 2 large eggs, 1 cup milk, 1/2 cup vegetable oil, and 2 tsp vanilla extract until smooth.
- Mix batter: Slowly add the wet ingredients to the dry, stirring gently until combined. Then, carefully pour in the 1 cup boiling water (yes, boiling!) and stir until smooth. The batter will be thin, but that’s perfect for a moist cake.
- Bake: Divide batter evenly between the pans. Bake for 30-35 minutes or until a toothpick comes out clean. Watch closely after 30 minutes to avoid overbaking.
- Cool: Let cakes cool in the pans for 10 minutes, then transfer to wire racks to cool completely. You want the cakes fully cool before frosting to prevent melting.
- Make buttercream: Using a mixer, beat 1 cup softened butter until creamy. Gradually add 4 cups powdered sugar and 1/2 cup cocoa powder. Add 3-4 tbsp cream, 1 tsp vanilla, and a pinch of salt. Beat until light and fluffy. Adjust cream or sugar for your preferred consistency.
- Assemble cake layers: Place one cake layer on your serving plate. Spread a generous layer of buttercream. Top with the second cake layer. Use the remaining frosting to crumb coat the whole cake—this seals in crumbs.
- Chill: Refrigerate the crumb-coated cake for 30 minutes to set the frosting.
- Prepare ganache drip: Heat 1 cup heavy cream in a saucepan until it just begins to simmer. Remove from heat and pour over 8 oz chopped semisweet chocolate. Let sit 2 minutes, then stir until smooth. Stir in 2 tbsp butter for shine.
- Drip the ganache: Let ganache cool slightly (to about 90°F/32°C) so it thickens but is still pourable. Using a spoon or piping bag, slowly drip ganache around the cake edges, letting it cascade naturally. Pour remaining ganache over the top and smooth gently.
- Add decorations: Shape black fondant into a square cap and a small circle for the top button. Create a tassel from white fondant or use royal icing piped on. Sprinkle the edible gold glitter over the ganache while slightly tacky for sparkle.
- Chill again: Refrigerate cake for another 30 minutes to set the ganache and decorations before serving.
Pro tip: If your ganache is too runny, let it cool more before dripping. If too thick, warm gently to loosen. And don’t worry if the drip isn’t perfect; that’s part of the charm!
Cooking Tips & Techniques
Making the Perfect Graduation Cap Chocolate Drip Cake with Gold Glitter can seem intimidating, but with a few insider tips, you’ll get it right on your first try.
- Measure accurately: Baking is a science. Use a kitchen scale if you can for flour and sugar to avoid dense cake layers.
- Use room temperature ingredients: Eggs and butter soften better, giving you smoother batter and frosting.
- Thin batter is good: The boiling water thins the batter, which creates moist, tender cake layers—it’s supposed to be runny.
- Cooling matters: Don’t rush frosting warm cake; the buttercream will melt, and the ganache drip will slide off.
- Ganache temperature: Test the drip temperature by dripping a bit on the side of a bowl first. It should flow slowly and set quickly.
- Edible glitter: Apply the gold glitter when the ganache is still a bit tacky; it sticks better without clumping or falling off.
- Practice fondant shaping: Roll the fondant thin for a clean cap shape. Dust your workspace with cornstarch to prevent sticking.
One time, I forgot to cool my ganache enough before dripping, and it ran down in a flood—lesson learned! Patience is your best friend here.
Variations & Adaptations
This cake is versatile and can be tweaked to fit your style or dietary needs. Here are some ideas I’ve tried or thought would be fun:
- Flavor twists: Add a teaspoon of espresso powder to the batter to deepen the chocolate flavor, or swap the cocoa for matcha powder for a green tea version.
- Frosting swap: Use cream cheese frosting for a tangy contrast instead of buttercream.
- Shape alternatives: Instead of a cake, bake cupcakes and decorate each with mini edible graduation caps and gold glitter for individual servings.
- Dietary modifications: Use almond flour and dairy-free substitutes for a gluten- and dairy-free cake.
- Seasonal touches: In spring, add fresh edible flowers alongside the gold glitter for a soft, elegant look.
One variation I love is using salted caramel ganache instead of plain chocolate—it adds a surprising but delightful layer of flavor that guests ask for every time.
Serving & Storage Suggestions
Serve this cake at room temperature for the best texture and flavor. The ganache will be glossy and slightly firm, while the cake stays moist and tender. For presentation, place it on a decorative cake stand and scatter a few gold confetti pieces around the base for extra sparkle.
It pairs wonderfully with a cup of freshly brewed coffee or a sparkling rosé for adult celebrations. For kids or teens, a rich hot chocolate complements it perfectly.
Store leftovers covered in the refrigerator for up to 4 days. Before serving again, let the cake sit out for 30 minutes to soften the buttercream and bring the flavors to life. To freeze, wrap tightly in plastic wrap and foil; thaw overnight in the fridge.
Flavors actually deepen after a day, so if you can wait, make it a day ahead for a tastier party centerpiece.
Nutritional Information & Benefits
One slice (1/12th of the cake) contains approximately 420 calories, 22 grams of fat, 50 grams of carbohydrates, and 5 grams of protein. Key nutritional highlights come from the cocoa powder, which is rich in antioxidants and can boost mood thanks to its natural compounds.
This recipe is free from artificial preservatives and uses real butter and cream for authentic flavor. For those monitoring allergens, it contains gluten, dairy, and eggs, but has easy substitutions for gluten-free and dairy-free needs.
I appreciate that this cake feels like a treat that’s indulgent but made with quality ingredients, making celebrations feel a bit more wholesome.
Conclusion
This Perfect Graduation Cap Chocolate Drip Cake with Gold Glitter is more than just a dessert—it’s a statement piece for your celebration table. Whether it’s your first time making a drip cake or you’re a dessert pro, this recipe balances flair and flavor without overwhelming your kitchen or schedule.
Feel free to customize the decorations or flavors to suit your graduate’s personality or your party theme. I love this cake because it brings that sparkle and joy every time I make it, and honestly, seeing those smiles around the table makes all the effort worth it.
Try it out, share your experiences, and don’t hesitate to experiment with your own twists. I’d love to hear how your cake turned out and what creative touches you added!
FAQs
How do I make edible gold glitter at home?
Mix superfine sugar with a small amount of edible gold dust (available at specialty baking stores). Spread on parchment paper and let dry before sprinkling on the cake.
Can I make this cake ahead of time?
Yes! Bake the cake layers up to 2 days before, wrap tightly, and store at room temperature. Assemble and decorate on the day of serving for best freshness.
What if my ganache drip is too thick or thin?
If too thick, warm gently over a double boiler to loosen. If too thin, let it cool longer to thicken before dripping.
Can I use fondant decorations instead of edible glitter?
Absolutely! Fondant caps and tassels look great and can be stored for longer periods before decorating. Just add glitter for extra shine if desired.
How do I prevent the cake from drying out?
Don’t overbake; check with a toothpick early. Also, crumb coat and chill the cake before final frosting to lock in moisture.
Pin This Recipe!
Perfect Graduation Cap Chocolate Drip Cake Easy Homemade Gold Glitter Recipe

A quick and easy chocolate drip cake shaped like a graduation cap, decorated with edible homemade gold glitter for a festive celebration centerpiece.
- Prep Time: 30 minutes
- Cook Time: 35 minutes
- Total Time: 1 hour 35 minutes
- Yield: 12 servings 1x
- Category: Dessert
- Cuisine: American
Ingredients
- 2 cups (240g) all-purpose flour
- 2 cups (400g) granulated sugar
- 3/4 cup (65g) unsweetened cocoa powder
- 1 1/2 tsp baking powder
- 1 1/2 tsp baking soda
- 1 tsp salt
- 2 large eggs, room temperature
- 1 cup (240ml) whole milk
- 1/2 cup (120ml) vegetable oil
- 2 tsp vanilla extract
- 1 cup (240ml) boiling water
- 1 cup (240ml) heavy cream
- 8 oz (230g) semisweet chocolate chips
- 2 tbsp unsalted butter, room temperature
- 1 cup (227g) unsalted butter, softened
- 4 cups (480g) powdered sugar
- 1/2 cup (43g) unsweetened cocoa powder
- 3–4 tbsp heavy cream or whole milk
- 1 tsp vanilla extract
- Pinch of salt
- Edible gold glitter (homemade from superfine sugar and edible gold dust)
- Black fondant or modeling chocolate (for graduation cap topper)
- White fondant or royal icing (for tassel)
Instructions
- Preheat oven to 350°F (175°C). Grease and line two 8-inch round cake pans with parchment paper.
- In a large bowl, sift together flour, sugar, cocoa powder, baking powder, baking soda, and salt. Whisk to combine.
- In a separate bowl, whisk eggs, milk, vegetable oil, and vanilla extract until smooth.
- Slowly add wet ingredients to dry ingredients, stirring gently until combined. Pour in boiling water and stir until smooth; batter will be thin.
- Divide batter evenly between pans and bake for 30-35 minutes or until a toothpick comes out clean. Cool in pans for 10 minutes, then transfer to wire racks to cool completely.
- Make buttercream: Beat softened butter until creamy. Gradually add powdered sugar and cocoa powder. Add cream, vanilla, and salt. Beat until light and fluffy, adjusting consistency as needed.
- Assemble cake: Place one cake layer on serving plate, spread buttercream generously. Top with second layer and crumb coat entire cake. Refrigerate for 30 minutes.
- Prepare ganache: Heat heavy cream until simmering. Pour over chopped chocolate, let sit 2 minutes, then stir until smooth. Stir in butter for shine.
- Let ganache cool to about 90°F (32°C). Drip ganache slowly around cake edges and pour remaining over top, smoothing gently.
- Shape black fondant into a square cap and small circle for top button. Create tassel from white fondant or royal icing. Sprinkle edible gold glitter over slightly tacky ganache.
- Refrigerate cake for another 30 minutes to set ganache and decorations before serving.
Notes
Use room temperature ingredients for best results. Let ganache cool to proper temperature before dripping. If ganache is too thick, warm gently; if too thin, cool longer. Apply gold glitter when ganache is slightly tacky. For gluten-free, substitute flour with gluten-free blend; for dairy-free, use plant-based milk and butter alternatives.
Nutrition
- Serving Size: 1 slice (1/12th of c
- Calories: 420
- Fat: 22
- Carbohydrates: 50
- Protein: 5
Keywords: graduation cake, chocolate drip cake, gold glitter cake, celebration cake, easy chocolate cake, homemade edible glitter