Love this? Save it for later!
Share the inspiration with your friends
“I wasn’t expecting to become a charcuterie board pro the night before my niece’s graduation party,” I admit, laughing as I recall the chaos. It was a hectic Saturday afternoon, and the local grocery was nearly out of everything fancy. No imported cheeses, no artisanal crackers—just the basics. I had about an hour to pull something together that looked festive but didn’t break the bank. Honestly, it felt like a test of my creativity more than cooking skills.
The sizzle of the deli slicer in the background and the buzz of last-minute shoppers created this oddly comforting soundtrack as I grabbed what I could: some cheddar, salami, grapes, and a few colorful veggies. I ended up layering everything on a simple wooden cutting board, not even fancy slate or marble, and you know what? It turned out better than expected. The colors popped, the flavors worked together, and my niece’s friends couldn’t stop complimenting it. I even forgot to bring a proper knife, so I had to improvise with a butter knife!
Maybe you’ve been there—needing something quick, affordable, and impressive for a celebration. This easy budget graduation charcuterie board recipe is exactly that: simple ingredients, minimal fuss, and a crowd-pleasing look that feels special. It’s proof you don’t need to spend a fortune or stress over every detail to celebrate big moments with style and flavor.
Why You’ll Love This Recipe
From my many last-minute celebrations and budget-friendly get-togethers, this charcuterie board recipe stands out because it’s:
- Quick & Easy: Comes together in under 30 minutes, perfect for those “oh no, I forgot” moments or any casual party prep.
- Simple Ingredients: No need to hunt down fancy imports; most items are pantry staples or easy finds at your local store.
- Perfect for Celebrations: Whether it’s a graduation, birthday, or casual hangout, this board fits the vibe without fuss.
- Crowd-Pleaser: Loved by kids and adults alike for its mix of sweet, savory, crunchy, and creamy textures.
- Unbelievably Delicious: The balance between sharp cheese, salty meats, and fresh fruit is just right—comfort food without the guilt.
This isn’t just any charcuterie board. It’s the one I made when I had zero time and a limited budget but wanted to bring something memorable. The trick? Thoughtful layering and pairing basics you can find anywhere. Plus, I’ve sprinkled in a few tips to make the presentation pop without extra stress.
Honestly, it’s the kind of recipe that makes you smile when your guests dig in and say, “Wow, you really pulled this off!” So, let me tell you, it’s worth keeping in your back pocket for those special moments.
What Ingredients You Will Need
This easy budget graduation charcuterie board keeps things straightforward with ingredients that are both tasty and affordable. Each component plays a role in adding flavor, texture, or color to your board.
- Cheeses:
- Sharp Cheddar Cheese, sliced or cubed (adds bold flavor and color)
- Colby Jack or Monterey Jack, sliced (milder, creamy texture)
- Optional: String cheese sticks for a fun, kid-friendly option
- Meats:
- Sliced Salami or Pepperoni (great salty, savory punch)
- Hard Summer Sausage or Turkey Pepperoni (budget-friendly alternative)
- Fresh Fruits & Veggies:
- Seedless Grapes (red or green, for sweetness and color contrast)
- Cherry Tomatoes (burst of freshness)
- Baby Carrots or Cucumber Slices (adds crunch and balance)
- Crunchy Elements:
- Store-bought Crackers (multigrain or plain water crackers work well)
- Mini Pretzels or Breadsticks (for texture variety)
- Extras:
- Olives (black or green, for a briny touch)
- Honey or Fig Jam (optional, pairs beautifully with cheese)
- Roasted Nuts like almonds or cashews (adds richness and crunch)
I usually pick whatever’s on sale or in season—grapes were on clearance that day—and sometimes I swap in sliced apples instead. For cheese, I like brands like Cabot for cheddar because it melts beautifully if you want to add a warm touch later. The beauty here is the flexibility: swap any meat for a plant-based alternative or use gluten-free crackers if needed.
Equipment Needed
- Large Wooden Cutting Board or Serving Platter (a simple tray works fine too)
- Sharp Knife for slicing cheese and meats (a serrated knife is handy but not necessary)
- Small Bowls for Olives, Nuts, and Jams (helps keep things tidy)
- Tongs or Small Forks (for guests to easily pick items)
- Optional: Cheese Markers or Small Labels (nice for parties but not a must)
If you don’t have a fancy cutting board, no worries! I once used a clean cookie sheet lined with parchment paper when in a pinch. A butter knife works if you don’t have a sharp one, though the presentation might be less neat. Keeping your knives sharp is key to avoiding squished cheese or torn meats. Budget-friendly knives from local stores do the trick just fine, so no need to splurge.
Preparation Method
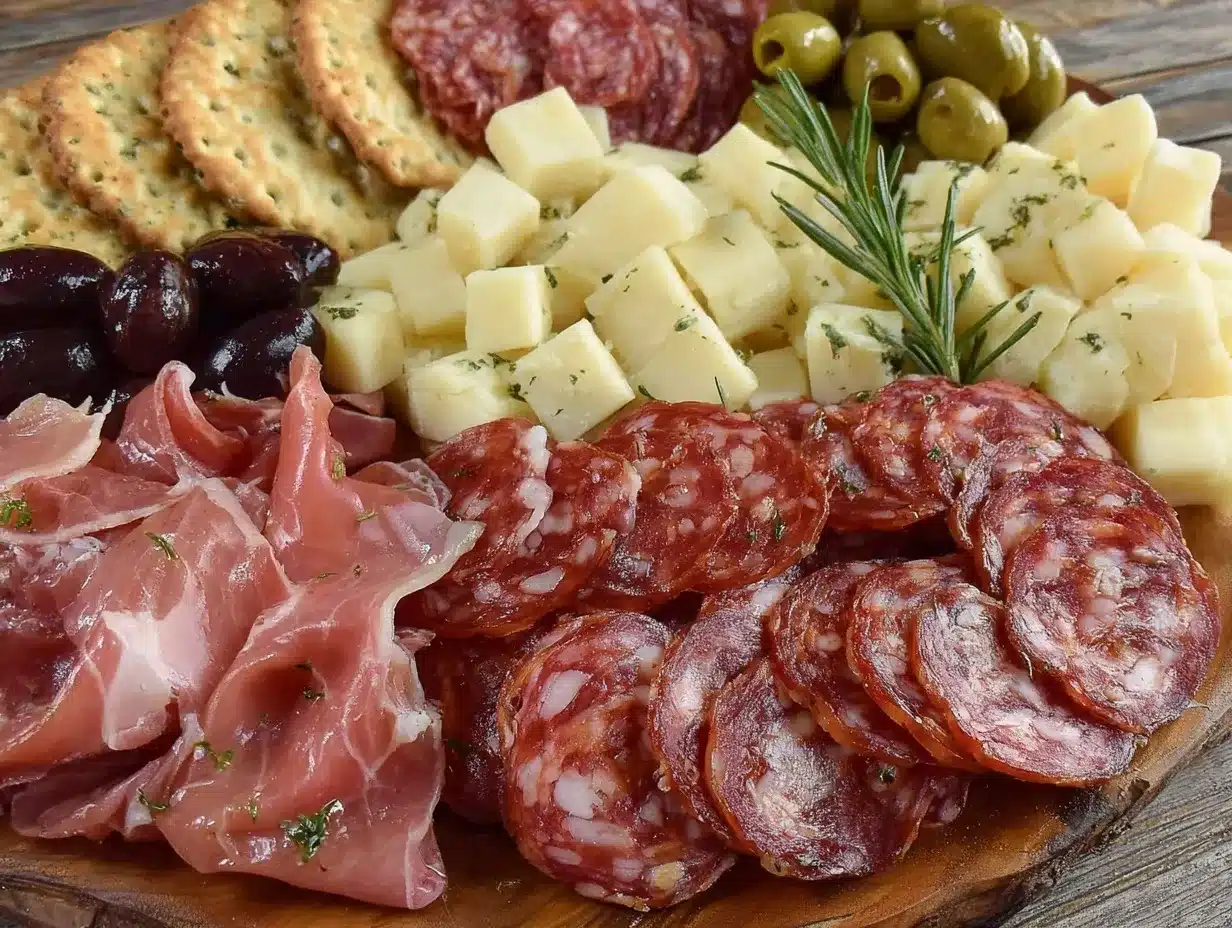
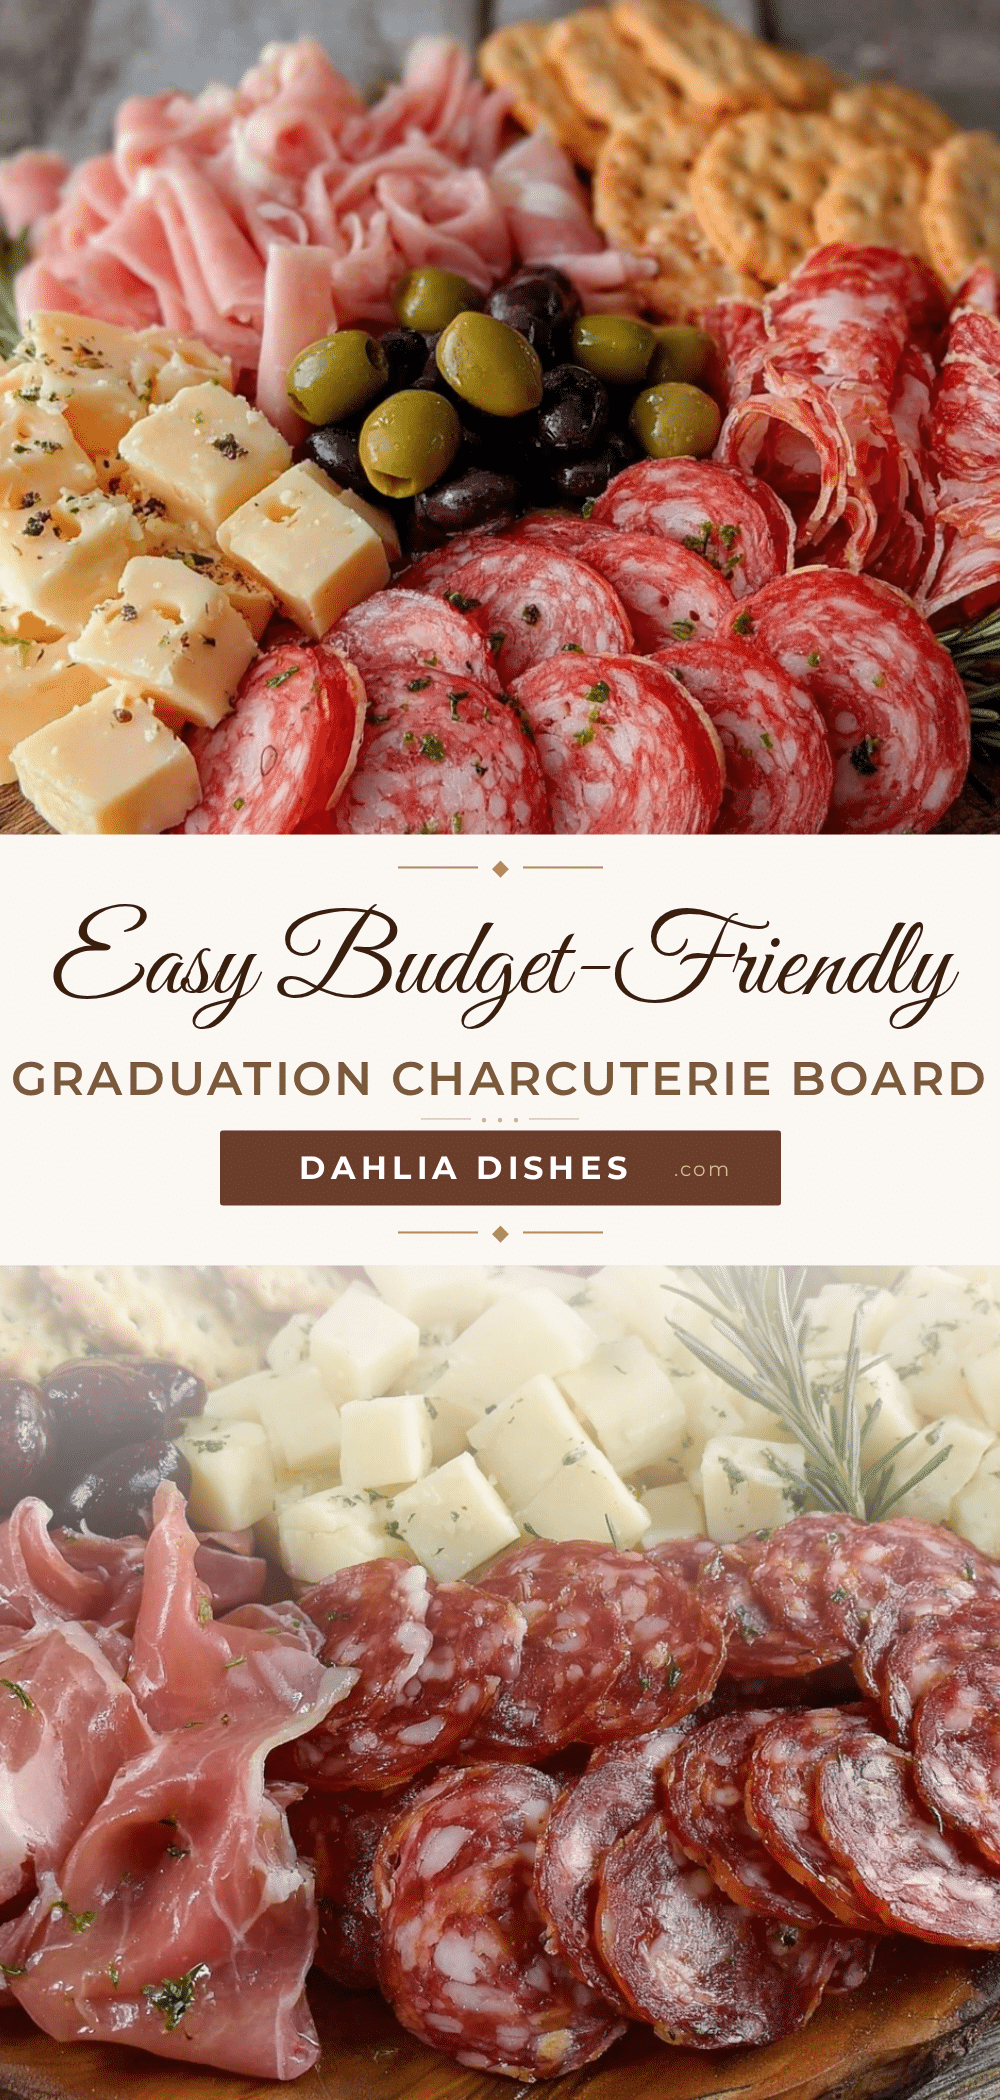
- Prepare Your Ingredients (10-15 minutes): Slice the cheddar and Colby Jack cheeses into bite-sized cubes or thin slices. Arrange sliced salami and summer sausage on a plate. Rinse grapes, cherry tomatoes, and cucumber slices. Pat dry with a paper towel to avoid moisture pooling on the board.
- Set Up Small Bowls: Fill small bowls with olives, roasted nuts, and any jams or honey you plan to serve. This keeps wet or sticky items contained and prevents soggy crackers.
- Arrange the Board (15-20 minutes): Start by placing the bowls on the board, spacing them evenly. Then, tuck in clusters of grapes and cherry tomatoes around the bowls. Next, layer your cheese cubes and slices in small piles to create texture and height.
- Add Meats: Fold or roll salami and sausage slices for a more attractive look and place them in groups near the cheeses. This makes grabbing easier and visually separates the flavors.
- Fill in with Crackers and Crunch: Use crackers and pretzels to fill empty spaces. Try to fan them out or stack in small piles for easy access. Remember to keep crackers dry and away from juicy fruit to maintain crispness.
- Finish with Veggies and Nuts: Scatter baby carrots, cucumber slices, and roasted nuts to fill gaps and add pops of color. These also offer fresh, crunchy options to balance the board.
- Final Touches: Drizzle a little honey on top of some cheese cubes or place a small spoon of fig jam near the cheeses. This adds sophistication and a sweet counterpoint that guests love.
Tip: If you’re short on time, prep everything in advance and assemble the board just before guests arrive. You’ll want to avoid letting crackers get soggy or fruit dry out. I’ve learned the hard way that presentation matters as much as taste for these boards!
Cooking Tips & Techniques
Charcuterie boards are more about assembly than cooking, but a few tricks can make yours stand out:
- Balance Flavors and Textures: Mix salty, sweet, creamy, and crunchy elements. For example, pairing sharp cheddar with sweet grapes creates a satisfying contrast.
- Use Height and Layers: Stack some cheese cubes or roll meats to create dimension. Flat boards can look boring, so think 3D!
- Keep Ingredients Fresh: Dry fruits and veggies well before placing them on the board to avoid sogginess. Also, add wet items like olives in small bowls.
- Don’t Overcrowd: Leave some space between groups so guests can easily pick items without a mess.
- Practice Knife Safety: A sharp knife cuts cleaner and faster but always cut away from yourself and keep fingers clear. I once nicked my thumb rushing to slice salami—lesson learned!
One personal trick is to prepare all ingredients ahead and keep them chilled. Just before serving, I assemble the board quickly, so everything looks fresh and inviting. This method saves stress and keeps your kitchen cleaner.
Variations & Adaptations
This easy budget graduation charcuterie board is versatile and can be tailored to fit different tastes or dietary needs:
- Vegetarian Option: Skip the meats and add marinated artichokes, hummus, and roasted red peppers for protein and flavor.
- Seasonal Twist: Swap grapes for fresh berries in summer or dried apricots in winter for a seasonal pop of sweetness.
- Gluten-Free: Use gluten-free crackers or rice cakes instead of traditional crackers. Many stores now offer tasty gluten-free options that don’t compromise texture.
- Spicy Kick: Add pepper jack cheese or a small bowl of spicy mustard for those who like a little heat.
- Personal Favorite Variation: I once added sliced pears and a drizzle of balsamic glaze for a fancy twist that surprised everyone and was so simple!
Serving & Storage Suggestions
Serve your charcuterie board at room temperature to let the flavors shine. Take it out of the fridge 20-30 minutes before guests arrive to avoid cold cheeses dulling the taste.
Pair the board with a crisp white wine like Sauvignon Blanc or a light red like Pinot Noir. Sparkling water with lemon slices is a refreshing non-alcoholic option.
To store leftovers, cover the board tightly with plastic wrap and refrigerate for up to 2 days. Keep crackers separate in an airtight container to preserve crunch. When reheating cheese, avoid microwaving; instead, let it warm naturally at room temperature for best texture.
Flavors often deepen overnight, especially with meats and cheeses, so leftover boards can sometimes taste even better the next day—if there’s any left, that is!
Nutritional Information & Benefits
This charcuterie board combines protein, healthy fats, and fresh produce for a balanced snack or light meal. Here’s a rough estimate per serving (based on 6 servings):
| Nutrient | Amount |
|---|---|
| Calories | 350-400 kcal |
| Protein | 18-22 g |
| Fat | 25-30 g |
| Carbohydrates | 15-20 g |
| Fiber | 3-5 g |
Cheese provides calcium and protein, while fruits and veggies add vitamins and fiber. Nuts offer healthy fats and antioxidants. This board can fit into many diets but watch for allergens like nuts, dairy, and gluten in crackers.
From a wellness perspective, I love how this recipe encourages mindful snacking with a variety of flavors and textures, making it easy to enjoy moderation without feeling deprived.
Conclusion
If you’re looking for an easy budget graduation charcuterie board that’s both tasty and visually impressive, this recipe is your go-to. It proves that celebrating milestones doesn’t require expensive ingredients or hours of prep—just a little creativity and thoughtful pairing.
I encourage you to customize it with your favorite cheeses, fruits, and snacks. Make it yours! Personally, I keep coming back to this recipe because it always brings people together, sparks smiles, and fits my sometimes chaotic schedule.
Give it a try at your next celebration, and drop a comment below sharing your own twists or tips—I’d love to hear how it worked for you. Here’s to stress-free, delicious gatherings!
FAQs
What meats work best for a budget charcuterie board?
Sliced salami, pepperoni, and summer sausage are affordable and flavorful options. Turkey pepperoni is a great lean alternative.
Can I make the charcuterie board ahead of time?
Yes! Prep all ingredients and keep refrigerated. Assemble the board about 30 minutes before serving for best freshness.
How do I keep crackers from getting soggy?
Place crackers away from juicy fruits and use small bowls for wet items like olives or jams to prevent moisture contact.
Are there good vegetarian substitutes for the meats?
Absolutely. Marinated veggies, hummus, nuts, and cheese varieties can replace meats and still offer plenty of flavor and texture.
What’s the best way to store leftovers?
Wrap the board tightly and refrigerate. Store crackers separately in an airtight container to keep them crisp.
Pin This Recipe!
Easy Budget Graduation Charcuterie Board Ideas for Perfect Celebrations

A quick and affordable charcuterie board recipe perfect for last-minute celebrations, featuring simple ingredients and easy assembly for a crowd-pleasing presentation.
- Prep Time: 10-15 minutes
- Cook Time: 0 minutes
- Total Time: 25-35 minutes
- Yield: 6 servings
- Category: Appetizer
- Cuisine: American
Ingredients
- Sharp Cheddar Cheese, sliced or cubed
- Colby Jack or Monterey Jack Cheese, sliced
- Optional: String cheese sticks
- Sliced Salami or Pepperoni
- Hard Summer Sausage or Turkey Pepperoni
- Seedless Grapes (red or green)
- Cherry Tomatoes
- Baby Carrots or Cucumber Slices
- Store-bought Crackers (multigrain or plain water crackers)
- Mini Pretzels or Breadsticks
- Olives (black or green)
- Honey or Fig Jam (optional)
- Roasted Nuts like almonds or cashews
Instructions
- Prepare Your Ingredients (10-15 minutes): Slice the cheddar and Colby Jack cheeses into bite-sized cubes or thin slices. Arrange sliced salami and summer sausage on a plate. Rinse grapes, cherry tomatoes, and cucumber slices. Pat dry with a paper towel to avoid moisture pooling on the board.
- Set Up Small Bowls: Fill small bowls with olives, roasted nuts, and any jams or honey you plan to serve. This keeps wet or sticky items contained and prevents soggy crackers.
- Arrange the Board (15-20 minutes): Start by placing the bowls on the board, spacing them evenly. Then, tuck in clusters of grapes and cherry tomatoes around the bowls. Next, layer your cheese cubes and slices in small piles to create texture and height.
- Add Meats: Fold or roll salami and sausage slices for a more attractive look and place them in groups near the cheeses. This makes grabbing easier and visually separates the flavors.
- Fill in with Crackers and Crunch: Use crackers and pretzels to fill empty spaces. Try to fan them out or stack in small piles for easy access. Remember to keep crackers dry and away from juicy fruit to maintain crispness.
- Finish with Veggies and Nuts: Scatter baby carrots, cucumber slices, and roasted nuts to fill gaps and add pops of color. These also offer fresh, crunchy options to balance the board.
- Final Touches: Drizzle a little honey on top of some cheese cubes or place a small spoon of fig jam near the cheeses. This adds sophistication and a sweet counterpoint that guests love.
Notes
Keep crackers dry and separate from juicy fruits to avoid sogginess. Prepare ingredients ahead and assemble just before serving for best freshness. Use a sharp knife for clean cuts. Variations include vegetarian options with marinated artichokes and hummus, gluten-free crackers, and seasonal fruit swaps.
Nutrition
- Serving Size: Approximately 1/6th
- Calories: 350400
- Fat: 2530
- Carbohydrates: 1520
- Fiber: 35
- Protein: 1822
Keywords: charcuterie board, budget charcuterie, graduation party, easy appetizer, quick party food, simple ingredients, crowd-pleaser