Love this? Save it for later!
Share the inspiration with your friends
“You won’t believe what saved me the night before my niece’s graduation party,” my friend Jenna confessed over coffee last spring. It was one of those frantic evenings when the clock seemed to be speeding up, and every last-minute party prep felt like a juggling act. She’d forgotten to pick up the graduation-themed desserts until—bam!—inspiration struck. She whipped up these Easy Make-Ahead Rice Krispie Treat Caps that not only looked adorable but tasted like a nostalgic hug in every bite. Honestly, I couldn’t stop thinking about them. I mean, who doesn’t love Rice Krispie treats, right? But turning them into graduation caps? Genius.
Maybe you’ve been there too—staring at a blank dessert table and wondering how to pull something festive together without running yourself ragged. This recipe is perfect for those moments. It’s quick, fun, and, most importantly, can be made ahead of time, so you’re not stuck in the kitchen while everyone else is celebrating. Plus, they bring a smile to every graduate’s face, mixing that classic crispy sweetness with a playful graduation party twist. Let me tell you, since Jenna’s party, these treats have become a go-to for every celebration I’m part of. And honestly, I’m betting they’ll be your new secret weapon too.
Why You’ll Love This Recipe
After testing and tweaking this recipe through numerous graduation parties, I can confidently say these Easy Make-Ahead Rice Krispie Treat Caps are a crowd favorite. They hit all the right notes, and here’s why:
- Quick & Easy: Ready in under 30 minutes, these caps save your precious party prep time.
- Simple Ingredients: No fancy or hard-to-find items here. Just pantry staples you probably already have.
- Perfect for Graduation Parties: The cap design is festive without being complicated, making them ideal for any celebration.
- Crowd-Pleaser: Kids and adults alike can’t resist them—especially with that nostalgic Rice Krispie treat crunch.
- Unbelievably Delicious: Crispy, chewy, and a little chocolatey, these treats hit that perfect sweet spot every time.
What sets this recipe apart? It’s all about the make-ahead magic and the details: using just the right amount of marshmallows for softness, molding the perfect cap shape, and topping it with a simple, elegant chocolate tassel that looks professional but is incredibly easy to make. It’s not just another Rice Krispie treat—it’s a celebration on a plate. Plus, since these can be prepped days in advance, you get to enjoy the party yourself instead of fussing over last-minute desserts. Trust me, that peace of mind is priceless.
What Ingredients You Will Need
This recipe uses simple, wholesome ingredients to deliver bold flavor and satisfying texture without the fuss. Most are pantry staples, and substitutions are easy if you want to tweak things a bit.
- For the Rice Krispie Treat Base:
- 6 cups Rice Krispies cereal (I recommend Kellogg’s for the perfect crunch)
- 4 tablespoons unsalted butter, softened (adds richness)
- 10 ounces marshmallows (about 4 cups mini or 40 regular-sized), use fresh for best results
- 1 teaspoon vanilla extract (optional, but it adds a lovely depth of flavor)
- For the Graduation Cap Decoration:
- 1 cup semisweet chocolate chips (Ghirardelli melts nicely)
- 2 tablespoons heavy cream (to make the chocolate glossy and smooth)
- Black edible decorating gel or black icing (for the tassel string)
- 1/4 cup mini marshmallows, halved (for the tassel button)
Ingredient tips: If you want to make these gluten-free, be sure to use gluten-free Rice Krispies. For a dairy-free version, swap butter with coconut oil and use dairy-free chocolate chips. Fresh marshmallows are key here; stale ones can make the treats less chewy. And if it’s summertime, you can store these in an air-conditioned spot to avoid melting or stickiness.
Equipment Needed
- Large mixing bowl for combining cereal and marshmallows
- Medium saucepan to melt butter and marshmallows
- Wooden spoon or heat-resistant spatula for stirring
- 9×13-inch baking pan lined with parchment paper (for pressing the treat base evenly)
- Sharp knife or cookie cutter to shape the caps
- Microwave-safe bowl for melting chocolate
- Small piping bag or plastic sandwich bag (for the edible gel tassel)
- Cooling rack for setting the decorated treats
If you don’t have a piping bag, a zip-top bag with a tiny corner snipped off works just as well. For cutting the caps, using a sharp serrated knife gives cleaner edges, but a sturdy plastic knife can do in a pinch. I’ve found that lining the pan with parchment paper makes cleanup a breeze, and pressing the mixture firmly helps the caps hold their shape better.
Preparation Method
- Prepare the pan: Line a 9×13-inch baking pan with parchment paper, leaving extra hanging over the sides for easy removal.
- Melt the butter and marshmallows: In a medium saucepan over low heat, melt 4 tablespoons of butter. Add marshmallows and stir constantly until fully melted and smooth, about 5 minutes. Remove from heat and stir in vanilla extract if using.
- Mix in the cereal: Quickly add 6 cups of Rice Krispies cereal to the melted marshmallow mixture. Use a wooden spoon to fold gently but thoroughly until every bit of cereal is coated.
- Press into the pan: Transfer the mixture to your lined pan. Using a buttered spatula or wax paper, press the mixture evenly and firmly into the pan to about 1-inch thickness. This helps the treats hold their shape when cut.
- Cool completely: Let the base cool and set at room temperature for at least 1 hour. You can speed this up by placing it in the refrigerator for 30 minutes.
- Cut the caps: Once set, use a sharp knife to cut the Rice Krispie layer into squares about 2.5 inches (6.5 cm) wide. These will form the tops of the graduation caps.
- Make the chocolate topping: In a microwave-safe bowl, combine 1 cup semisweet chocolate chips with 2 tablespoons heavy cream. Microwave in 20-second intervals, stirring each time, until smooth and glossy.
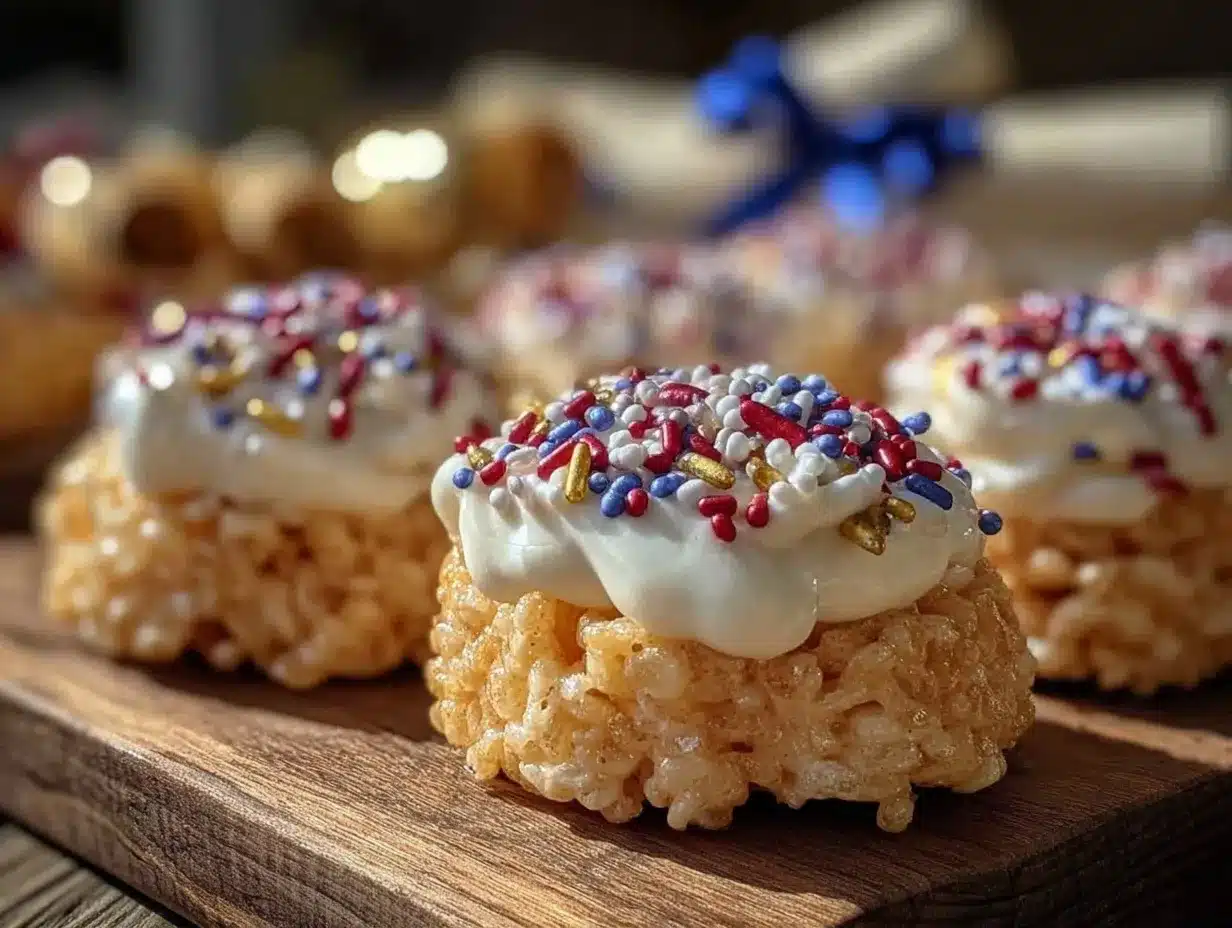
- Decorate the caps: Using a spoon, spread a thin layer of the melted chocolate on top of each square to create the mortarboard surface. Let the chocolate set slightly but stay tacky.
- Create the tassels: Attach a halved mini marshmallow in the center of each cap using a dab of chocolate as glue. Use black edible gel or icing to pipe a tassel string from the marshmallow’s base to the edge of the square.
- Set and serve: Place decorated caps on a cooling rack until the chocolate hardens completely, about 20 minutes. Now they’re ready to impress at your graduation party!
Pro tip: Don’t rush the cooling steps — the treats hold their shape better and look cleaner when fully set. Also, if the marshmallow mixture feels sticky or too soft to press, a quick chill in the fridge helps firm it up.
Cooking Tips & Techniques
Making these Rice Krispie Treat Caps is pretty forgiving, but a few tips go a long way:
- Use fresh marshmallows: Stale marshmallows can make the treats tough or crumbly. The fresh ones melt smoothly for that perfect chewy texture.
- Don’t overheat the marshmallows: Low and slow melting prevents scorching, which can give a burnt flavor.
- Press firmly but don’t compact too much: You want the treats dense enough to hold the cap shape, but too much pressure can make them hard.
- Chocolate cooling: Let the chocolate set at room temperature if possible. Refrigeration can cause the chocolate to bloom (white streaks), which doesn’t affect taste but isn’t as pretty.
- Pipe tassels carefully: Practice piping on parchment paper first if you’re new to edible gel. A steady hand makes a big difference.
Honestly, the first time I tried this, I rushed the cooling and ended up with misshapen caps that melted under the chocolate. Lesson learned! Now I always build in cooling time and it pays off big at the party. Also, multitasking helps—melting chocolate while the base cools saves a ton of time.
Variations & Adaptations
Want to mix things up? Here are some fun ideas to suit different tastes or dietary needs:
- Chocolate Rice Krispie Caps: Use cocoa-flavored Rice Krispies or add 2 tablespoons cocoa powder to the marshmallow mixture for a chocolatey twist.
- Nut-Free Option: Swap butter with coconut oil and use allergy-friendly cereal if needed. The texture stays delightfully chewy.
- Colorful Caps: Add a few drops of food coloring to the melted marshmallows before mixing with cereal to match school colors or party themes.
- Vegan Version: Use vegan marshmallows and dairy-free butter or coconut oil. Melt dairy-free chocolate chips with plant-based cream for the decoration.
- Personalized Messages: Use colored edible markers to write graduate names or years on the caps once the chocolate is set.
My personal favorite variation is swapping in peanut butter for half the butter—it adds a nutty depth and the kids at the last party went wild for it. Just be mindful of allergies!
Serving & Storage Suggestions
These Rice Krispie Treat Caps are best served at room temperature, so the chocolate is firm but the base stays soft and chewy. Arrange them on a festive platter—maybe add some fresh fruit or colorful napkins for a cute display.
If you’re pairing drinks, milk or a light fruit punch complement the sweetness perfectly. For more party treats, these go well with crispy garlic chicken or a fresh fruit salad to balance the flavors.
Storage is straightforward. Keep the caps in an airtight container at room temperature for up to 3 days. If your party prep starts early, you can store them in the fridge but bring them to room temperature before serving to avoid hard chocolate and chewy treats.
For longer storage, freeze the uncoated Rice Krispie base layers wrapped tightly in plastic wrap, then decorate after thawing. Reheat gently (just a few seconds in the microwave) if needed to soften before cutting.
Over time, the flavors mellow and the texture firms slightly, so these treats are great for making a day ahead. Just don’t forget to add those tassels right before serving so they look fresh!
Nutritional Information & Benefits
Each Rice Krispie Treat Cap contains approximately:
| Calories | Fat | Carbohydrates | Protein | Sugar |
|---|---|---|---|---|
| 150 kcal | 5 g | 26 g | 1 g | 15 g |
The main ingredients—Rice Krispies and marshmallows—are primarily carbohydrates, providing quick energy. Butter and chocolate contribute fats that add richness and help with satiety. Vanilla extract adds flavor without calories.
While these treats are definitely a sweet indulgence, using quality ingredients like real butter and chocolate improves the taste and texture. For gluten-free needs, simply use certified gluten-free cereals.
I like to think of these as celebration treats—perfect for marking milestones with a bit of sweet joy. Just remember to balance them out with wholesome meals throughout the day!
Conclusion
If you’re looking for a dessert that’s charming, delicious, and stress-free for your next graduation party, these Easy Make-Ahead Rice Krispie Treat Caps are a winner. They’re simple enough for beginners but impressive enough to make your spread stand out. Plus, making them ahead means you get to enjoy the celebration, not just prepare it.
Feel free to put your spin on the decoration or try one of the variations—I promise this recipe is flexible and forgiving. I love these treats because they bring back the sweet nostalgia of childhood while celebrating new beginnings. That mix of memories and milestones? It’s priceless.
Let me know how your graduation caps turn out or if you’ve added a fun twist—sharing your experiences always makes my day! And hey, don’t forget to show these off on your party table; they’re total conversation starters.
FAQs
Can I make these Rice Krispie Treat Caps ahead of time?
Absolutely! They can be made up to 3 days in advance and stored in an airtight container at room temperature. Just add the tassels close to serving for the freshest look.
What if I don’t have a sharp knife for cutting the caps?
A serrated knife works best, but you can also use a sturdy plastic knife. To prevent sticking, lightly grease the knife or warm it under hot water and dry before cutting.
Can I use a different cereal instead of Rice Krispies?
You can try puffed rice or similar crunchy cereals, but the classic Rice Krispies give the best texture and hold shape well for molding.
How do I keep the chocolate from melting or getting sticky?
Keep the treats in a cool, dry place. Avoid direct sunlight or warm spots. Let the chocolate set at room temperature for the best finish.
Are these treats suitable for kids with nut allergies?
Yes, as long as you avoid adding nut-based ingredients. Use allergy-friendly products and double-check labels to keep them safe.
Pin This Recipe!
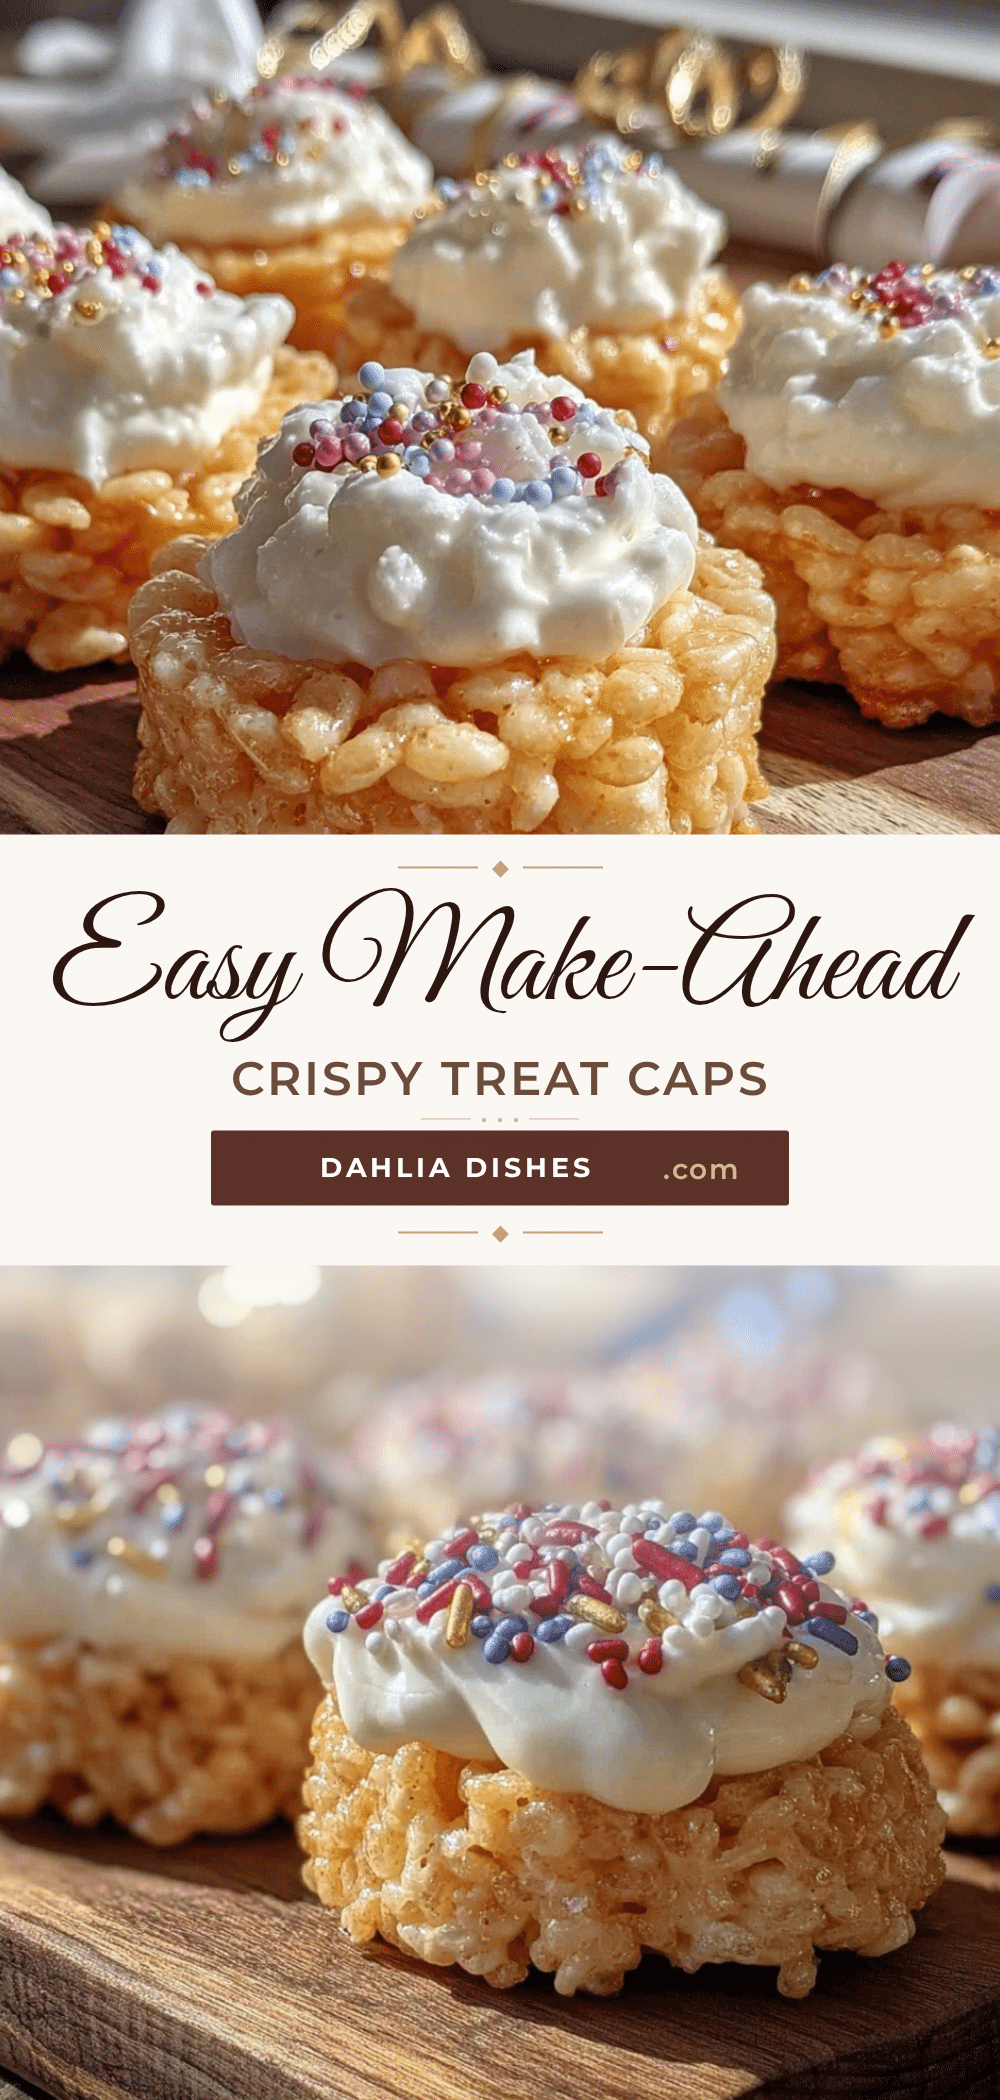
Easy Make-Ahead Rice Krispie Treat Caps Recipe for Graduation Parties

These festive Rice Krispie Treat Caps are quick, easy, and perfect for graduation parties. They combine nostalgic crispy sweetness with a playful graduation cap design and can be made ahead to save party prep time.
- Prep Time: 15 minutes
- Cook Time: 10 minutes
- Total Time: 1 hour 45 minutes
- Yield: 24 servings 1x
- Category: Dessert
- Cuisine: American
Ingredients
- 6 cups Rice Krispies cereal (recommend Kellogg’s)
- 4 tablespoons unsalted butter, softened
- 10 ounces marshmallows (about 4 cups mini or 40 regular-sized), fresh preferred
- 1 teaspoon vanilla extract (optional)
- 1 cup semisweet chocolate chips (Ghirardelli recommended)
- 2 tablespoons heavy cream
- Black edible decorating gel or black icing
- 1/4 cup mini marshmallows, halved
Instructions
- Line a 9×13-inch baking pan with parchment paper, leaving extra hanging over the sides for easy removal.
- In a medium saucepan over low heat, melt 4 tablespoons of butter. Add marshmallows and stir constantly until fully melted and smooth, about 5 minutes. Remove from heat and stir in vanilla extract if using.
- Quickly add 6 cups of Rice Krispies cereal to the melted marshmallow mixture. Fold gently but thoroughly until every bit of cereal is coated.
- Transfer the mixture to the lined pan. Using a buttered spatula or wax paper, press the mixture evenly and firmly into the pan to about 1-inch thickness.
- Let the base cool and set at room temperature for at least 1 hour, or refrigerate for 30 minutes to speed cooling.
- Once set, cut the Rice Krispie layer into squares about 2.5 inches wide to form the graduation caps.
- In a microwave-safe bowl, combine 1 cup semisweet chocolate chips with 2 tablespoons heavy cream. Microwave in 20-second intervals, stirring each time, until smooth and glossy.
- Spread a thin layer of melted chocolate on top of each square to create the mortarboard surface. Let the chocolate set slightly but stay tacky.
- Attach a halved mini marshmallow in the center of each cap using a dab of chocolate as glue. Pipe a tassel string from the marshmallow’s base to the edge of the square using black edible gel or icing.
- Place decorated caps on a cooling rack until the chocolate hardens completely, about 20 minutes. Serve.
Notes
Use fresh marshmallows for best texture. Avoid overheating marshmallows to prevent burning. Press mixture firmly but not too compact. Let chocolate set at room temperature to avoid bloom. Pipe tassels carefully for best appearance. Store in airtight container at room temperature up to 3 days. Add tassels just before serving for freshness.
Nutrition
- Serving Size: 1 Rice Krispie Treat
- Calories: 150
- Sugar: 15
- Sodium: 90
- Fat: 5
- Saturated Fat: 3
- Carbohydrates: 26
- Protein: 1
Keywords: Rice Krispie treats, graduation party dessert, make-ahead treats, easy dessert, party snacks, chocolate tassel, nostalgic treats