Love this? Save it for later!
Share the inspiration with your friends
“You know that feeling when you’re standing in the grocery aisle, staring at those colorful Lunchable boxes, wondering if you could make something just like that but better—without all the mystery ingredients?” That was me one Saturday morning, juggling a half-packed backpack, a cup of lukewarm coffee, and a stubborn toddler demanding snacks. I wasn’t expecting to end up in a mini culinary experiment, but there I was, sorting crackers and cheese on my kitchen counter, trying to recreate those fun little boxes at home.
It all started when I realized the store-bought ones were loaded with preservatives and didn’t quite hit the mark on flavor or variety. Plus, the portions seemed off for my kid’s appetite. So, armed with a few pantry staples and a bit of trial and error (including a cheese mishap that turned into an impromptu snack plate), I crafted an easy DIY Lunchable boxes recipe that felt fresh, wholesome, and honestly, way more fun to assemble.
Maybe you’ve been there too—wanting convenience without compromise, or just craving that nostalgic lunchbox vibe but with homemade love. This recipe stayed with me because it’s flexible, quick, and lets you customize everything, from the meats and cheeses to the little touches that make lunchtime exciting. Let me tell you, once you try making these, you might find yourself sneaking bites before the kids even get to them!
Why You’ll Love This Recipe
I mean, who doesn’t want lunch that’s both kid-approved and parent-friendly? After whipping up these easy DIY Lunchable boxes multiple times, I can tell you this recipe checks all the boxes:
- Quick & Easy: Comes together in under 20 minutes, perfect for busy mornings or last-minute packing.
- Simple Ingredients: Uses everyday pantry staples—no need for a special trip to a fancy store.
- Perfect for Lunch or Snack Time: Great for school lunches, office snacks, or even impromptu picnics.
- Crowd-Pleaser: Kids love the mix-and-match vibe, and adults appreciate the wholesome, preservative-free options.
- Unbelievably Delicious: The combo of fresh meats, cheeses, and crunchy crackers is comfort food at its best.
What sets this DIY Lunchable boxes recipe apart is the freedom it offers. No more one-size-fits-all; you can swap in gluten-free crackers, add fresh fruit, or include your favorite dips. I personally find that blending a little homemade ranch dip amps up the flavor and makes everything feel special. Plus, the ease of portion control means less waste and more smiles.
Honestly, it’s like comfort food with a twist—simple, fun, and made with love (and zero artificial stuff). Whether you’re packing lunch for picky eaters or just want a fuss-free snack idea, this recipe has your back.
What Ingredients You Will Need
This easy DIY Lunchable boxes recipe uses simple, wholesome ingredients to deliver bold flavor and satisfying texture without the fuss. You likely already have most of these in your kitchen, and they come together beautifully for a balanced meal.
- For the Protein:
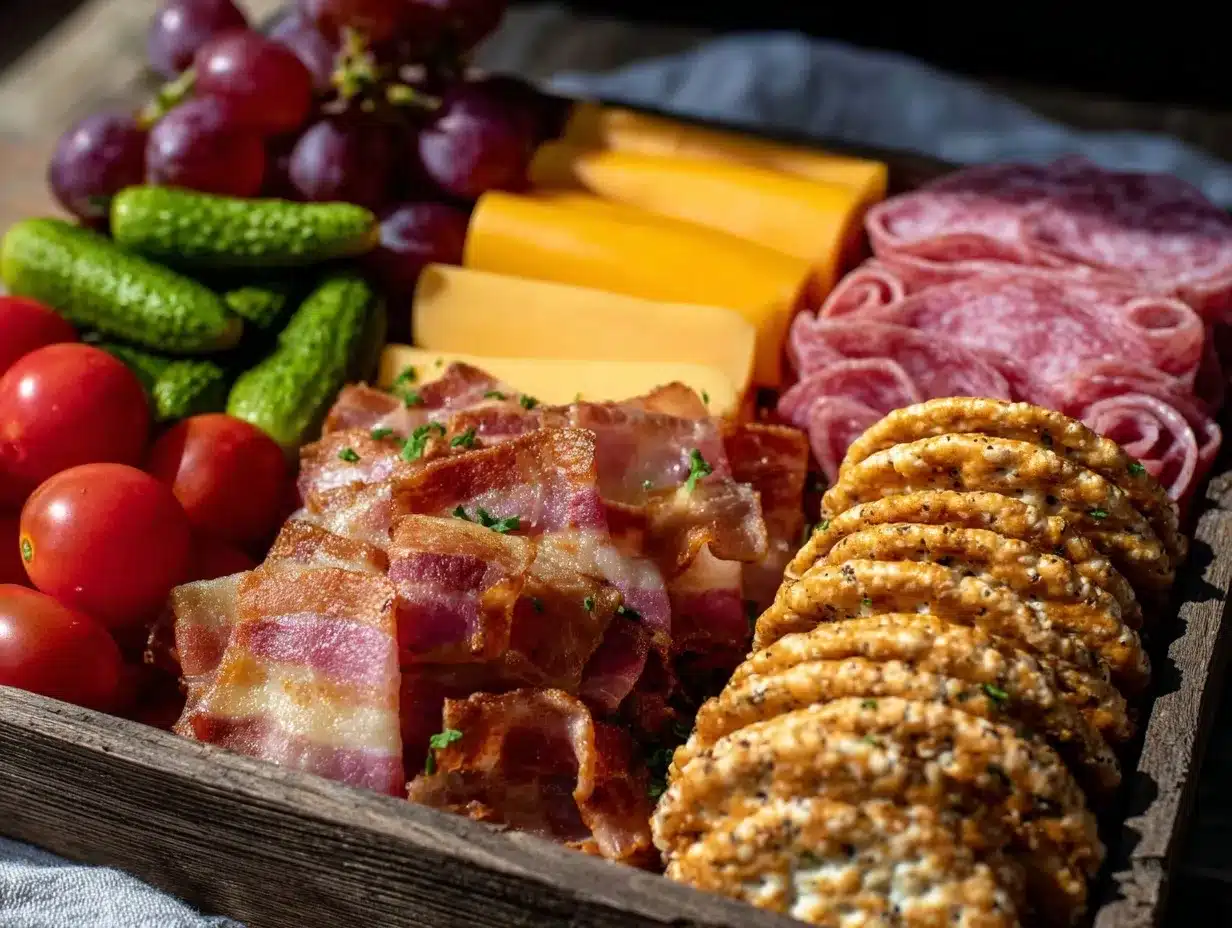
- Thinly sliced deli turkey or ham (about 4 oz / 115 g) – I prefer Boar’s Head for its flavor and quality
- Hard salami or pepperoni slices (optional, 2 oz / 57 g)
- String cheese sticks or cubed cheddar (3 oz / 85 g) – sharp cheddar adds a nice bite
- For the Crackers & Bread:
- Assorted crackers (about 20 pieces) – Triscuit or Wheat Thins work great for crunch
- Mini pita pockets or small sandwich bread slices (optional)
- For the Veggies & Extras:
- Baby carrots or cucumber slices (1 cup / 120 g)
- Grape or cherry tomatoes (½ cup / 75 g)
- Pickle slices or olives (¼ cup / 30 g) – adds a tangy contrast
- Fresh fruit like apple slices or berries (½ cup / 70 g), seasonal if possible
- For the Dips & Spreads:
- Hummus or ranch dip (2 tablespoons) – homemade or store-bought
- Mustard or mayonnaise packets (optional)
For a gluten-free option, swap regular crackers with gluten-free varieties from brands like Mary’s Gone Crackers. If you need dairy-free, string cheese can be replaced with vegan cheese alternatives, and dips can be made from avocado or tahini. I usually recommend buying deli meats from the fresh counter rather than pre-packaged to avoid added sodium and preservatives.
Equipment Needed
- Lunchbox or compartmentalized bento box – anything with sections to keep ingredients separate works well
- Sharp knife for slicing cheese and meats
- Cutting board
- Small containers or silicone cups for dips and spreads
- Measuring cups and spoons for portioning ingredients
- Optional: mini cookie cutters to shape cheese or sandwiches for fun presentation
Honestly, you don’t need anything fancy. I often use a simple plastic container with dividers I got from the dollar store. If you don’t have a bento box, small reusable silicone muffin liners inside a regular lunchbox do the trick. For dips, small condiment containers with lids keep everything neat and prevent spills. A good sharp knife is a must though—trust me, dull knives make the whole process slower and messier.
Preparation Method
- Prep the Proteins (5 minutes): Slice deli meats into bite-sized pieces or roll them for easy eating. Cube or cut string cheese into fun shapes if you like. Arrange them neatly in one compartment. Tip: If your deli meat is cold and stiff, let it sit a few minutes at room temp—it’s easier to handle.
- Prepare Crackers and Bread (3 minutes): Portion out about 20 crackers or cut mini pita pockets in half. If using bread, lightly toast slices to avoid sogginess. Place them in their own section to keep crisp. Note: Avoid stacking crackers too high, or they might break when packed.
- Slice Veggies and Fruit (7 minutes): Wash and cut baby carrots, cucumber, and tomatoes. Slice fruit like apples thinly and toss with a little lemon juice to prevent browning. Place these in separate compartments or silicone cups to keep fresh. Warning: Avoid mixing juicy fruits with crackers to keep everything crunchy.
- Prepare Dips (2 minutes): Scoop hummus or ranch into small containers. If using mustard or mayo packets, include them on the side. This keeps flavors fresh and prevents sogginess. Personal tip: A tiny container with a lid is perfect for dips and prevents spills in the lunchbox.
- Assemble the Box (3 minutes): Arrange all components neatly. Balance colors and textures for visual appeal—bright reds, greens, and yellows make the box inviting. Seal the container tightly.
- Store or Serve: Keep refrigerated if not eating right away. These boxes hold up well for a few hours, perfect for school or work.
Cooking Tips & Techniques
Making easy DIY Lunchable boxes isn’t rocket science, but a couple of insider tips make a huge difference:
- Keep textures separate: Moisture is the enemy of crunchy crackers. Use silicone cups or compartments to separate dips and juicy fruit from dry items.
- Choose quality deli meats: I’ve learned that fresher slices taste way better and hold up well throughout the day—avoid overly processed options.
- Cut uniformly: When slicing cheese or veggies, try to keep pieces similar in size. It makes the box look prettier and makes eating easier for little hands.
- Freeze bread if you pack in advance: Toast it lightly and freeze; thaw in the morning for fresher sandwiches.
- Multitasking tip: While veggies soak or fruit slices rest, prep the proteins. It saves time and keeps everything fresh.
- Personal lesson: Once, I tossed everything in one compartment and ended up with a soggy mess—lesson learned: compartmentalize!
Variations & Adaptations
One of the best parts about this easy DIY Lunchable boxes recipe is how adaptable it is. Here are a few ways to switch things up:
- Vegetarian Version: Replace deli meats with roasted chickpeas, hard-boiled eggs, or a scoop of hummus. Add veggie sticks and cheese or vegan cheese cubes.
- Seasonal Twist: Swap fresh fruit according to the season—summer berries, autumn apple slices, or winter citrus segments all work wonderfully.
- Snack-Size Boxes: Make mini versions for after-school snacks by reducing portions and focusing on bite-sized treats like rolled turkey and tiny crackers.
- Allergen-Friendly: Use nut-free crackers and dairy-free cheese alternatives if allergies are a concern. Sunflower seed butter pairs nicely with apple slices as a sweet option.
- My Favorite Variation: I once added a small container of homemade guacamole alongside tortilla chips instead of crackers—huge hit at a weekend picnic.
Serving & Storage Suggestions
These easy DIY Lunchable boxes are best served chilled but not ice-cold. Let them sit out for about 10 minutes before eating to soften the cheese and enhance flavors. For presentation, arrange items by color and texture; kids love picking out their favorites from a visually appealing box.
Complement your box with a small juice box, a reusable water bottle, or a thermos of warm soup for colder days. Personally, I like pairing these with a crisp apple cider or a refreshing iced tea.
For storage, keep the boxes refrigerated and consume within 24 hours for best freshness. If you prep the boxes a day ahead, add delicate fruits or dips just before serving to avoid sogginess. Reheat any bread or pita separately if desired.
Flavors tend to meld nicely if you give the box a gentle shake before eating, especially if dips are included. The variety keeps lunchtime exciting and fresh, day after day.
Nutritional Information & Benefits
This easy DIY Lunchable boxes recipe offers balanced nutrition with protein from deli meats and cheese, fiber and vitamins from fresh veggies and fruits, and energy from whole-grain crackers. A typical serving provides approximately 350-400 calories, with around 20 grams of protein and 5 grams of fiber.
Choosing lean meats and pairing with fresh produce supports sustained energy and satiation. Plus, making these boxes at home means fewer preservatives and artificial additives compared to store-bought options.
Gluten-free or dairy-free adaptations make this recipe accessible for many dietary needs, while the inclusion of colorful fruits and veggies boosts antioxidants and essential nutrients.
I always feel good packing these boxes knowing they’re wholesome, tasty, and made with ingredients I trust.
Conclusion
At the end of the day, this easy DIY Lunchable boxes recipe is all about making lunchtime simple, fun, and healthy. Whether you’re packing for picky eaters, busy adults, or anyone in between, these homemade boxes offer a fresh twist on a classic favorite.
Feel free to tweak ingredients, swap flavors, or add your personal touch—it’s your box to build. I love how these come together quickly and how they bring a little joy and color to the lunch hour.
If you give this recipe a try, I’d love to hear how you customize your boxes or what combos became your family’s favorites. Don’t hesitate to share your thoughts or tips in the comments below. Happy packing, and here’s to many delicious lunches ahead!
FAQs
Can I make these lunch boxes ahead of time?
Yes! You can prepare most components a day in advance, but keep fruits and dips separate until just before serving to keep everything fresh and crunchy.
What if my kid doesn’t like deli meats?
Try swapping deli meats for hard-boiled eggs, hummus, or nut butters, depending on preferences and allergies. You can also include more cheese or veggies to round out the box.
Are these lunch boxes suitable for school?
Absolutely. They’re portable, balanced, and mess-free when packed in compartmentalized containers. Just ensure any perishable items stay refrigerated until lunchtime.
How can I keep crackers from getting soggy?
Keep crackers separate from moist foods and dips using silicone cups or compartments. Add dips right before eating when possible.
Can I freeze any parts of these lunch boxes?
Most components are best fresh or refrigerated. However, you can freeze bread or pita pockets ahead of time and toast them before packing to keep them fresh.
Pin This Recipe!
Easy DIY Lunchable Boxes Recipe

A quick and customizable homemade version of Lunchable boxes using simple pantry staples, fresh meats, cheeses, crackers, and veggies for a wholesome, preservative-free lunch or snack.
- Prep Time: 17 minutes
- Cook Time: 0 minutes
- Total Time: 17 minutes
- Yield: 1 lunch box (1 serving) 1x
- Category: Lunch, Snack
- Cuisine: American
Ingredients
- 4 oz thinly sliced deli turkey or ham
- 2 oz hard salami or pepperoni slices (optional)
- 3 oz string cheese sticks or cubed cheddar cheese
- About 20 assorted crackers (e.g., Triscuit or Wheat Thins)
- Mini pita pockets or small sandwich bread slices (optional)
- 1 cup baby carrots or cucumber slices
- ½ cup grape or cherry tomatoes
- ¼ cup pickle slices or olives
- ½ cup fresh fruit like apple slices or berries
- 2 tablespoons hummus or ranch dip
- Mustard or mayonnaise packets (optional)
Instructions
- Slice deli meats into bite-sized pieces or roll them for easy eating. Cube or cut string cheese into fun shapes if desired. Arrange neatly in one compartment.
- Portion out about 20 crackers or cut mini pita pockets in half. Lightly toast bread slices if using to avoid sogginess. Place in their own section.
- Wash and cut baby carrots, cucumber, and tomatoes. Slice fruit thinly and toss with a little lemon juice to prevent browning. Place in separate compartments or silicone cups.
- Scoop hummus or ranch dip into small containers. Include mustard or mayo packets on the side if using.
- Arrange all components neatly in a lunchbox or bento box, balancing colors and textures for visual appeal. Seal container tightly.
- Keep refrigerated if not eating immediately. Consume within 24 hours for best freshness.
Notes
Keep moist items like dips and juicy fruits separate from crackers to avoid sogginess. Use fresh deli meats from the fresh counter to reduce sodium and preservatives. Prepare most components a day ahead but add fruits and dips just before serving. Toast and freeze bread if packing in advance. Use silicone cups or compartments to keep textures separate.
Nutrition
- Serving Size: One compartmentalize
- Calories: 375
- Sugar: 6
- Sodium: 600
- Fat: 18
- Saturated Fat: 7
- Carbohydrates: 30
- Fiber: 5
- Protein: 20
Keywords: DIY Lunchable, homemade lunch box, kid-friendly lunch, easy lunch recipe, healthy snacks, lunchbox ideas, quick lunch, preservative-free lunch