Love this? Save it for later!
Share the inspiration with your friends
My neighbor, a retired baker named Edna, asked me why I couldn’t just freeze the butter and grate it into the flour instead of cutting it in. I started to explain why that wouldn’t work—something about overworking the dough and melting fat. Then I stopped. Honestly, I had never tried it. So I handed her the box grater, feeling a little like I was about to prove myself right. She grated that cold butter into the flour like it was cheese, and I watched the tiny, even pieces fall into the bowl. I was sure it would be a mess. The dough, I thought, would be tough and the scones would be flat. But I was wrong. So, so wrong. Those scones came out of the oven with the tallest, flakiest layers I had ever managed at home. They were light, tender, and practically shattered when you bit into them. I had been making scones for years, and a beginner’s trick—one I was certain would fail—had just shown me up. It was a humbling moment, let me tell you. And now, I use that trick every single time I make these Perfect Cranberry Orange Scones with Buttermilk Glaze. The tart cranberries and bright orange zest are a match made in heaven, and that buttermilk glaze? It’s the kind of thing you want to eat with a spoon. Maybe you’ve been there, holding onto a method because “that’s how it’s done,” only to find out a simpler way was staring you in the face. That’s this recipe for me. It’s the one that taught me to stay quiet and listen to the Ednas of the world.
Why You’ll Love This Recipe
These aren’t just any scones. They are the ones that disappear first at brunch, the ones people ask for the recipe for. I’ve tested this method more times than I can count—through a dozen batches, a few burnt edges, and one particularly memorable incident with a spilled bag of flour. Here is why this version is the one you need to save.
- Quick & Easy: From start to oven in about 20 minutes. The grating trick saves you time and elbow grease.
- Simple Ingredients: You probably have everything but the buttermilk and cranberries in your pantry right now.
- Perfect for Holiday Mornings: These feel special enough for Christmas brunch or Thanksgiving breakfast, but simple enough for a Saturday in January when you just need a little brightness.
- Unbelievably Delicious: The tart pop of cranberry against the sweet, citrusy orange glaze is a flavor combination that just works. It’s comfort food that feels a little fancy.
What makes these different from every other scone recipe? It’s the texture. That grated butter trick creates steam pockets that lift the dough high, giving you a scone that is crisp on the outside and impossibly tender on the inside. No dry, dense hockey pucks here. This is the recipe that made me stop searching for a better one.
What Ingredients You Will Need
This recipe relies on a short list of pantry staples, but a few key players make all the difference. The ingredients work together to create that perfect balance of tart, sweet, and buttery.
- All-Purpose Flour: 2 ½ cups (315g). Spoon and level it into your measuring cup—don’t scoop, or you’ll pack in too much.
- Granulated Sugar: ½ cup (100g). Just enough to sweeten the scone without overpowering the fruit.
- Baking Powder: 1 tablespoon (14g). Make sure it’s fresh. This is your main leavener, so old powder will give you flat scones.
- Salt: ½ teaspoon (3g). Balances the sweetness and brings out the orange flavor.
- Unsalted Butter: ½ cup (1 stick, 113g), very cold. This is non-negotiable. I like using a good quality European-style butter like Kerrygold for extra richness, but any unsalted butter works.
- Dried Cranberries: 1 cup (140g). I prefer Craisins or a store brand for consistent moisture. If you use fresh cranberries, chop them roughly and expect a tarter flavor.
- Orange Zest: 2 tablespoons (from about 2 large oranges). Use a microplane for the finest zest. Avoid the white pith—it’s bitter.
- Buttermilk: ½ cup (120ml), cold. The acidity reacts with the baking powder for lift and adds a subtle tang. If you don’t have buttermilk, you can make a quick substitute: add 1 ½ teaspoons of lemon juice or white vinegar to ½ cup of whole milk and let it sit for 5 minutes.
- Vanilla Extract: 1 teaspoon (5ml). Pure vanilla, not imitation, for the best flavor.
For the Buttermilk Glaze:
- Powdered Sugar: 1 ½ cups (180g), sifted. Sifting prevents lumps.
- Buttermilk: 2-3 tablespoons (30-45ml). Start with 2 tablespoons and add more for a thinner drizzle.
- Orange Juice: 1 tablespoon (15ml), freshly squeezed from the oranges you zested.
Equipment Needed
You don’t need a fancy bakery setup for these. Here is what you’ll want on hand.
- Box Grater: This is my secret weapon for the butter. A standard box grater is perfect. If you don’t have one, you can use a pastry cutter or your fingers, but grating is easier and more consistent.
- Large Mixing Bowl: For the dry ingredients.
- Small Bowl: For the wet ingredients.
- Pastry Blender or Fork: For mixing in the butter if you don’t grate it.
- Baking Sheet: Line it with parchment paper for easy cleanup.
- Bench Scraper or Sharp Knife: For cutting the dough into wedges. A bench scraper is ideal for clean cuts without squishing the dough.
- Cooling Rack: Essential for letting the glaze set properly.
Preparation Method
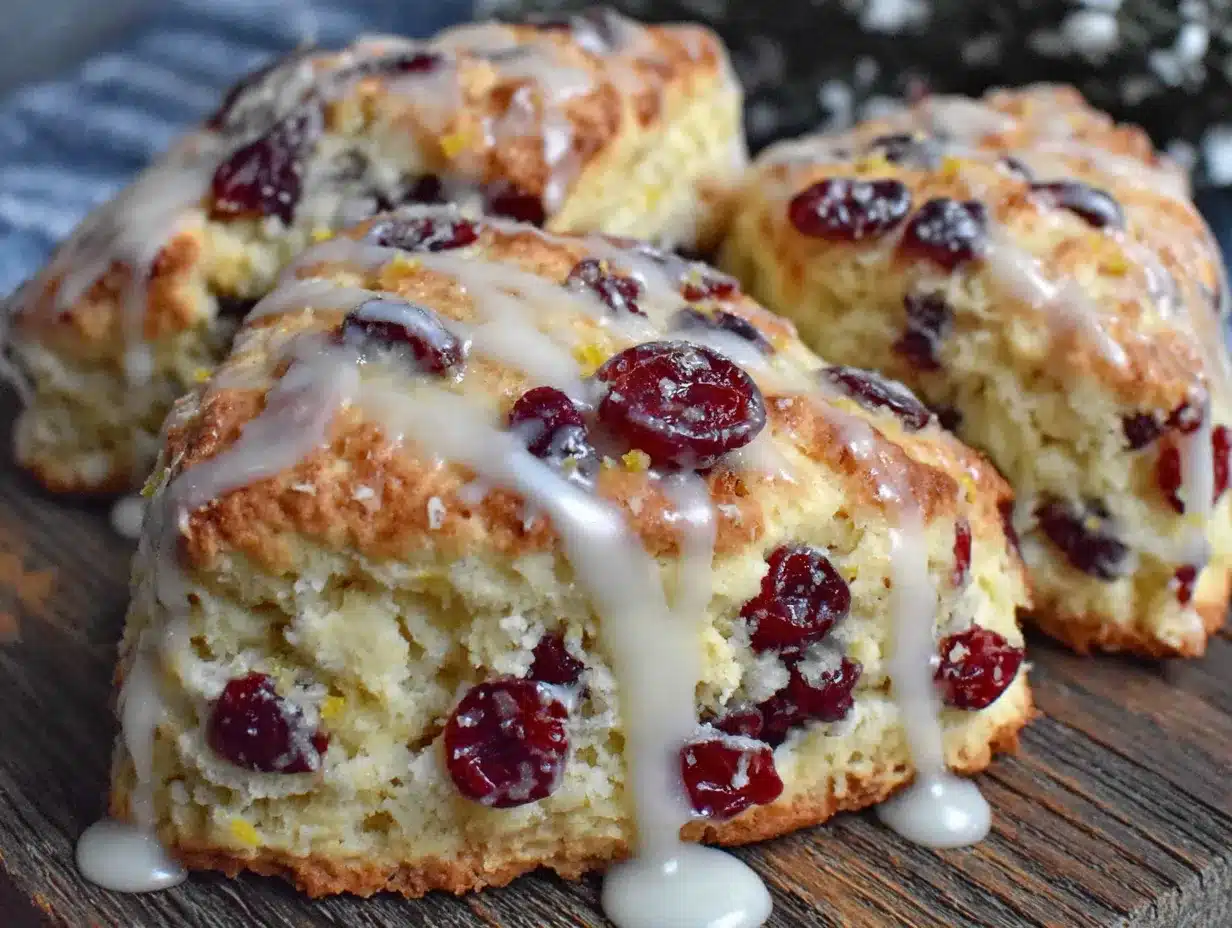
Follow these steps carefully, and you’ll have perfect scones every time. The key is keeping everything cold and handling the dough as little as possible.
- Preheat and Prep: Preheat your oven to 400°F (200°C). Line a baking sheet with parchment paper. Pop your stick of butter in the freezer for 15 minutes while you get the other ingredients ready. This makes it much easier to grate.
- Grate the Butter: Using the large holes of a box grater, grate the frozen butter into a small bowl. Place the grated butter back in the freezer while you mix the dry ingredients. This is the step that changed everything for me.
- Mix Dry Ingredients: In a large bowl, whisk together the flour, sugar, baking powder, and salt. Make sure the baking powder is evenly distributed.
- Combine Butter and Flour: Take the grated butter out of the freezer and add it to the flour mixture. Use your fingers or a fork to gently toss the butter pieces with the flour until they are all coated. You want the butter to stay in distinct, small pieces—don’t rub it in. The mixture should look like coarse meal with visible butter bits.
- Add Cranberries and Zest: Toss in the dried cranberries and orange zest. Stir gently to distribute them evenly.
- Add Wet Ingredients: In a small bowl or measuring cup, whisk together the cold buttermilk and vanilla extract. Pour this into the flour mixture all at once. Use a fork to stir until just combined. The dough will look shaggy and a little dry. That’s perfect. If it looks too dry to come together, add another tablespoon of buttermilk, but no more.
- Bring the Dough Together: Turn the dough out onto a lightly floured surface. Gently bring it together with your hands, kneading it just 2 or 3 times—just enough to form a cohesive ball. Over-kneading will make the scones tough.
- Shape and Cut: Pat the dough into a circle about ¾-inch thick. Don’t roll it out; just press it gently with your hands. Using a sharp knife or bench scraper, cut the circle into 8 wedges like a pizza.
- Bake: Place the wedges on the prepared baking sheet, spacing them about 2 inches apart. Bake for 14-17 minutes, or until the scones are golden brown on the bottom and just lightly browned on top. The kitchen will smell incredible—like butter and orange and warm sugar.
- Cool: Let the scones cool on the baking sheet for 5 minutes, then transfer them to a wire rack to cool completely before glazing.
- Make the Glaze: While the scones cool, whisk together the sifted powdered sugar, 2 tablespoons of buttermilk, and the fresh orange juice. The glaze should be thick but pourable. If it’s too thick, add a tiny bit more buttermilk. Drizzle the glaze over the cooled scones. Let it set for about 10 minutes before serving.
Cooking Tips & Techniques
I’ve made every mistake in the book with scones. Here is what I learned so you don’t have to repeat my failures.
Keep Everything Cold. This is the number one rule. Warm butter melts before the scones hit the oven, and you lose all that flaky texture. If your kitchen is warm, pop the shaped scones in the freezer for 10 minutes before baking. I once forgot to do this on a hot July day, and my scones spread into flat, greasy discs. Not my finest moment.
Don’t Twist the Cutter. If you’re cutting the wedges, press straight down and pull straight up. Twisting seals the edges and prevents the scones from rising properly. Same goes for round cutters—push down, don’t twist.
Use a Light Hand. The more you handle scone dough, the tougher it gets. Mix until it just comes together. A few dry spots are okay. They’ll sort themselves out in the oven.
Check Your Oven Temperature. Ovens run hot or cold. I recommend an oven thermometer. If your scones are browning too fast on the bottom but are still pale on top, your oven is too hot. If they’re taking 20 minutes and still look doughy, it’s too cool. Adjust accordingly next time.
Make Ahead. You can shape the scones, place them on the baking sheet, and freeze them solid. Once frozen, transfer to a zip-top bag. Bake from frozen, adding 2-3 minutes to the baking time. This is a lifesaver for holiday mornings.
Variations & Adaptations
This recipe is a great base for playing around. Here are a few ways I’ve adapted it over the years.
- Gluten-Free: Substitute a good 1:1 gluten-free baking flour blend (I like King Arthur Measure for Measure). Add 1 teaspoon of xanthan gum if your blend doesn’t already include it. The texture will be a little more crumbly, but still delicious.
- Vegan: Use a high-quality vegan butter stick (like Miyoko’s) and replace the buttermilk with ½ cup of unsweetened almond milk mixed with 1 ½ teaspoons of apple cider vinegar. For the glaze, use a vegan powdered sugar and a plant-based milk.
- Different Fruit: Swap the dried cranberries for dried cherries, chopped dried apricots, or even fresh blueberries (toss them in a little flour to prevent sinking). In the fall, I love using dried figs and a pinch of cinnamon.
- Citrus Swap: Use lemon zest and lemon juice instead of orange for a brighter, tarter scone. A lemon-blueberry version is a personal favorite of mine.
- Spiced Version: Add ½ teaspoon of ground ginger and ¼ teaspoon of ground cardamom to the dry ingredients. It pairs beautifully with the orange and cranberry.
Serving & Storage Suggestions
These scones are best enjoyed the day they are made, but they store well if you know the trick.
Serving: Serve the scones slightly warm or at room temperature. The glaze should be set but still soft. They are perfect alongside a cup of hot coffee or a pot of Earl Grey tea. For a more decadent treat, split a scone in half and toast it lightly, then slather it with butter or clotted cream.
Storage: Store leftover scones in an airtight container at room temperature for up to 2 days. Do not refrigerate them—the fridge dries them out. If you need to keep them longer, freeze them unglazed.
Freezing: To freeze, bake and cool the scones completely without the glaze. Wrap each one tightly in plastic wrap, then place them in a freezer bag. They will keep for up to 3 months. When you’re ready to eat, thaw at room temperature, then warm in a 300°F oven for 5 minutes. Make the glaze fresh and drizzle it on after warming.
Reheating: The best way to revive a day-old scone is in the oven. Pop it in a 350°F oven for 5-7 minutes. The microwave will make it rubbery, so avoid that if you can. The flavor actually deepens a little overnight, so day-old scones are still a treat.
Nutritional Information & Benefits
While these are definitely a treat, they aren’t devoid of redeeming qualities. Here is a rough estimate per scone (based on 8 servings).
Estimated Nutrition per Scone: Calories: 380 | Fat: 14g | Carbohydrates: 58g | Fiber: 2g | Sugar: 32g | Protein: 5g
Health Highlights: Cranberries are packed with antioxidants and vitamin C. Oranges provide a good dose of immune-supporting vitamin C as well. The buttermilk adds a little calcium and protein. While this is not a health food, it is a real food treat made with simple, recognizable ingredients. I feel better about serving these to my family than anything from a box or a bakery full of preservatives.
Dietary Considerations: This recipe contains gluten, dairy, and eggs (in the glaze, if you consider the buttermilk). See the variations section for vegan and gluten-free options.
Conclusion
These Perfect Cranberry Orange Scones with Buttermilk Glaze are the kind of recipe that becomes a staple. They are forgiving enough for a beginner but impressive enough to serve to company. The combination of tart, sweet, and buttery is just so satisfying, and that bright orange glaze is the finishing touch that makes them feel special. I love that I can throw them together on a whim, and I love even more that they make my house smell like a bakery. I hope you give them a try, and I hope you let yourself be a little wrong about something in the kitchen—it might just be the best thing that happens to your baking. If you make these, I’d love to hear about it. Drop a comment below and tell me how they turned out, or share your own twist on the recipe. Happy baking!
Frequently Asked Questions
Can I use fresh cranberries instead of dried?
Yes, you can. Use 1 cup of fresh or frozen cranberries. If using frozen, do not thaw them first. The scones will be more tart, and the berries may bleed a little color into the dough, but the flavor is wonderful. You might want to increase the sugar by a tablespoon to balance the tartness.
Why did my scones turn out dry and crumbly?
This usually happens from over-measuring the flour or over-baking. Make sure you spoon the flour into your measuring cup and level it off, rather than scooping it. Also, check your oven temperature. If the scones are in there a minute too long, they will dry out quickly. Bake until just golden on the bottom.
Can I make the dough ahead of time and bake later?
Absolutely. Shape the scones, place them on the baking sheet, and refrigerate for up to 24 hours. You can also freeze them as described in the tips section. If baking from the fridge, you may need to add 1-2 minutes to the baking time. No need to bring them to room temperature first.
What can I use instead of buttermilk?
You can make a quick buttermilk substitute by adding 1 ½ teaspoons of lemon juice or white vinegar to ½ cup of whole milk. Let it sit for 5 minutes until it curdles slightly. It won’t be as thick as real buttermilk, but it will work in a pinch. You can also use plain yogurt thinned with a little milk.
Can I skip the glaze?
You can, but you’ll be missing out on a key part of the experience. The glaze adds sweetness and moisture that balances the tart cranberries. If you want a less sweet version, you can brush the warm scones with a little melted butter and sprinkle them with coarse sugar instead. That gives a nice crunchy top without the icing.
Pin This Recipe!

Perfect Cranberry Orange Scones with Easy Buttermilk Glaze
These tender, flaky scones are packed with tart dried cranberries and bright orange zest, then drizzled with a sweet buttermilk glaze. A simple grating trick ensures tall, buttery layers every time.
- Prep Time: 20 minutes
- Cook Time: 17 minutes
- Total Time: 37 minutes
- Yield: 8 servings 1x
- Category: Breakfast
- Cuisine: American
Ingredients
- 2 ½ cups (315g) all-purpose flour
- ½ cup (100g) granulated sugar
- 1 tablespoon (14g) baking powder
- ½ teaspoon (3g) salt
- ½ cup (1 stick, 113g) unsalted butter, very cold
- 1 cup (140g) dried cranberries
- 2 tablespoons orange zest (from about 2 large oranges)
- ½ cup (120ml) cold buttermilk
- 1 teaspoon (5ml) vanilla extract
- 1 ½ cups (180g) powdered sugar, sifted
- 2–3 tablespoons (30-45ml) buttermilk (for glaze)
- 1 tablespoon (15ml) freshly squeezed orange juice
Instructions
- Preheat oven to 400°F (200°C). Line a baking sheet with parchment paper. Place the stick of butter in the freezer for 15 minutes.
- Using the large holes of a box grater, grate the frozen butter into a small bowl. Return the grated butter to the freezer.
- In a large bowl, whisk together flour, sugar, baking powder, and salt.
- Add the grated butter to the flour mixture. Use your fingers or a fork to gently toss until the butter pieces are coated and the mixture looks like coarse meal with visible butter bits.
- Toss in the dried cranberries and orange zest. Stir gently to distribute.
- In a small bowl, whisk together cold buttermilk and vanilla extract. Pour into the flour mixture and stir with a fork until just combined. The dough will look shaggy and slightly dry.
- Turn the dough out onto a lightly floured surface. Gently bring it together with your hands, kneading just 2-3 times to form a cohesive ball.
- Pat the dough into a circle about ¾-inch thick. Cut into 8 wedges like a pizza.
- Place wedges on the prepared baking sheet, spacing about 2 inches apart. Bake for 14-17 minutes, until golden brown on the bottom and lightly browned on top.
- Let scones cool on the baking sheet for 5 minutes, then transfer to a wire rack to cool completely.
- For the glaze: whisk together sifted powdered sugar, 2 tablespoons buttermilk, and orange juice until thick but pourable. Add more buttermilk if needed. Drizzle over cooled scones. Let set for about 10 minutes before serving.
Notes
Keep all ingredients cold for flakiest scones. Do not overmix the dough. For make-ahead, shape scones and freeze unbaked; bake from frozen adding 2-3 minutes. Store leftovers at room temperature for up to 2 days.
Nutrition
- Serving Size: 1 scone
- Calories: 380
- Sugar: 32
- Sodium: 280
- Fat: 14
- Saturated Fat: 8
- Carbohydrates: 58
- Fiber: 2
- Protein: 5
Keywords: cranberry orange scones, buttermilk scones, easy scone recipe, holiday breakfast, brunch recipe


