Love this? Save it for later!
Share the inspiration with your friends
My neighbor, a retired art teacher named Mrs. Gable, watched me wrestling a piping bag on my back porch last October. I was sweating over a batch of fancy appetizers for a grown-up party, and honestly, I was losing the battle. She didn’t say anything at first. Then, she just walked over, picked up a hard-boiled egg, and peeled it in one perfect, smooth motion. “You’re thinking too hard,” she said. “Halloween food for kids should be fun, not fussy. It should make them laugh.”
She told me about making these black cat deviled eggs for her kindergarten class every year. She didn’t have a recipe written down—she just did it from memory. The idea was so simple it almost felt like cheating. You take a classic deviled egg, you add a little bit of black food coloring to the yolk mixture (or you get creative with black olives), and you turn it into a cute cat face. That was it. No elaborate carving, no fancy tools. Just a good, old-fashioned laugh on a plate.
I went back inside and tried it myself. The first batch looked a little… sad. One cat had a crooked ear, and another looked more like a grumpy owl. But my kids, who had been watching from the kitchen table, absolutely lost it. They thought the ugly ones were the best part. Maybe you’ve been there—you try to make something perfect for your family, and they end up loving the messy version the most. That’s the spirit of this recipe. It’s not about perfection. It’s about making something silly and delicious together. I’ve been making these every Halloween since, and they never fail to get a giggle.
Why You’ll Love This Recipe
Let’s be real—Halloween can get expensive. Between costumes, candy, and decorations, the last thing you need is a complicated appetizer that costs a fortune. These black cat deviled eggs are the opposite of that. They use simple, budget-friendly ingredients that you probably already have in your fridge. And the best part? They come together in under 30 minutes, leaving you more time to help the kids with their costume zippers or to answer the door for trick-or-treaters.
- Quick & Easy: From start to finish, you’re looking at about 20 minutes of active work. The hardest part is boiling the eggs, and even that is hands-off.
- Simple Ingredients: No weird specialty items. You need eggs, mayo, mustard, and a few black olives or a drop of food coloring. That’s it.
- Perfect for Halloween Parties: Whether it’s a school party, a family gathering, or just a spooky snack before the big candy hunt, these fit right in.
- Crowd-Pleaser: My picky eater, who swears he hates eggs, ate three of these last year. There’s something about the cat face that makes them irresistible to kids.
- Unbelievably Delicious: The creamy, tangy yolk filling paired with the salty pop of a black olive “ear” is a combination that just works. It’s comfort food with a spooky twist.
What makes this recipe different from the dozens of other Halloween deviled egg recipes out there? It’s the attention to the little details. I’ve tested different ways to make the “fur” look right, and I’ve found that using a small piping tip (or even a zip-top bag with the corner snipped) gives you the best control. Plus, I’ve figured out a trick to keep the black olives from sliding off the egg whites—a tiny dab of the yolk mixture acts like glue. This isn’t just another version; it’s the version that works every single time, even when you’re in a rush.
What Ingredients You Will Need
This recipe relies on a handful of pantry staples to create something that feels special without breaking the bank. Every ingredient has a job, from the creamy base to the salty garnish. Here’s what you need to gather:
- 12 large eggs, hard-boiled and peeled – The foundation of the whole dish. I recommend using eggs that are at least a week old; they peel much easier than fresh ones. (Pro tip: buy your eggs a week ahead of time for the best results.)
- 1/3 cup mayonnaise – This gives the filling its creamy texture. I prefer Hellmann’s or Duke’s for their tangy flavor, but any brand works. If you’re out of mayo, plain Greek yogurt is a surprisingly good substitute.
- 1 teaspoon yellow mustard – Adds a little tang and that classic deviled egg color. You can use Dijon for a sharper flavor, but the kids might notice the difference.
- 1/2 teaspoon white vinegar – A tiny splash brightens everything up. Don’t skip it—it makes the filling taste more like the ones from the deli.
- Salt and black pepper to taste – Simple seasonings that let the eggs shine.
- 1 can (2.25 oz) sliced black olives, drained – These are your cat ears and noses. Look for the pre-sliced ones to save time, but whole olives work too if you want to slice them yourself. (I always buy an extra can because my kids eat them straight from the can while I’m working.)
- Optional: Black food coloring or black cocoa powder – If you want the yolk mixture to be a deep, spooky black, you can add a drop or two of black gel food coloring. I’ve also used black cocoa powder (like the kind for Oreo cookies) for a subtle chocolate flavor that kids love. It’s not traditional, but it’s delicious.
- Paprika or smoked paprika for garnish – A light dusting adds color and a little smoky flavor. It’s optional, but it makes the cats look more “finished.”
For the best texture, make sure your eggs are fully hard-boiled but not overcooked. A green ring around the yolk means they’ve been boiled too long, which can make the filling a little sulfurous. If you’re using food coloring, start with just one drop and mix well—you can always add more, but you can’t take it away. And if you’re feeding very young kids, consider using black olive slices instead of food coloring to keep things all-natural.
Equipment Needed
You don’t need a fancy kitchen to make these little guys. Here’s what you’ll need, along with a few workarounds if you’re missing something:
- Large pot with a lid – For boiling the eggs. Any pot works, but a wider pot lets you cook more eggs at once without them bumping into each other and cracking.
- Mixing bowls – One medium bowl for the yolks and one small bowl for the filling mixture.
- Fork or potato masher – For mashing the yolks. A fork is fine, but a potato masher makes it even faster and gives you a smoother texture.
- Piping bag or zip-top bag – For piping the filling into the egg whites. A piping bag with a star tip gives you a pretty swirl, but a zip-top bag with the corner snipped off works just as well. I’ve used both, and honestly, the zip-top bag is easier to clean.
- Small knife and cutting board – For slicing the black olives into ears and noses.
- Serving platter – A flat plate or a deviled egg carrier works best. I use a white platter to make the black cats pop.
A few budget-friendly tips: if you don’t have a piping bag, just use a sturdy zip-top bag. And if you don’t have a deviled egg carrier, a regular plate lined with a paper towel works perfectly to keep the eggs from sliding around. I’ve been using the same zip-top bag method for years, and it’s never let me down.
Preparation Method
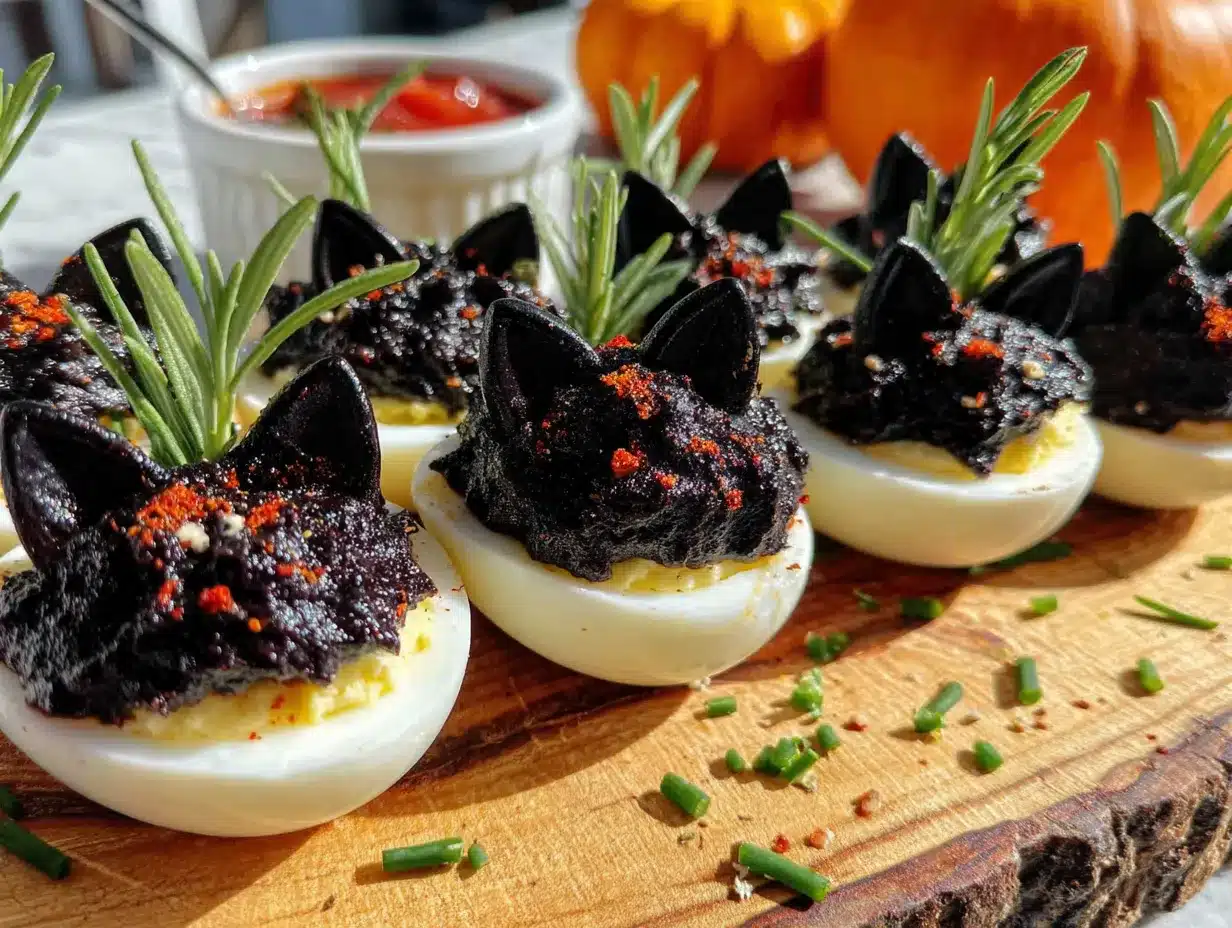
Let’s get to the fun part. Follow these steps, and you’ll have a platter of adorable black cat deviled eggs in no time.
- Boil the eggs. Place your 12 eggs in a single layer in a large pot. Cover them with cold water by about an inch. Bring the water to a rolling boil over high heat. Once it’s boiling, cover the pot, turn off the heat, and let the eggs sit for exactly 12 minutes. (Set a timer—this is important.) After 12 minutes, transfer the eggs to a bowl of ice water to cool completely. This stops the cooking and makes peeling easier.
- Peel the eggs. Once the eggs are cool enough to handle, gently tap them on the counter to crack the shell all over. Start peeling from the wider end, where the air pocket is—it’s usually easier. Rinse the peeled eggs under cold water to remove any tiny shell fragments. Pat them dry with a paper towel.
- Slice the eggs in half lengthwise. Use a sharp knife to cut each egg in half from top to bottom. Wipe the knife clean between cuts for the neatest edges. Gently pop out the yolks into a medium bowl. Arrange the egg white halves on your serving platter, cut side up.
- Make the filling. Add the mayonnaise, yellow mustard, white vinegar, and a pinch of salt and pepper to the bowl with the yolks. Mash everything together with a fork until it’s smooth and creamy. If you’re using black food coloring, add one drop at this point and stir until the color is even. If you want a deeper black, add a second drop. (Remember: you can always add more, but you can’t take it out.)
- Prepare the olive decorations. Take your drained sliced black olives. For the cat ears, you’ll need to cut each slice in half to create two pointed “ear” shapes. For the noses, you can use small triangular pieces or just leave a few slices whole. I like to set aside about 24 ear halves and 12 nose pieces. (You’ll have extra olives, which is perfect for snacking.)
- Pipe the filling. Spoon the yolk mixture into your piping bag or zip-top bag. If using a zip-top bag, squeeze the filling into one corner and snip off about 1/4 inch of the tip. Pipe a generous swirl of filling into each egg white half. Don’t be shy—you want a nice mound that looks like a little cat face.
- Add the cat features. Immediately after piping, press two olive ear halves into the top of each filling mound, pointing upward like cat ears. Place one olive nose piece in the center, just below the ears. If you want to add whiskers, you can use thin strips of chives or just leave the face simple. (My kids prefer the simple version.)
- Garnish and serve. Lightly dust the eggs with paprika or smoked paprika for color. Serve immediately, or refrigerate for up to 2 hours before serving. These are best enjoyed the same day.
A personal tip: if the olive ears keep falling over, dab a tiny bit of the yolk mixture on the back of each olive before pressing it into the filling. It acts like edible glue and keeps everything in place. I learned this after my first batch of cats looked like they were melting.
Cooking Tips & Techniques
I’ve made these eggs about a dozen times now, and I’ve learned a few things the hard way. Here are my best tips to make your black cat deviled eggs perfect every time.
- Perfect hard-boiled eggs every time. The biggest mistake people make is boiling the eggs too long. That green ring around the yolk? It’s not harmful, but it makes the filling look less appetizing. Stick to the 12-minute method I described above. If you’re at a high altitude, add an extra minute or two. If you’re at sea level, 12 minutes is perfect.
- Peeling without the pain. Older eggs peel much easier than fresh ones. If you’re in a rush, try this trick: add a teaspoon of baking soda to the boiling water. It raises the pH and helps loosen the shell. I’ve tried it, and it really works.
- Keep the filling smooth. For the creamiest filling, make sure your mayonnaise is at room temperature. Cold mayo can make the mixture seize up. Also, mash the yolks while they’re still slightly warm—they mash more easily and absorb the other ingredients better.
- Avoid a runny filling. If your filling seems too thin, add a little more mashed yolk or a pinch of instant potato flakes. If it’s too thick, add a tiny splash of milk or pickle juice. (Pickle juice adds a nice tang, believe it or not.)
- Timing is everything. You can boil and peel the eggs a day ahead of time. Store them in the fridge, unpeeled, in a covered container. Then, on Halloween day, you just need to slice, mix, and pipe. It makes the whole process feel effortless.
One time, I forgot to drain the olives properly, and the moisture made the filling a little watery. Now I always pat the olives dry with a paper towel before slicing them. It’s a small step, but it makes a big difference.
Variations & Adaptations
This recipe is incredibly flexible. Here are a few ways to change it up based on your family’s tastes or dietary needs.
- Gluten-Free Version: This recipe is naturally gluten-free, as long as your mustard and mayonnaise are certified gluten-free. Most major brands are, but it’s worth double-checking the labels if you’re serving someone with celiac disease.
- Dairy-Free Adaptation: The classic recipe doesn’t use dairy, but if you’re adding any extras like sour cream to the filling, swap it for a dairy-free alternative. The basic mayo-and-mustard version is already dairy-free.
- Spicy Cat Version: Add a dash of hot sauce or a pinch of cayenne pepper to the yolk mixture for a little kick. My husband loves this version, and it’s a fun surprise for adults at the party.
- Avocado “Green Monster” Cats: Replace half the mayonnaise with mashed avocado for a greener, healthier filling. The color won’t be black, but it’s a fun twist—you can call them “Swamp Cats” or “Monster Cats.” My kids thought this was hilarious.
- Different Cat Faces: Use small strips of roasted red pepper for the tongue or tiny capers for the eyes. You can get really creative with the faces. One year, we made a whole family of cats with different expressions—grumpy cats, surprised cats, sleepy cats.
I’ve also tried making these with quail eggs for a “mini cat” version, which was adorable but took forever to peel. Stick with chicken eggs for your first try.
Serving & Storage Suggestions
These deviled eggs are best served cold or at room temperature, which makes them perfect for a party spread. Here’s how to serve and store them like a pro.
- Serving Temperature: Take the eggs out of the fridge about 15 minutes before serving. This takes the chill off and lets the flavors come through. Don’t leave them out for more than 2 hours, especially if it’s a warm day.
- Presentation Ideas: Arrange the eggs on a black or orange platter for a festive look. You can scatter a few candy corn or pumpkin-shaped pretzels around the edges for extra Halloween flair. I like to place a small sign next to the platter that says “Black Cat Crossing” or “Witch’s Brew.”
- Complementary Dishes: These pair wonderfully with other Halloween finger foods like mummy pizza rolls, spider web dip, or a bowl of Halloween popcorn mix. They also go great with a simple green salad if you’re serving them as part of a meal.
- Storage Instructions: Store leftover deviled eggs in an airtight container in the refrigerator for up to 2 days. Place them in a single layer, and cover them loosely with plastic wrap to prevent them from drying out. Do not freeze—the texture will be ruined.
- Reheating: These are served cold, so no reheating is needed. If you’ve stored them and the filling seems a little dry, let them sit at room temperature for 10 minutes before serving. The moisture will redistribute.
- Flavor Development: Honestly, these eggs taste even better the next day. The flavors meld together overnight, and the filling becomes even creamier. Just be aware that the black food coloring might bleed slightly into the egg white over time, which is totally fine and still looks spooky.
Nutritional Information & Benefits
Deviled eggs are a surprisingly nutritious snack, especially when you compare them to the candy and cookies that dominate Halloween. Here’s a quick breakdown:
| Nutrient | Per Serving (2 halves) |
|---|---|
| Calories | 140 |
| Protein | 10g |
| Fat | 10g |
| Carbohydrates | 1g |
| Fiber | 0g |
| Sugar | 0g |
| Sodium | 180mg |
- High-Quality Protein: Eggs are one of the best sources of complete protein, which helps keep kids full and focused during a long night of trick-or-treating.
- Healthy Fats: The fats in egg yolks and mayonnaise are mostly unsaturated, which is good for heart health. Plus, they help your body absorb fat-soluble vitamins.
- Vitamins and Minerals: Eggs are rich in vitamin B12, vitamin D, and choline, which supports brain health. The black olives add a small amount of iron and healthy monounsaturated fats.
- Dietary Considerations: This recipe is naturally low-carb, keto-friendly, and gluten-free. If you’re watching your sodium, use low-sodium olives and skip the added salt.
- Allergen Note: Eggs and mayonnaise (which contains eggs) are the main allergens. If you’re serving someone with an egg allergy, this recipe isn’t suitable. For a vegan alternative, try making deviled “eggs” with halved boiled potatoes and a vegan mayo filling.
I love that I can serve these to my kids without worrying about a sugar crash later. They get a little protein and healthy fat to balance out the candy they’ll inevitably eat. It’s a win-win in my book.
Conclusion
These black cat deviled eggs are more than just a cute Halloween snack—they’re a tradition in the making. They’re easy enough for a busy weeknight, cheap enough for a big party, and fun enough to get the whole family involved. My kids now argue over who gets to place the olive ears on each cat, and I love that we have a little ritual that’s just ours.
I hope you give these a try, whether it’s for a classroom party, a family dinner, or just a silly snack before the big candy hunt. Don’t be afraid to make them your own—use different face shapes, add a little spice, or let the kids go wild with the decorations. The best part about this recipe is that it’s forgiving. Even the ugliest cat will still taste amazing.
If you make these, I’d love to hear about it. Drop a comment below and tell me how your family liked them. Did your kids come up with their own cat faces? Did you try a fun variation? Share a photo on Pinterest and tag me—I can’t wait to see your spooky creations. Until next time, happy Halloween and happy cooking!
Frequently Asked Questions
Can I make these black cat deviled eggs ahead of time?
Yes, you can! You can boil and peel the eggs up to 2 days in advance. Store them unpeeled in the fridge. You can also prepare the filling and store it in a piping bag in the fridge for up to 24 hours. Assemble the eggs just before serving for the best appearance.
How do I get the black food coloring to be really dark?
Start with one drop of black gel food coloring and mix well. If the color is more gray than black, add another drop. Some brands are stronger than others, so go slowly. If you don’t want to use artificial coloring, black cocoa powder gives a dark gray color with a chocolatey taste.
My olive ears keep falling off. What am I doing wrong?
The most common reason is that the olive slices are too wet. Pat them dry with a paper towel before placing them on the filling. Also, use a tiny dab of the yolk mixture as “glue” on the back of each olive piece. Press gently and let them set for a minute before moving the platter.
Can I use a different type of olive for the cat features?
Absolutely. Kalamata olives work well and have a slightly different flavor. Green olives stuffed with pimentos can also be used, but they’re a little brinier. Just make sure whatever olive you use is firm enough to hold its shape when sliced.
How long will these deviled eggs last at a party?
They should be fine at room temperature for up to 2 hours. If you’re serving them outdoors or in a warm room, place the platter on a bed of ice to keep them cool. After 2 hours, any leftovers should be refrigerated promptly.
Pin This Recipe!
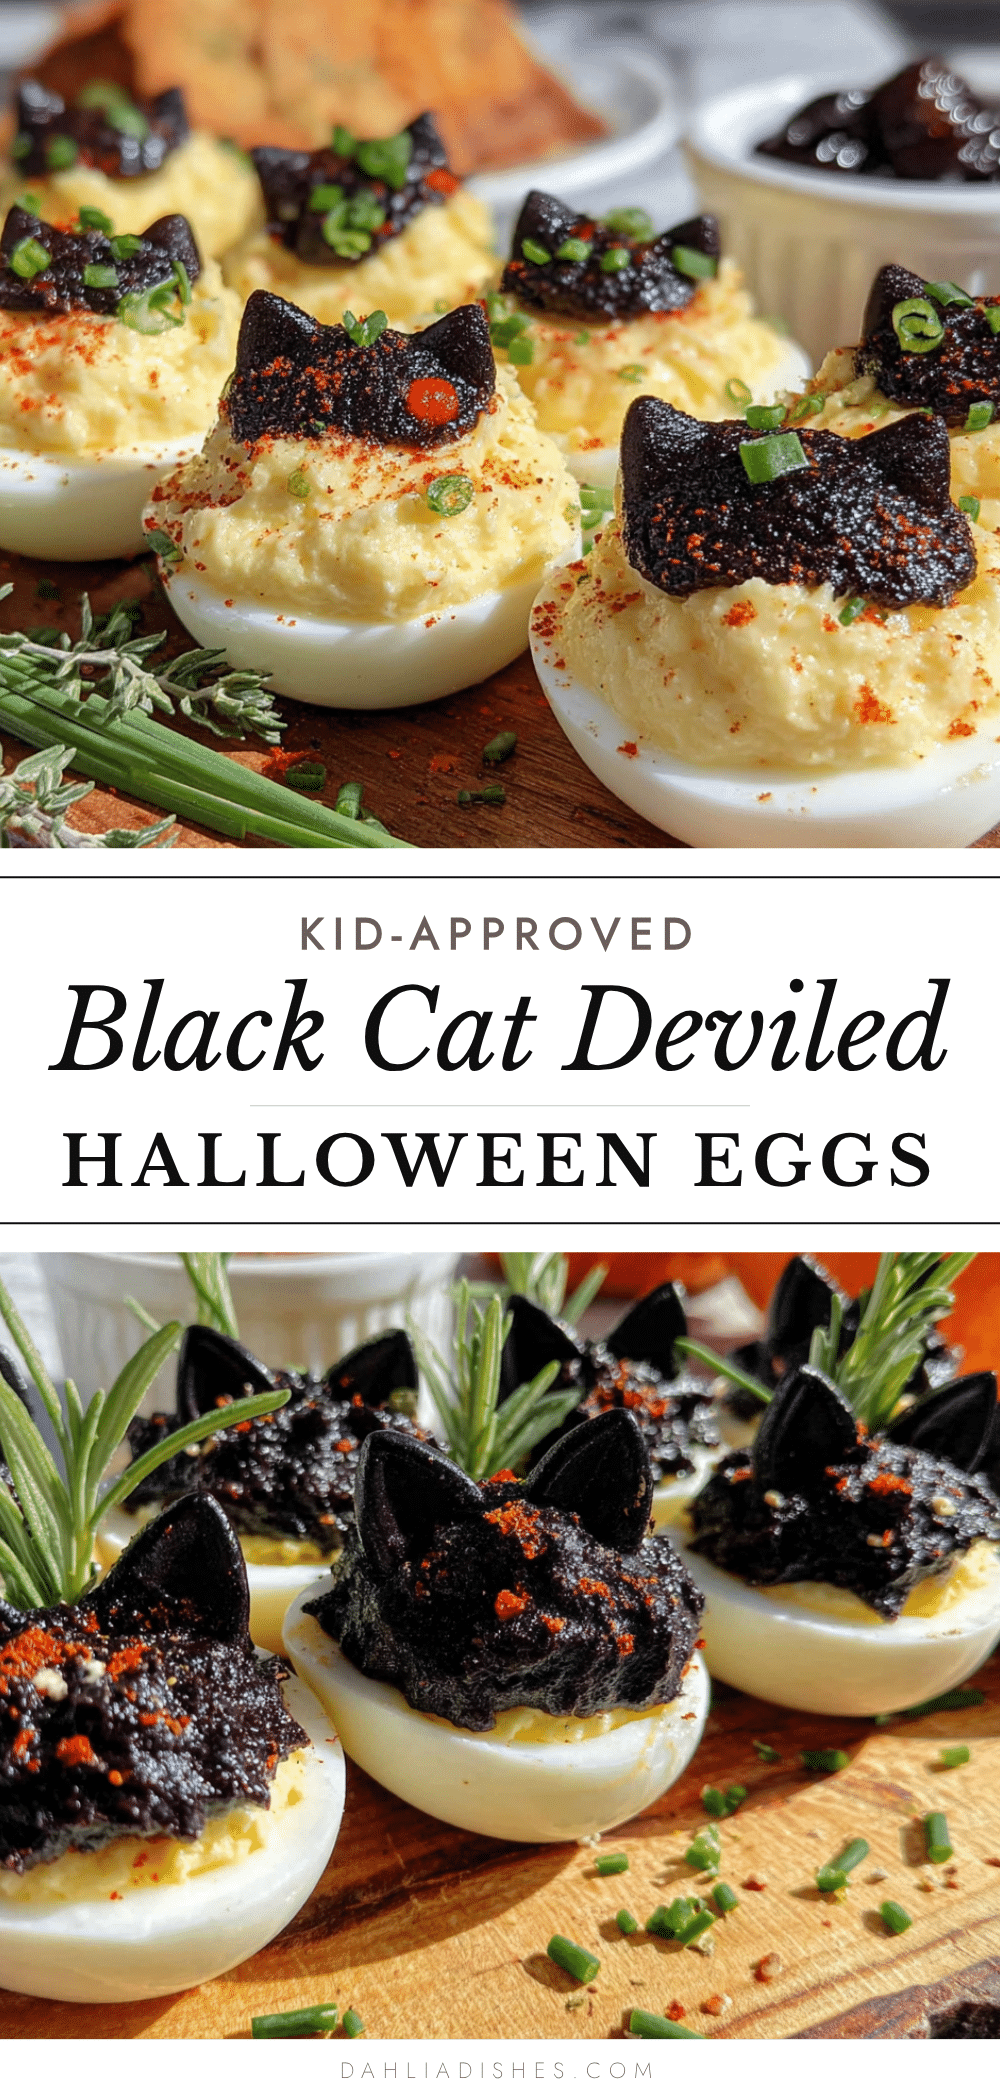
Best Black Cat Deviled Eggs: Easy Halloween Recipe
These adorable black cat deviled eggs are a fun, easy, and budget-friendly Halloween treat that kids and adults will love. Made with simple ingredients, they come together in under 30 minutes for a spooky snack that’s sure to get a giggle.
- Prep Time: 20 minutes
- Cook Time: 12 minutes
- Total Time: 32 minutes
- Yield: 24 deviled egg halves (12 servings of 2 halves each) 1x
- Category: Appetizer
- Cuisine: American
Ingredients
- 12 large eggs, hard-boiled and peeled
- 1/3 cup mayonnaise
- 1 teaspoon yellow mustard
- 1/2 teaspoon white vinegar
- Salt and black pepper to taste
- 1 can (2.25 oz) sliced black olives, drained
- Optional: Black food coloring or black cocoa powder
- Paprika or smoked paprika for garnish
Instructions
- Boil the eggs: Place 12 eggs in a single layer in a large pot. Cover with cold water by about an inch. Bring to a rolling boil over high heat. Cover, turn off heat, and let sit for exactly 12 minutes. Transfer to a bowl of ice water to cool completely.
- Peel the eggs: Tap eggs gently to crack shells, then peel starting from the wider end. Rinse under cold water and pat dry.
- Slice eggs in half lengthwise. Remove yolks to a medium bowl. Arrange egg white halves on a serving platter, cut side up.
- Make the filling: Add mayonnaise, yellow mustard, white vinegar, salt, and pepper to the yolks. Mash with a fork until smooth and creamy. If using black food coloring, add 1-2 drops and stir until evenly colored.
- Prepare olive decorations: Cut each olive slice in half to create pointed ear shapes. Set aside 24 ear halves and 12 nose pieces (or use whole slices for noses).
- Pipe the filling: Spoon yolk mixture into a piping bag or zip-top bag. Snip off 1/4 inch of the tip. Pipe a generous swirl into each egg white half.
- Add cat features: Immediately press two olive ear halves into the top of each filling mound. Place one olive nose piece in the center below the ears.
- Garnish and serve: Lightly dust with paprika. Serve immediately or refrigerate for up to 2 hours.
Notes
For easier peeling, use eggs that are at least a week old. If olive ears keep falling off, dab a tiny bit of yolk mixture on the back as ‘glue’. You can boil and peel eggs up to 2 days ahead. The filling can be made 24 hours in advance and stored in a piping bag in the fridge. Assemble just before serving for best appearance.
Nutrition
- Serving Size: 2 deviled egg halves
- Calories: 140
- Sodium: 180
- Fat: 10
- Saturated Fat: 2.5
- Carbohydrates: 1
- Protein: 10
Keywords: Halloween deviled eggs, black cat deviled eggs, easy Halloween appetizer, spooky deviled eggs, kid-friendly Halloween snack


