Love this? Save it for later!
Share the inspiration with your friends
It was 11:47 PM on a random Wednesday in December, and I had an overwhelming need to make something that looked like it belonged in Whoville. The craving wasn’t for cookies exactly—it was for tiny, edible proof that the Grinch’s heart grows three sizes. I didn’t have any fancy cookie cutters or food coloring gels, but I had a bag of all-purpose flour, a stick of butter that was finally at room temperature, and this ridiculous idea that maybe, just maybe, I could capture that moment of transformation in a single bite. Honestly, I’d been watching the cartoon for the fourth time that week—don’t judge me—and something about that final scene where the Grinch carves the roast beast just gets me every time.
So there I was, pajama-clad, measuring sugar into a bowl while my cat judged me from the counter. I wanted a cookie that felt like a hug, that looked festive without being fussy, and that had that perfect little pocket for something sweet and red. The thumbprint cookie was the obvious answer, but I needed a twist. Red sugar sprinkles seemed too simple at first, but let me tell you, the way they catch the light? Pure magic. Maybe you’ve been there—staring into your pantry at 11 PM, feeling like if you don’t make something beautiful right now, the whole week was a waste.
The first batch came out lopsided and some of the thumbprints vanished during baking. I almost gave up. But then I remembered: the Grinch didn’t get it right on the first try either. The second batch? That’s when the magic happened. The red sugar sparkled like tiny Christmas lights, and the cookie itself was soft, buttery, and just sweet enough. I ate three before they even cooled. These cookies aren’t just a recipe—they’re a little piece of that late-night stubbornness, that belief that you can make something good out of what you have. And honestly? They’re the coziest thing I’ve ever baked.
Why You’ll Love This Recipe
These Cozy Grinch Thumbprint Cookies with Red Sugar Sprinkles aren’t just another Christmas cookie. They’re the kind of treat that makes you slow down, take a deep breath, and actually enjoy the season. I’ve tested this recipe six times—yes, six—to get that perfect balance of soft, crumbly cookie and sweet, jammy center. Here’s why this version is the one you’ll come back to year after year:
- Quick & Easy: From start to finish, these cookies take about 35 minutes. No chilling required, no complicated techniques. Perfect for those “I need cookies NOW” moments.
- Simple Ingredients: You probably have everything in your kitchen right now. Butter, sugar, flour, jam, and red sugar sprinkles. That’s it. No trips to a specialty baking store.
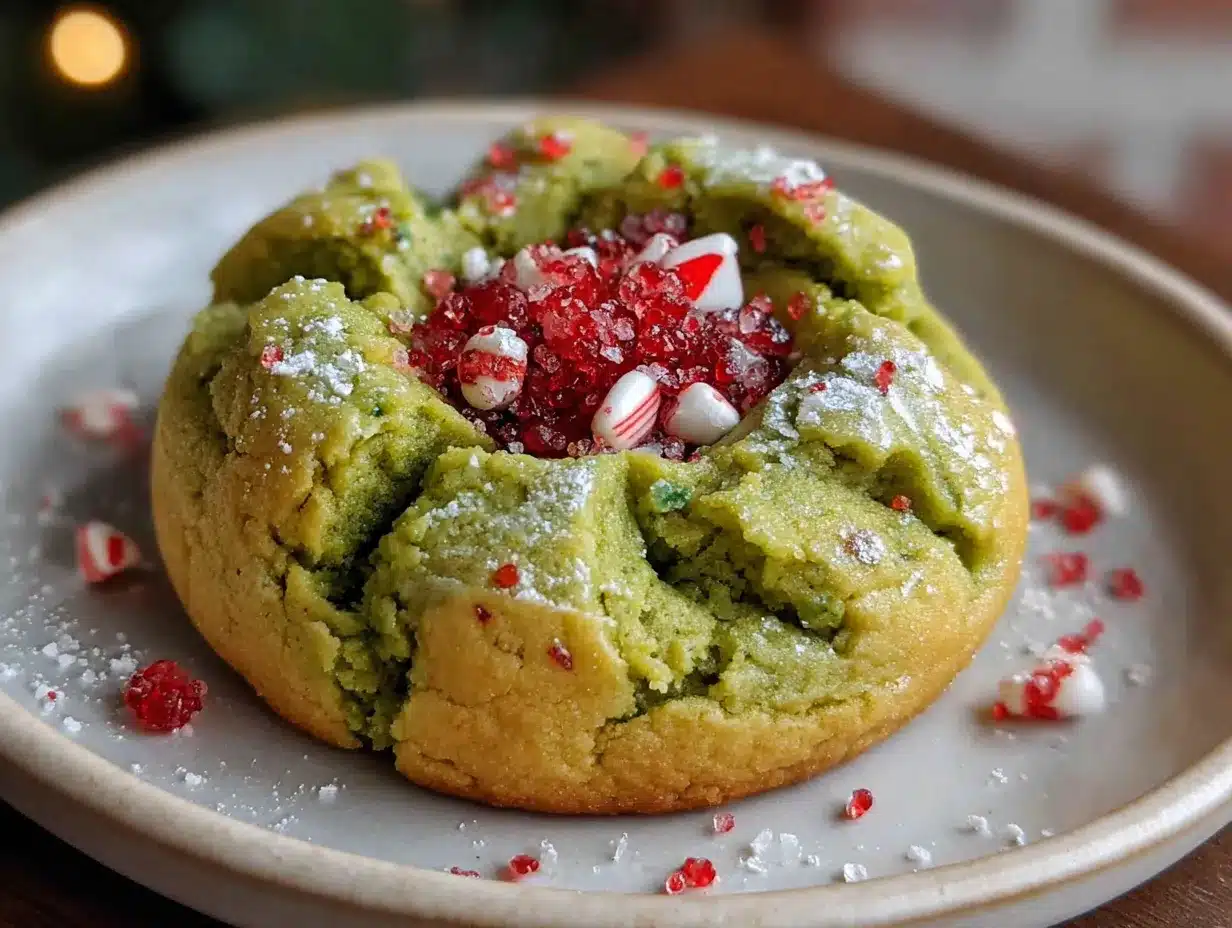
- Perfect for Holiday Parties: These little guys are showstoppers on any cookie platter. The red center against the golden cookie is pure holiday cheer.
- Crowd-Pleaser: Kids love them because they look like something out of a Dr. Seuss book. Adults love them because they taste like childhood memories.
- Unbelievably Delicious: The texture is what gets me every time—soft and tender with a slight crunch from the sugar coating. The jam center adds this burst of fruity sweetness that balances the buttery cookie perfectly.
What makes these cookies different from the dozens of thumbprint recipes out there? It’s the technique. I use a secret trick—freezing the jam for 15 minutes before filling the cookies—to keep the centers perfectly nestled in the dough instead of bubbling out everywhere. Plus, the red sugar sprinkles aren’t just for decoration; they add a subtle textural contrast that makes each bite interesting. This isn’t just a cookie; it’s a little moment of joy, the kind that makes you close your eyes after the first bite and forget about everything else for a second.
What Ingredients You Will Need
This recipe uses simple, wholesome ingredients to deliver bold flavor and satisfying texture without the fuss. Most of these are pantry staples, so you can whip up a batch anytime the holiday spirit—or a craving for something cozy—strikes.
For the Cookie Dough
- 1 cup (226g) unsalted butter, softened — I prefer using Kerrygold or Challenge butter for the best flavor. Make sure it’s truly softened to room temperature, not melted.
- 2/3 cup (133g) granulated sugar — Regular white sugar works perfectly here. Don’t substitute with brown sugar; it changes the texture.
- 1 large egg yolk, at room temperature — The yolk adds richness without making the dough too wet. Save the egg white for another use.
- 1 teaspoon vanilla extract — Pure vanilla extract makes a difference. Imitation vanilla will work, but the flavor won’t be as warm and cozy.
- 1 1/2 cups (188g) all-purpose flour — Spoon and level your flour for the most accurate measurement. Scooping directly from the bag can pack in too much flour.
- 1/4 teaspoon salt — Just a pinch to balance the sweetness and enhance the butter flavor.
For the Coating and Filling
- 1/2 cup (100g) granulated sugar — For rolling the dough balls. This gives the cookies their sparkly exterior.
- 3 tablespoons red sanding sugar or red sprinkles — Look for the coarse, sparkly kind. Wilton makes a great red sanding sugar that really catches the light.
- 1/3 cup (about 100g) raspberry or strawberry jam — Seedless jam works best for a smooth center. Bonne Maman raspberry preserves are my go-to for that perfect sweet-tart balance.
Ingredient Tips: If you’re using a different brand of butter, just make sure it’s at least 80% butterfat. For the jam, you can use any red fruit flavor—cherry, strawberry, or even pomegranate jelly. Just avoid anything with large fruit chunks or seeds, as they can make the thumbprints look messy. And here’s a little secret: if you want an even more vibrant red center, mix a tiny drop of red food coloring into your jam before filling the cookies.
Equipment Needed
You don’t need a fancy bakery setup for these cookies. Here’s what you’ll need:
- Electric mixer — A stand mixer with the paddle attachment is ideal, but a hand mixer works just as well. I’ve made these with both, and honestly, the hand mixer gives me more control.
- Two baking sheets — Light-colored, rimmed baking sheets are best. Dark pans can cause the bottoms to brown too quickly.
- Parchment paper or silicone baking mat — Silpat mats are my favorite because the cookies slide right off and the bottoms stay perfectly golden.
- Medium mixing bowl and large mixing bowl — Any bowls you have will work. I use my grandmother’s old Pyrex mixing bowls for that nostalgic feel.
- Measuring cups and spoons — For accuracy, especially with the flour. A kitchen scale is even better if you have one.
- 1-tablespoon cookie scoop — This ensures all your cookies are the same size, which means they’ll bake evenly. Not essential, but helpful.
- Small bowl for rolling sugar — A shallow bowl or plate works perfectly.
- Cooling rack — Wire racks allow air to circulate so the cookies cool evenly without soggy bottoms.
If you don’t have a cookie scoop, just use a regular tablespoon and roll the dough into balls with your hands. The warmth of your hands helps the sugar stick better anyway. And if you’re missing a cooling rack, just transfer the cookies to a clean cutting board or plate—they’ll still be delicious.
Preparation Method
Let’s make some magic happen. Follow these steps, and you’ll have a batch of cozy Grinch cookies in no time.
- Preheat your oven to 350°F (175°C). Line two baking sheets with parchment paper or silicone mats. This is important—don’t skip the lining, or the cookies might stick and lose their beautiful bottoms.
- In a large mixing bowl, cream together the softened butter and 2/3 cup sugar. Beat on medium speed for about 3 minutes until the mixture is light, fluffy, and pale yellow. You’re looking for a texture that’s almost like whipped frosting. Scrape down the sides of the bowl halfway through.
- Add the egg yolk and vanilla extract. Beat on low speed until just combined. Don’t overmix here—you don’t want to incorporate too much air. The dough should look smooth and cohesive.
- In a separate medium bowl, whisk together the flour and salt. This ensures the salt is evenly distributed. Gradually add the dry ingredients to the wet mixture, mixing on low speed. Stop as soon as the flour disappears. The dough will be soft but not sticky.
- In a small bowl, combine the 1/2 cup granulated sugar with the red sanding sugar. Mix them together with a fork until the red sugar is evenly distributed. You should see sparkly red flecks throughout.
- Scoop tablespoon-sized portions of dough. Roll each portion into a smooth ball between your palms. The warmth of your hands will make the dough slightly tacky, which helps the sugar stick. Roll each ball in the red sugar mixture until completely coated.
- Place the coated dough balls on the prepared baking sheets, spacing them about 2 inches apart. You should get about 24 cookies total, 12 per sheet.
- Bake for 8 minutes. Here’s the crucial part: after 8 minutes, remove the baking sheets from the oven. The cookies should be puffed and set on the edges but still soft in the center. Don’t let them brown too much—we want them tender.
- Immediately make the thumbprints. Using the back of a 1/2 teaspoon measuring spoon or your thumb (if it’s not too hot), gently press a deep indent into the center of each cookie. The indent should be about 1/2 inch wide. If the edges crack a little, don’t worry—that’s part of the charm.
- Return the cookies to the oven and bake for another 4-5 minutes. The edges should be lightly golden, and the centers should look set but still soft. Total baking time: 12-13 minutes.
- Let the cookies cool on the baking sheet for 5 minutes. This is important—they’re delicate when hot. After 5 minutes, transfer them to a wire cooling rack to cool completely.
- Once the cookies are completely cool, fill each thumbprint with jam. Use a small spoon or a piping bag for precision. Fill the indent just to the brim—don’t overflow, or it’ll get messy. Let the jam set for about 10 minutes before serving.
Pro tip: If you want perfectly round thumbprints, use the end of a wooden spoon handle instead of your thumb. And if the jam seems too runny, pop it in the freezer for 10 minutes before filling. This trick changed my cookie game forever.
Cooking Tips & Techniques
I’ve made these cookies at least a dozen times, and I’ve learned a few things the hard way. Let me save you some trouble.
Don’t overwork the dough. The first time I made these, I mixed the flour in for way too long, and the cookies came out tough and dense. Mix just until the flour disappears—a few streaks are okay. The less you handle the dough, the more tender the cookies will be.
Use cold jam for filling. Here’s a mistake I made twice: I filled the thumbprints with warm jam right after I made it, and it soaked into the cookies, making them soggy. Let the jam cool completely, or even chill it slightly before filling. The contrast between the cool jam and the warm cookie is actually wonderful.
Watch the baking time like a hawk. These cookies go from perfectly baked to overdone in about 60 seconds. Every oven is different, so check at the 10-minute mark. The edges should be just barely golden, and the centers should look puffed but not brown. If you tap the top gently, it should feel set but soft.
Multitask wisely. While the first batch is baking, roll the remaining dough balls and coat them in the red sugar. This way, you can pop the second batch in as soon as the first comes out. It saves time and keeps your workflow smooth.
If your cookies spread too much: This usually means the butter was too soft or the dough wasn’t chilled enough. Pop the rolled, sugar-coated dough balls in the fridge for 15 minutes before baking. It firms up the butter and prevents excessive spreading.
If your thumbprints disappear during baking: You didn’t press deep enough. Make the indent deeper than you think you need—the dough will puff up around it during baking. I use the back of a 1/2 teaspoon measure and press almost to the bottom of the cookie.
Variations & Adaptations
One of the best things about this recipe is how versatile it is. Here are some ways to make it your own:
Dietary Adaptations
- Gluten-Free Version: Substitute the all-purpose flour with a 1:1 gluten-free baking flour blend. I’ve used Bob’s Red Mill with great results. Add 1/4 teaspoon xanthan gum if your blend doesn’t already include it.
- Vegan Version: Use vegan butter (I like Miyoko’s) and substitute the egg yolk with 1 tablespoon of aquafaba (chickpea water) mixed with 1 teaspoon of cornstarch. The texture is slightly different but still delicious.
- Lower Sugar Version: Reduce the sugar in the dough to 1/2 cup and use a sugar-free jam. The red sugar coating is non-negotiable for the Grinch look, but you can use a sugar-free sprinkle alternative.
Flavor Twists
- Chocolate Grinch Cookies: Replace 1/4 cup of the flour with unsweetened cocoa powder. The chocolate version with raspberry jam is absolutely divine.
- Lemon Grinch Cookies: Add 1 tablespoon of lemon zest to the dough and use lemon curd instead of jam. The tartness cuts through the sweetness beautifully.
- Peppermint Grinch Cookies: Add 1/2 teaspoon of peppermint extract to the dough and crush a candy cane over the jam-filled centers. So festive!
Method Variations
- Air Fryer Method: Preheat air fryer to 325°F (163°C). Place dough balls in the basket, leaving space between them. Cook for 6-7 minutes, then make thumbprints and cook for another 2-3 minutes.
- Freezer-Friendly: Roll and coat the dough balls in sugar, then freeze them on a baking sheet. Once frozen, transfer to a freezer bag. Bake from frozen, adding 2-3 minutes to the baking time.
I personally love the lemon version for spring gatherings. It’s bright, cheerful, and still has that cozy thumbprint cookie feel. My niece calls them “Happy Grinch Cookies,” and honestly, that’s the best name I’ve heard.
Serving & Storage Suggestions
These cookies are best served at room temperature, about an hour after filling. The jam needs that time to set and meld with the cookie. Arrange them on a festive platter—a white or silver tray makes the red centers pop beautifully.
Perfect pairings: Serve these alongside a cup of hot cocoa with marshmallows, a warm mug of spiced chai, or a glass of cold milk. For an adult twist, they’re wonderful with a glass of mulled wine or a cozy bourbon cocktail. The sweetness of the cookie balances the warmth of the drinks perfectly.
For cookie exchanges or gift-giving: Layer the cookies in a tin or decorative box, separated by parchment paper. They make gorgeous gifts tied with a red ribbon and a little tag that says “Your heart grew three sizes today.”
Storage: Store the filled cookies in an airtight container at room temperature for up to 5 days. The jam will keep them moist, but the sugar coating might soften a bit after day 3. If that bothers you, store the unfilled cookies and fill them just before serving.
Freezing instructions: You can freeze the unfilled, baked cookies for up to 3 months. Thaw them at room temperature, then fill with jam before serving. The jam doesn’t freeze well once it’s in the cookie—it can make the cookie soggy upon thawing.
Reheating tip: If you want that just-baked warmth, pop the filled cookies in a 300°F (150°C) oven for 3-4 minutes. They’ll be soft, warm, and absolutely irresistible. The flavors actually deepen after a day or two—the jam soaks into the cookie just a little, creating this perfect harmony of textures.
Nutritional Information & Benefits
Let’s be real: these are cookies, not health food. But here’s the estimated nutritional breakdown per cookie (based on 24 cookies):
| Nutrient | Amount per Cookie |
|---|---|
| Calories | 145 |
| Total Fat | 8g |
| Saturated Fat | 5g |
| Carbohydrates | 18g |
| Sugar | 11g |
| Protein | 1g |
| Sodium | 35mg |
Health highlights: The butter in these cookies provides a small amount of vitamin A, and if you use raspberry jam, you’re getting a tiny dose of antioxidants from the berries. The egg yolk adds choline, which is good for brain health. Look, I’m not saying these are a superfood—but they’re made with real ingredients, no preservatives, and the joy they bring is genuinely good for your soul.
Dietary considerations: These cookies contain gluten, dairy, and eggs. For allergen-friendly versions, check the variations section above. They are nut-free as written, which makes them great for school events or parties where allergies are a concern.
My personal philosophy? Life is short. Eat the cookie. But balance it with a good walk and some vegetables later. These cookies are about celebration and comfort, not guilt.
Conclusion
These Cozy Grinch Thumbprint Cookies with Red Sugar Sprinkles are more than just a recipe—they’re a little piece of holiday magic you can hold in your hand. They’re the cookie equivalent of watching the Grinch’s heart grow three sizes, of that warm feeling when you’re surrounded by people you love, of the simple joy of creating something beautiful with your own two hands.
I’ve made these for Christmas parties, for cookie exchanges, and for quiet nights when I just needed something sweet. Every single time, they disappear first. People don’t just eat them—they smile when they see them. And that’s the whole point, isn’t it? To make something that spreads a little joy, one thumbprint at a time.
So go ahead. Make a mess in your kitchen. Get sugar on your counter. Fill your home with the smell of butter and vanilla. And when you take that first bite of a warm, jam-filled cookie, let yourself feel that little burst of happiness. You deserve it.
I’d love to hear how your cookies turn out! Drop a comment below and tell me—did you stick with classic raspberry, or did you try one of the variations? Tag me in your photos on social media. Happy baking, friend. And remember: even the Grinch found his joy. You can too.
Frequently Asked Questions
Can I use a different color of sprinkles?
Absolutely! While red is classic for the Grinch theme, you can use green sprinkles for a more traditional Grinch look, or white, gold, or even rainbow sprinkles for different occasions. The technique stays the same—just substitute the same amount of any coarse decorating sugar.
Why did my cookies spread too much?
This usually happens for one of three reasons: your butter was too soft (it should be softened but still cool to the touch), your dough wasn’t chilled, or you used too much sugar in the coating. Next time, try chilling the rolled dough balls for 15 minutes before baking, and make sure your butter isn’t greasy or melted.
Can I make the dough ahead of time?
Yes! You can make the dough up to 3 days in advance and keep it wrapped tightly in the refrigerator. Let it sit at room temperature for about 10 minutes before rolling into balls—it’ll be easier to work with. You can also freeze the unbaked, sugar-coated dough balls for up to 3 months.
What’s the best jam to use for the centers?
Seedless raspberry jam is the classic choice—it’s sweet, slightly tart, and that deep red color is perfect for the Grinch theme. Strawberry, cherry, or pomegranate jelly also work beautifully. Avoid jams with large fruit chunks or seeds, as they can make the thumbprints look uneven.
How do I keep the thumbprints from disappearing during baking?
The trick is to press the indent deeper than you think you need—about halfway through the dough ball. The cookie will puff up during baking, so a shallow indent will vanish. Also, making the indent immediately after the first bake (before the second bake) helps the shape hold. Use the back of a 1/2 teaspoon measure for perfect, consistent indents every time.
Pin This Recipe!

Cozy Grinch Thumbprint Cookies with Red Sugar Sprinkles

These soft, buttery thumbprint cookies are filled with sweet jam and coated in sparkly red sugar, capturing the heartwarming spirit of the Grinch in every bite. Perfect for holiday parties, cookie exchanges, or a cozy night in.
- Prep Time: 15 minutes
- Cook Time: 13 minutes
- Total Time: 35 minutes
- Yield: 24 cookies 1x
- Category: Dessert
- Cuisine: American
Ingredients
- 1 cup (226g) unsalted butter, softened
- 2/3 cup (133g) granulated sugar
- 1 large egg yolk, at room temperature
- 1 teaspoon vanilla extract
- 1 1/2 cups (188g) all-purpose flour
- 1/4 teaspoon salt
- 1/2 cup (100g) granulated sugar (for rolling)
- 3 tablespoons red sanding sugar or red sprinkles
- 1/3 cup (about 100g) raspberry or strawberry jam
Instructions
- Preheat your oven to 350°F (175°C). Line two baking sheets with parchment paper or silicone mats.
- In a large mixing bowl, cream together the softened butter and 2/3 cup sugar on medium speed for about 3 minutes until light, fluffy, and pale yellow. Scrape down the sides halfway through.
- Add the egg yolk and vanilla extract. Beat on low speed until just combined.
- In a separate medium bowl, whisk together the flour and salt. Gradually add the dry ingredients to the wet mixture, mixing on low speed until just combined. The dough will be soft but not sticky.
- In a small bowl, combine the 1/2 cup granulated sugar with the red sanding sugar. Mix with a fork until evenly distributed.
- Scoop tablespoon-sized portions of dough. Roll each into a smooth ball between your palms. Roll each ball in the red sugar mixture until completely coated.
- Place the coated dough balls on the prepared baking sheets, spacing them about 2 inches apart. You should get about 24 cookies total, 12 per sheet.
- Bake for 8 minutes. The cookies should be puffed and set on the edges but still soft in the center.
- Immediately make the thumbprints using the back of a 1/2 teaspoon measuring spoon or your thumb, pressing a deep indent into the center of each cookie.
- Return the cookies to the oven and bake for another 4-5 minutes until edges are lightly golden and centers are set but still soft. Total baking time: 12-13 minutes.
- Let the cookies cool on the baking sheet for 5 minutes, then transfer to a wire cooling rack to cool completely.
- Once completely cool, fill each thumbprint with jam using a small spoon or piping bag. Fill just to the brim. Let the jam set for about 10 minutes before serving.
Notes
For perfectly round thumbprints, use the end of a wooden spoon handle. If jam is too runny, freeze for 10 minutes before filling. To prevent spreading, chill rolled dough balls for 15 minutes before baking. Store filled cookies in an airtight container at room temperature for up to 5 days.
Nutrition
- Serving Size: 1 cookie
- Calories: 145
- Sugar: 11
- Sodium: 35
- Fat: 8
- Saturated Fat: 5
- Carbohydrates: 18
- Protein: 1
Keywords: Grinch cookies, thumbprint cookies, Christmas cookies, holiday cookies, red sugar cookies, jam cookies, easy cookies


